Extending the Domain Model
The starter project ships with a base Person entity that handles common person attributes (name, contact details, gender, and so on). In this step you will extend it with a Member entity that adds membership-specific properties, a reference list for membership status, and a database migration to apply the schema change.
You will then come back to the forms from the previous step and re-point them at the new Member entity.
Extending an Existing Entity
Open the backend/Shesha.Membership.sln solution in Visual Studio 2022.
1. Set a Table Prefix
A table prefix is a short string added to the front of database table and column names. It groups your module's tables together visually, helps avoid naming conflicts with other modules, and makes it easy to see at a glance which schema a column belongs to.
- Navigate to
Shesha.Membership.Domain > Properties > AssemblyInfo.cs. - Change the table prefix to
Mem_:
Example - Setting the table prefix in AssemblyInfo.cs:
[assembly: TablePrefix("Mem_")]
Three-or-four-character prefixes are usually the sweet spot. They are short enough to not clutter column names, but long enough to remain unique and recognisable.
2. Create a Reference List
Reference lists are how Shesha represents controlled vocabularies (the equivalent of an enum on the database side). You define them as C# enums decorated with attributes that tell Shesha how to render them in forms.
- In the
Shesha.Membership.Domainproject, create anEnumsfolder. - Right-click the folder and choose Add > Class.
- Name the class
RefListMembershipStatuses.cs.
Example - The MembershipStatuses reference list:
using Shesha.Domain.Attributes;
using System.ComponentModel;

namespace Shesha.Membership.Domain.Enums
{
    /// <summary>
    /// Statuses for a Member's Membership.
    /// </summary>
    [ReferenceList("MembershipStatuses")]
    public enum RefListMembershipStatuses : long
    {
        [Description("In Progress")]
        InProgress = 1,

        [Description("Active")]
        Active = 2,

        [Description("Cancelled")]
        Cancelled = 3
    }
}
Use the single-parameter form [ReferenceList("Name")]. The two-parameter form that took a separate namespace is marked obsolete.
// Correct - single-parameter form
[ReferenceList("MembershipStatuses")]
public enum RefListMembershipStatuses : long { ... }

// Obsolete - two-parameter form with separate namespace
[ReferenceList("Shesha.Membership", "MembershipStatuses")]
public enum RefListMembershipStatuses : long { ... }
3. Create the Member Entity
The Member class inherits from the base Person entity, so it picks up all of Person's existing properties (firstName, lastName, etc.) and adds new ones on top.
- Navigate to
Shesha.Membership.Domain > Domain. - Right-click the folder and choose Add > Class.
- Name the class
Member.cs.
Example - The Member entity that extends Person:
using Shesha.Domain.Attributes;
using Shesha.Domain;
using Shesha.Membership.Domain.Enums;
using System;

namespace Shesha.Membership.Domain.Domain
{
    /// <summary>
    /// A person within the application that is a Member.
    /// </summary>
    [Entity(TypeShortAlias = "Mem.Member")]
    public class Member : Person
    {
        public virtual string MembershipNumber { get; set; }

        public virtual DateTime? MembershipStartDate { get; set; }

        public virtual DateTime? MembershipEndDate { get; set; }

        public virtual StoredFile IdDocument { get; set; }

        [ReferenceList("MembershipStatuses")]
        public virtual RefListMembershipStatuses? MembershipStatus { get; set; }
    }
}
4. Create the Migration
Because Member inherits from Person, the new properties are stored as additional columns on the existing Core_Persons table. FluentMigrator runs migrations in date order, so name the class with a timestamp.
- Navigate to
Shesha.Membership.Domain > Migrations. - Right-click the folder and choose Add > Class.
- Name the class using the format
M[YEAR][MONTH][DAY][HOUR][MINUTE][SECONDS].cs, for exampleM20231124085300.cs.
Example - Migration that adds the Member columns to Core_Persons:
using FluentMigrator;
using Shesha.FluentMigrator;
using System;

namespace Shesha.Membership.Domain.Migrations
{
    /// <summary>
    /// Adds membership-specific columns to the Core_Persons table.
    /// </summary>
    [Migration(20231124085300)]
    public class M20231124085300 : Migration
    {
        public override void Up()
        {
            Alter.Table("Core_Persons")
                .AddColumn("Mem_MembershipNumber").AsString().Nullable()
                .AddForeignKeyColumn("Mem_IdDocumentId", "Frwk_StoredFiles").Nullable()
                .AddColumn("Mem_MembershipStartDate").AsDateTime().Nullable()
                .AddColumn("Mem_MembershipEndDate").AsDateTime().Nullable()
                .AddColumn("Mem_MembershipStatusLkp").AsInt64().Nullable();
        }

        public override void Down()
        {
            throw new NotImplementedException();
        }
    }
}
AddForeignKeyColumn is a Shesha extension over FluentMigrator. It creates the column and the foreign key constraint in a single call. For more migration options see the FluentMigrator docs.
- Start the application (Debug > Start Debugging or F5).
- The app should open on the Swagger page.
- Search for Member in Swagger to see the auto-generated CRUD endpoints.
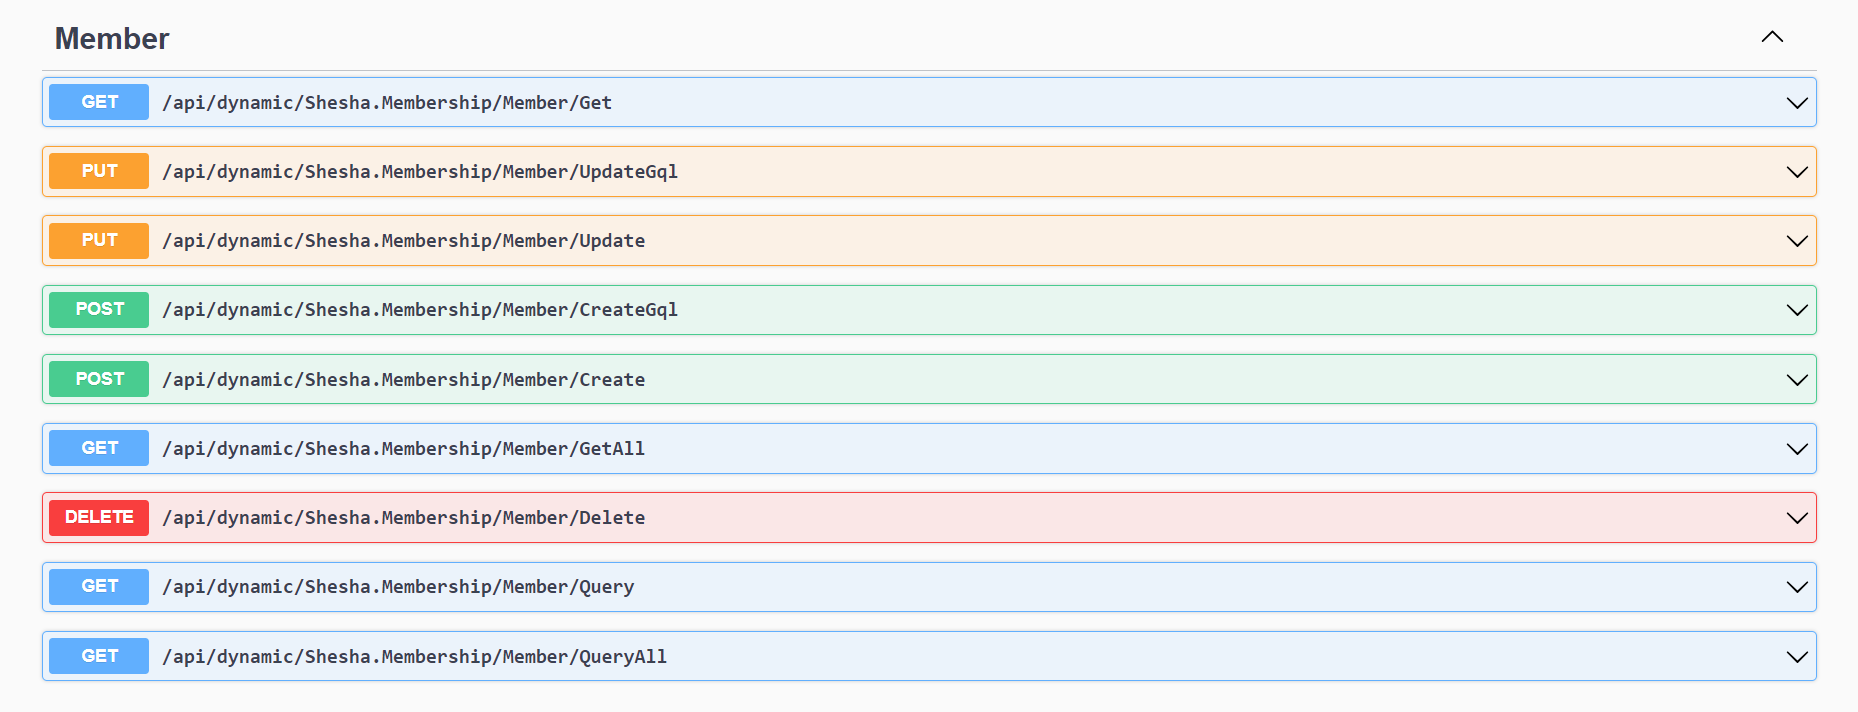
See CRUD APIs for details on what endpoints Shesha exposes for each entity and how to customise them.
Updating the Front-End Configurations
Now that the domain model has been extended, the forms from the previous step need to be re-pointed at Member and updated to show the new properties.
The basic pattern is the same for each form:
- Open the form's Settings in the designer.
- Change the Entity from
Shesha.Domain.Person (Shesha.Core.Person)toShesha.Membership.Domain.Member (Mem.Member). - Update any CRUD endpoints referenced on the form to match the new entity.
- Add the new fields:
| Property | Component | Type |
|---|---|---|
MembershipNumber | Textfield | string |
MembershipStatus | RadioButton | RefListMembershipStatuses |
MembershipStartDate | Datefield | DateTime |
MembershipEndDate | Datefield | DateTime |
IdDocument | File | StoredFile |
Updating the Create View
The create form now needs to capture the new membership fields. To keep the form manageable you will split it into two wizard steps.
- Open the member-create form designer.
- In Settings, change the Entity to
Shesha.Membership.Domain.Member (Mem.Member).
For more on the wizard component, see the wizard component reference.
- Search for wizard in the Builder Widgets and drag it onto the form.
- Drag the existing components into the wizard's draggable area.
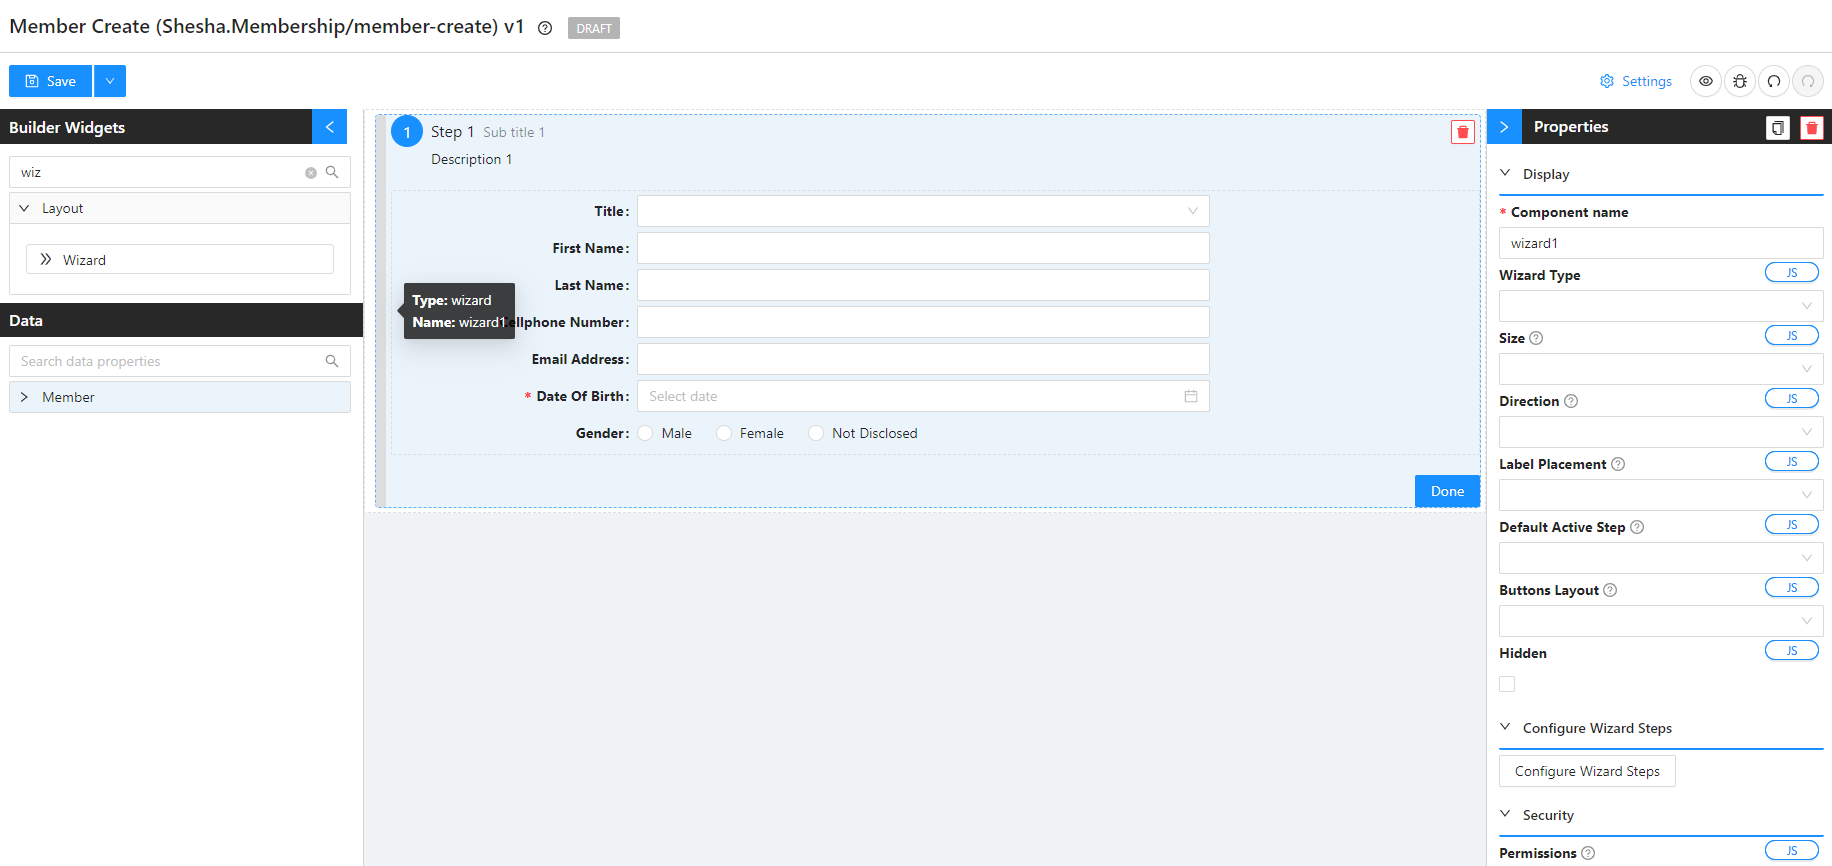
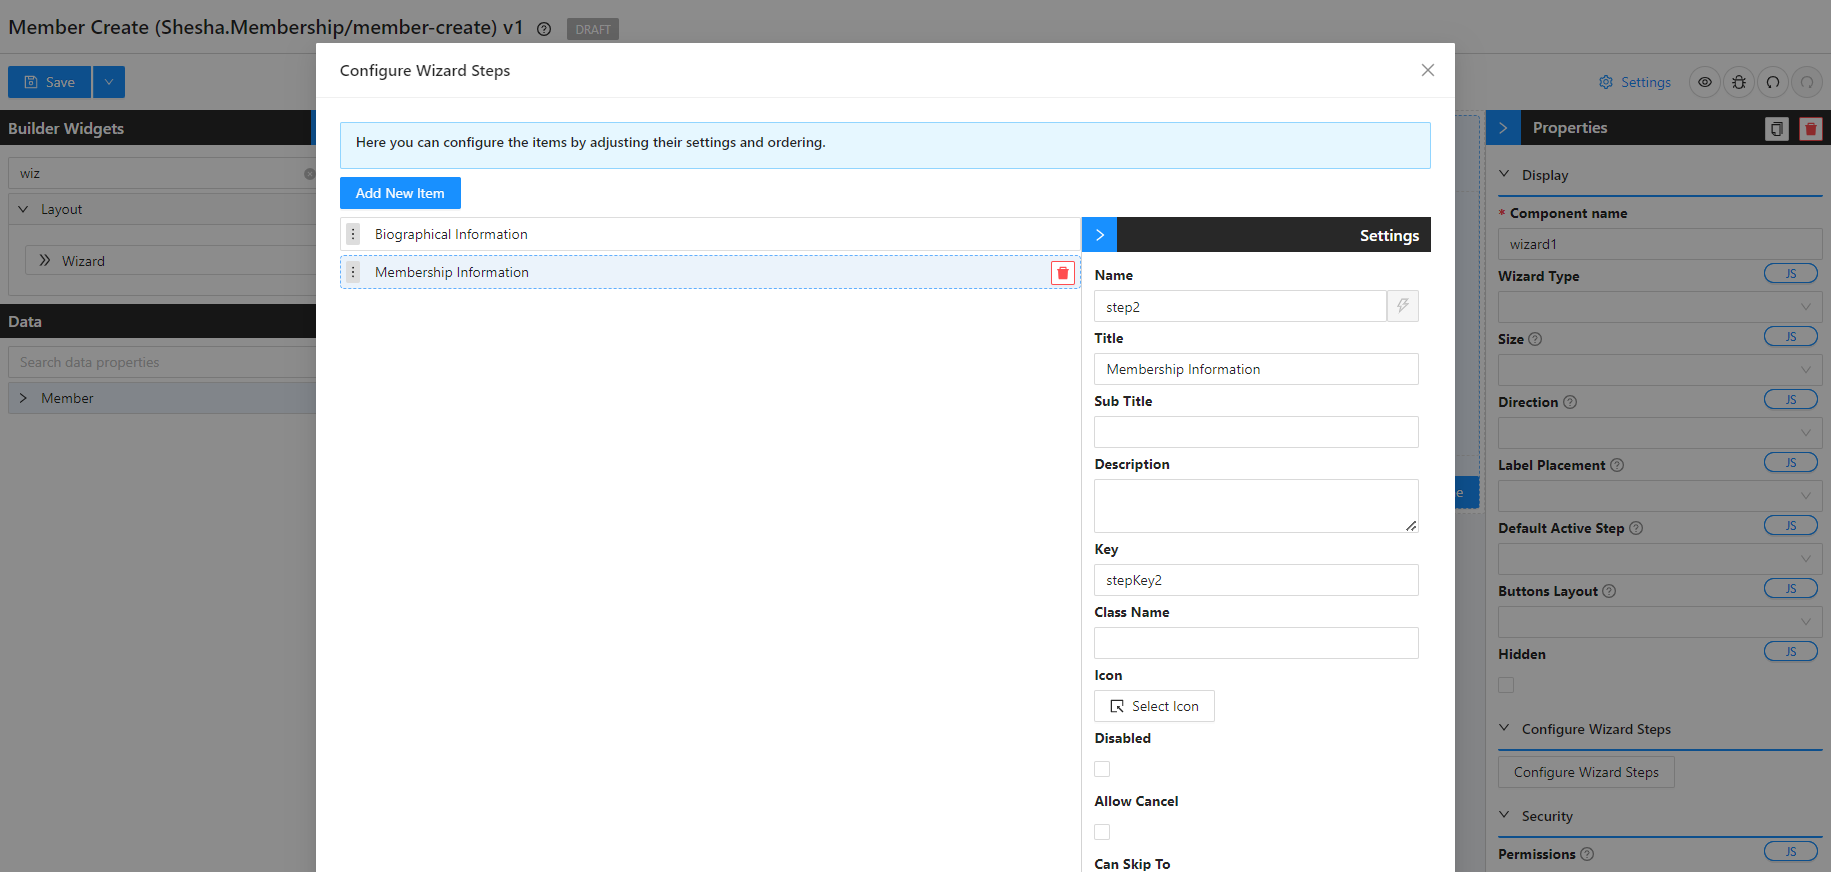
- Click Configure Wizard Steps and set up two steps:
| Step | Name |
|---|---|
1 | Biographical Information |
2 | Membership Information |
Wizard Done Action
On the Membership Information step, configure the Done button to POST to the Member create endpoint and then navigate to the new member's details view.
Form type to use: Wizard step After Done Action on the member-create form.
Example - Submitting the wizard and navigating to the new member:
const PATH = `/api/dynamic/Shesha.Membership/Member/Create`;

try {
  const resp = await http.post(PATH, data);
  // Navigate to the details view of the created member
  window.location.href = `/dynamic/Shesha.Membership/member-details?id=${resp.data.result.id}`;
} catch (e) {
  message.error(`Failed to create member: ${e}`, 10);
  console.error(e);
  throw e;
}
The wizard's Done action runs in JavaScript, so this is a one-off custom script. For most navigation needs in the designer, use the built-in Navigate action type rather than writing scripted navigation.
Adding the File and Entity Picker Components
On the Biographical Information step:
- Drag in a File component (see the File component reference):
| Field | Value |
|---|---|
Property Name | idDocument |
Label | Id Document |
Owner Id | (leave empty) |
- Drag in an Entity Picker (see the Entity Picker reference):
| Field | Value |
|---|---|
Property Name | address |
Label | Address |
Entity Type | Shesha.Domain.Address (Shesha.Core.Address) |
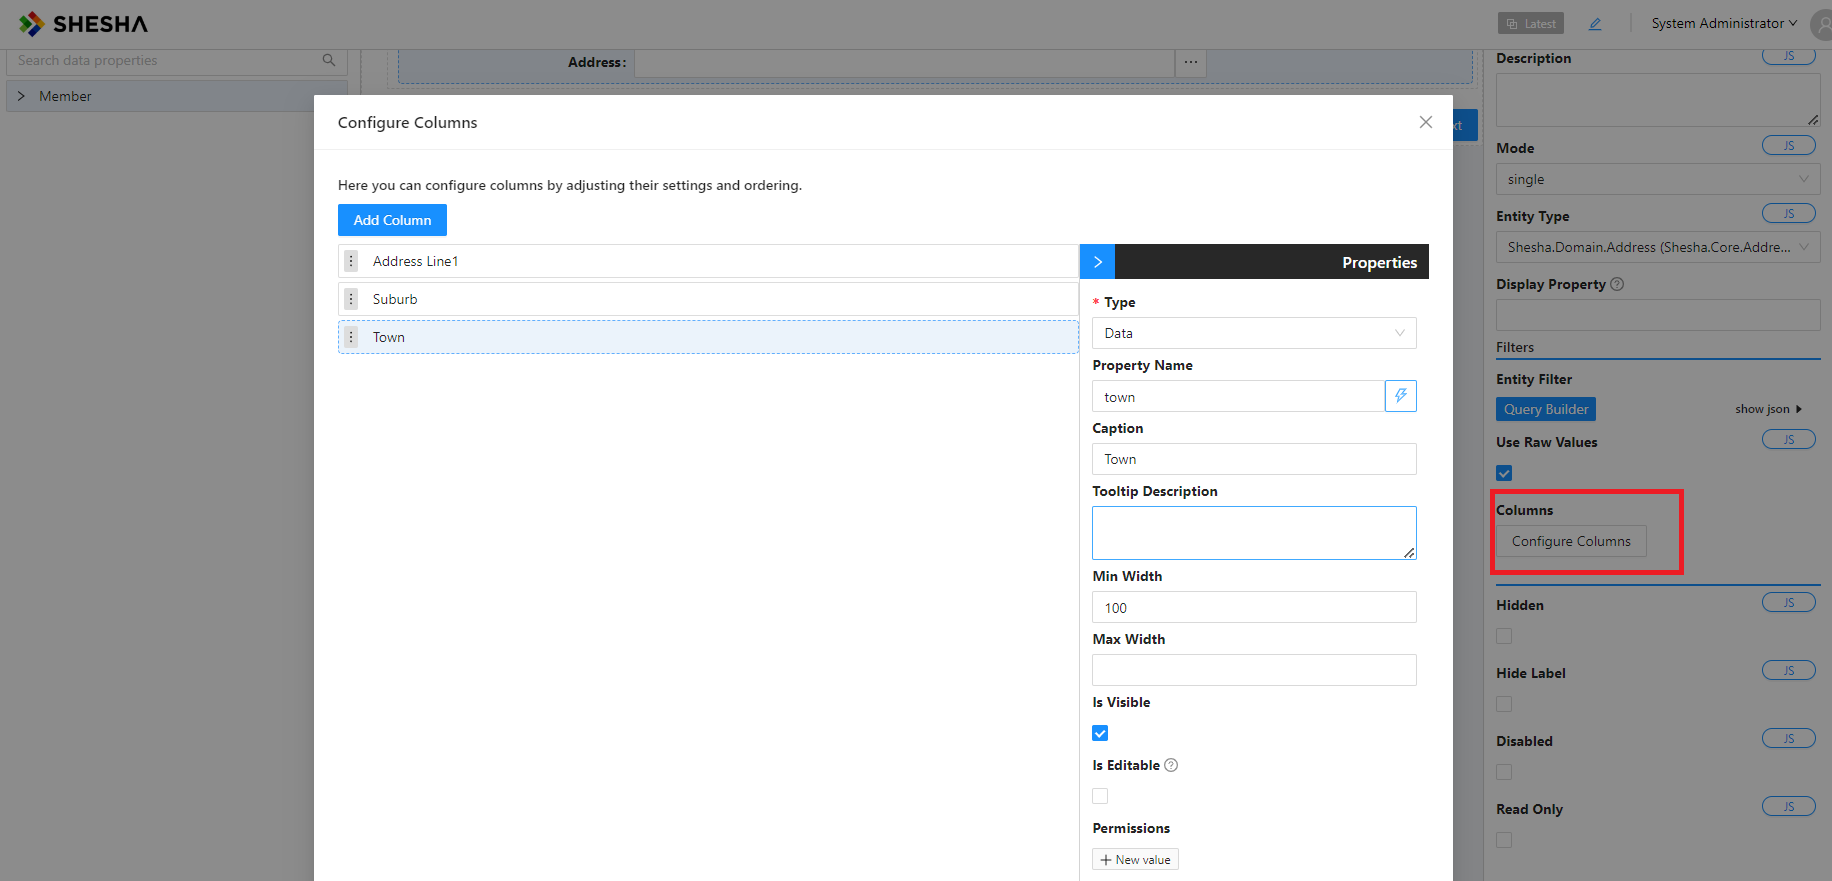
- Configure the Entity Picker's columns:
| Column |
|---|
addressLine1 |
suburb |
town |
Allowing New Addresses
The Entity Picker can let users add a new address inline if one doesn't already exist. First, build a quick form to capture a new address.
Create a new form with:
| Field | Value |
|---|---|
Module | Shesha |
Template | blank-view |
Name | address-create |
Label | Address Create |
Description | This create view is used to create a new address |
Model Type | Shesha.Domain.Address (Shesha.Core.Address) |
Add these fields to the form:
| Property |
|---|
addressLine1 |
suburb |
town |
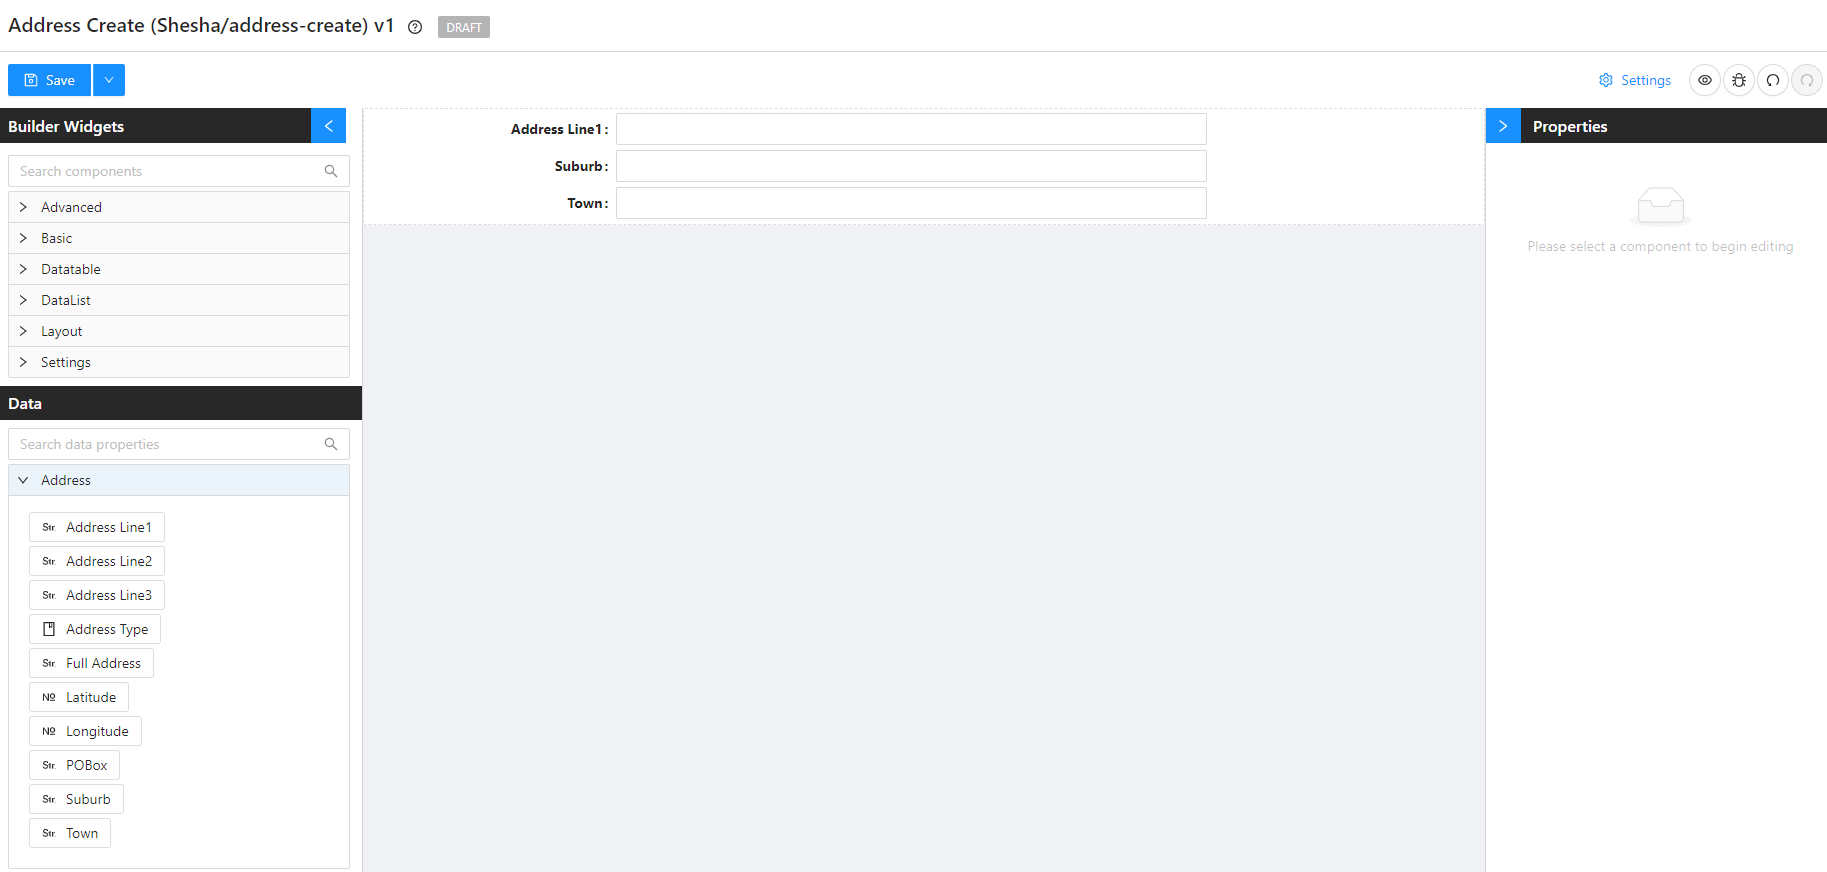
Save and head back to member-create.
- Select the Entity Picker, enable Allow New Record, and populate the Dialogue Settings:
| Field | Value |
|---|---|
Title | Add Address |
Modal Form | address-create |
Show Modal Buttons | true |
Wizard Step Two: Membership Information
On the Membership Information step, drag in the following:
| Property |
|---|
membershipNumber |
membershipStartDate |
membershipEndDate |
membershipStatus |
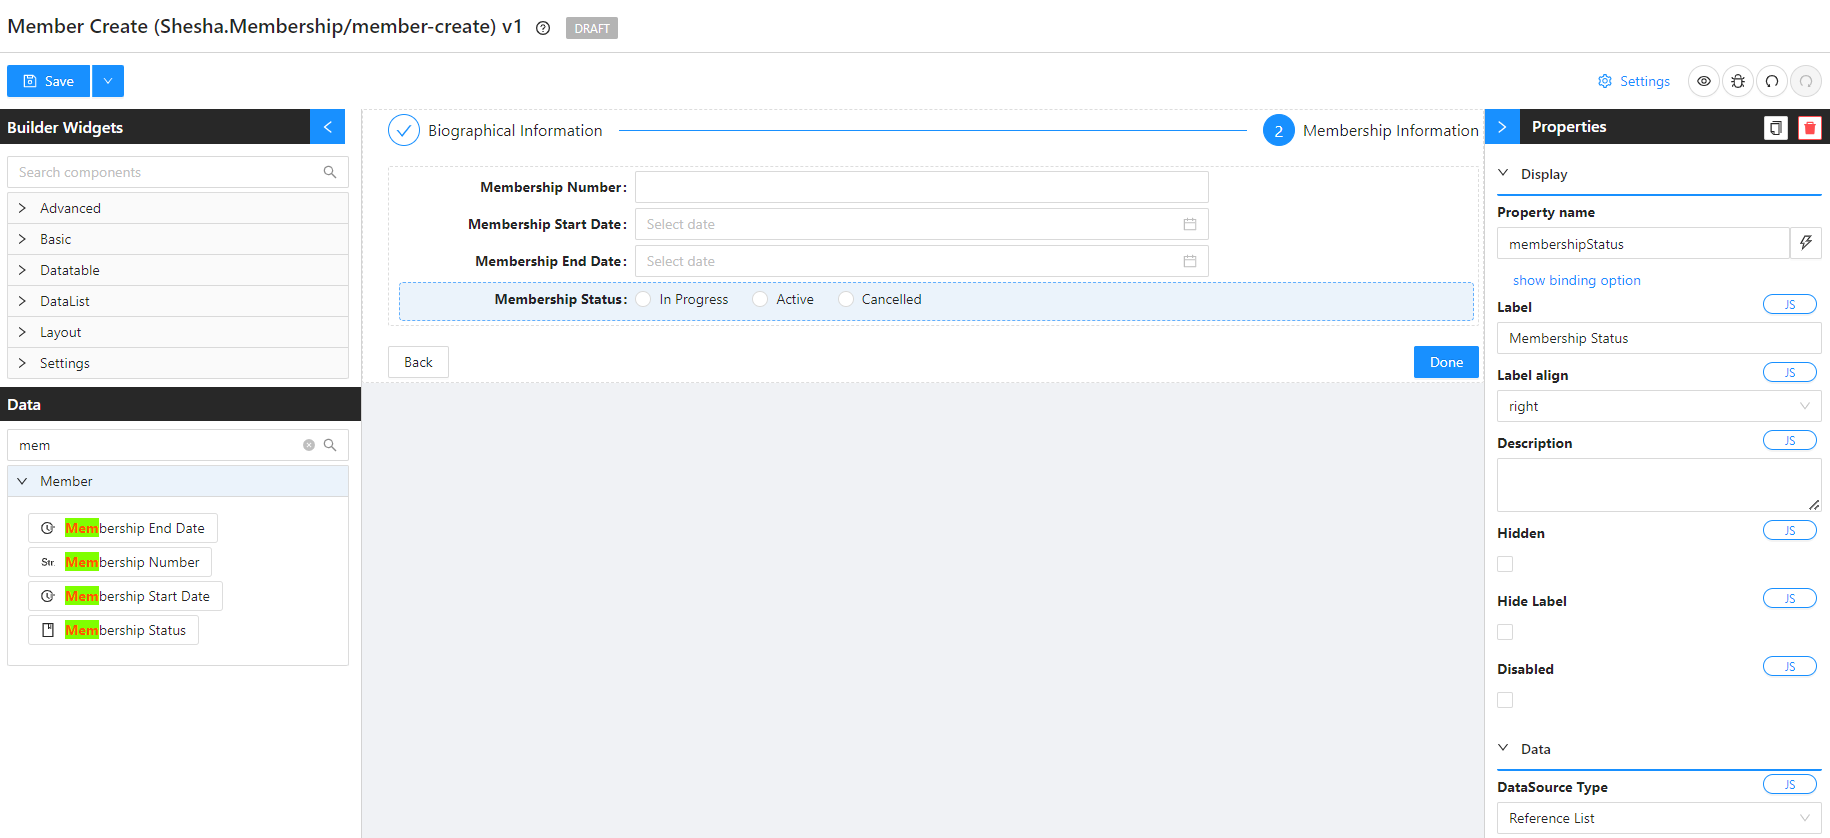
To stop users picking impossible dates, add validations:
| Property | Setting | Value |
|---|---|---|
membershipStartDate | Disabled Date Mode | Function Template |
membershipStartDate | Disabled Date Template | Disable Past Dates |
membershipEndDate | Disabled Date Mode | Function Template |
membershipEndDate | Disabled Date Template | Disable Past Dates |

Save the form.
Updating the Table View
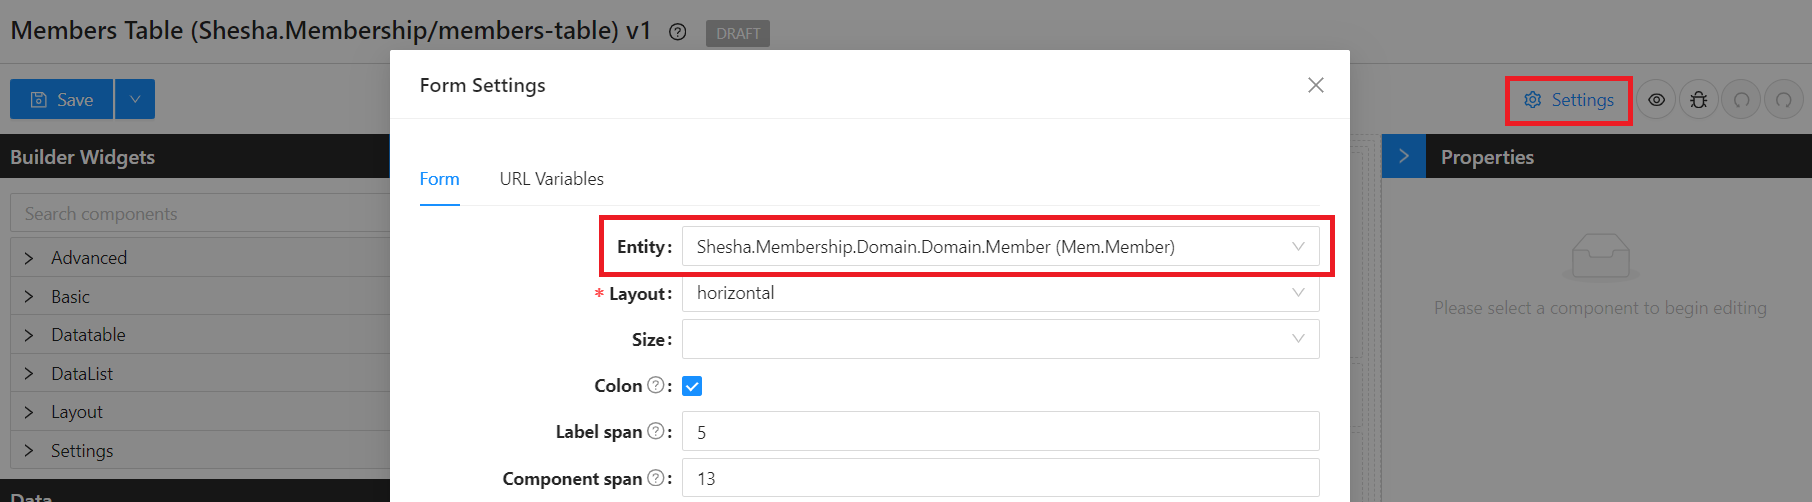
- Open the members-table form designer.
- In Settings, change the Entity to
Shesha.Membership.Domain.Member (Mem.Member).
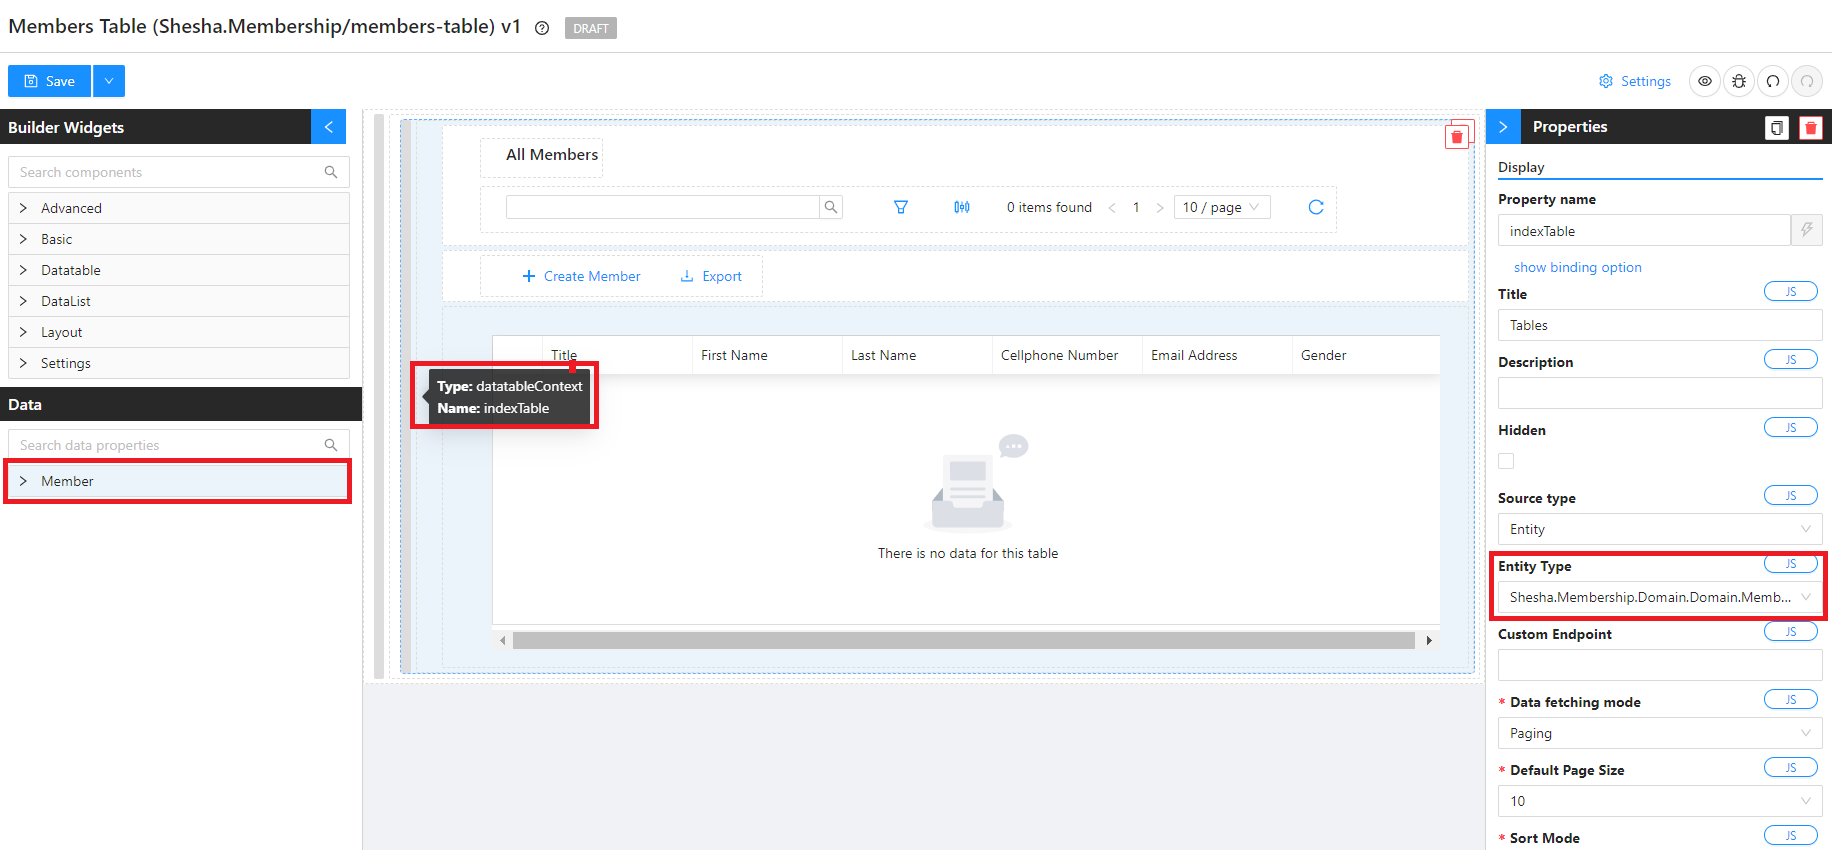
- Select the Datatable Context component and change its Entity Type to
Shesha.Membership.Domain.Member (Mem.Member).
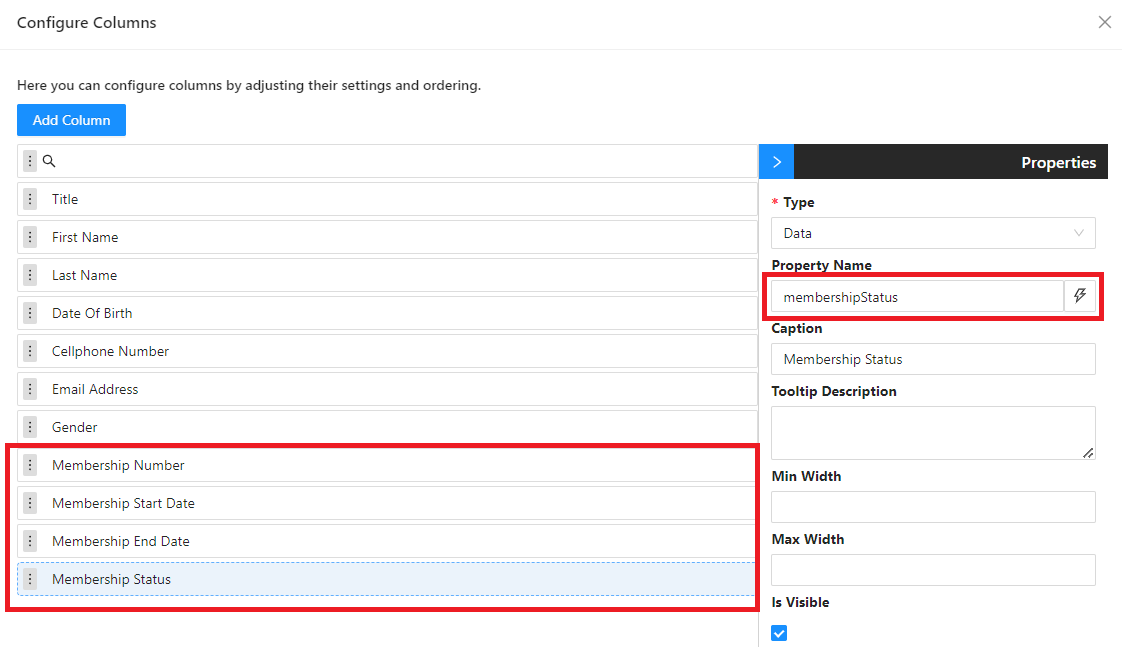
- Select the Datatable component, click Customize Columns, and add the new membership columns.
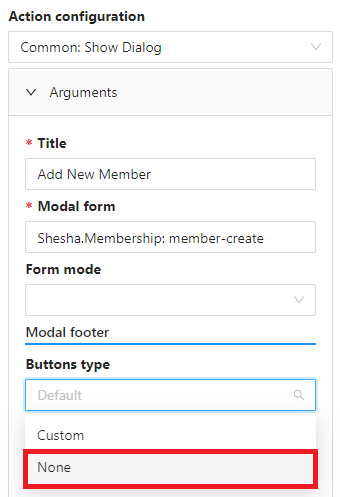
- Select the Button Group component on the toolbar and update the Create Member button:
| Field | Value |
|---|---|
Button Type | None |
This hides the button because the wizard's own buttons handle the submit flow now.
- Save the form.
Updating the Details View
- Open the member-details form designer.
- In Settings, change the Entity to
Shesha.Membership.Domain.Member (Mem.Member).
For more on the tab component, see the tab component reference.
- Drag in a tab component from the Builder Widgets onto the details panel.
- Drag the existing components into the tab's first pane.
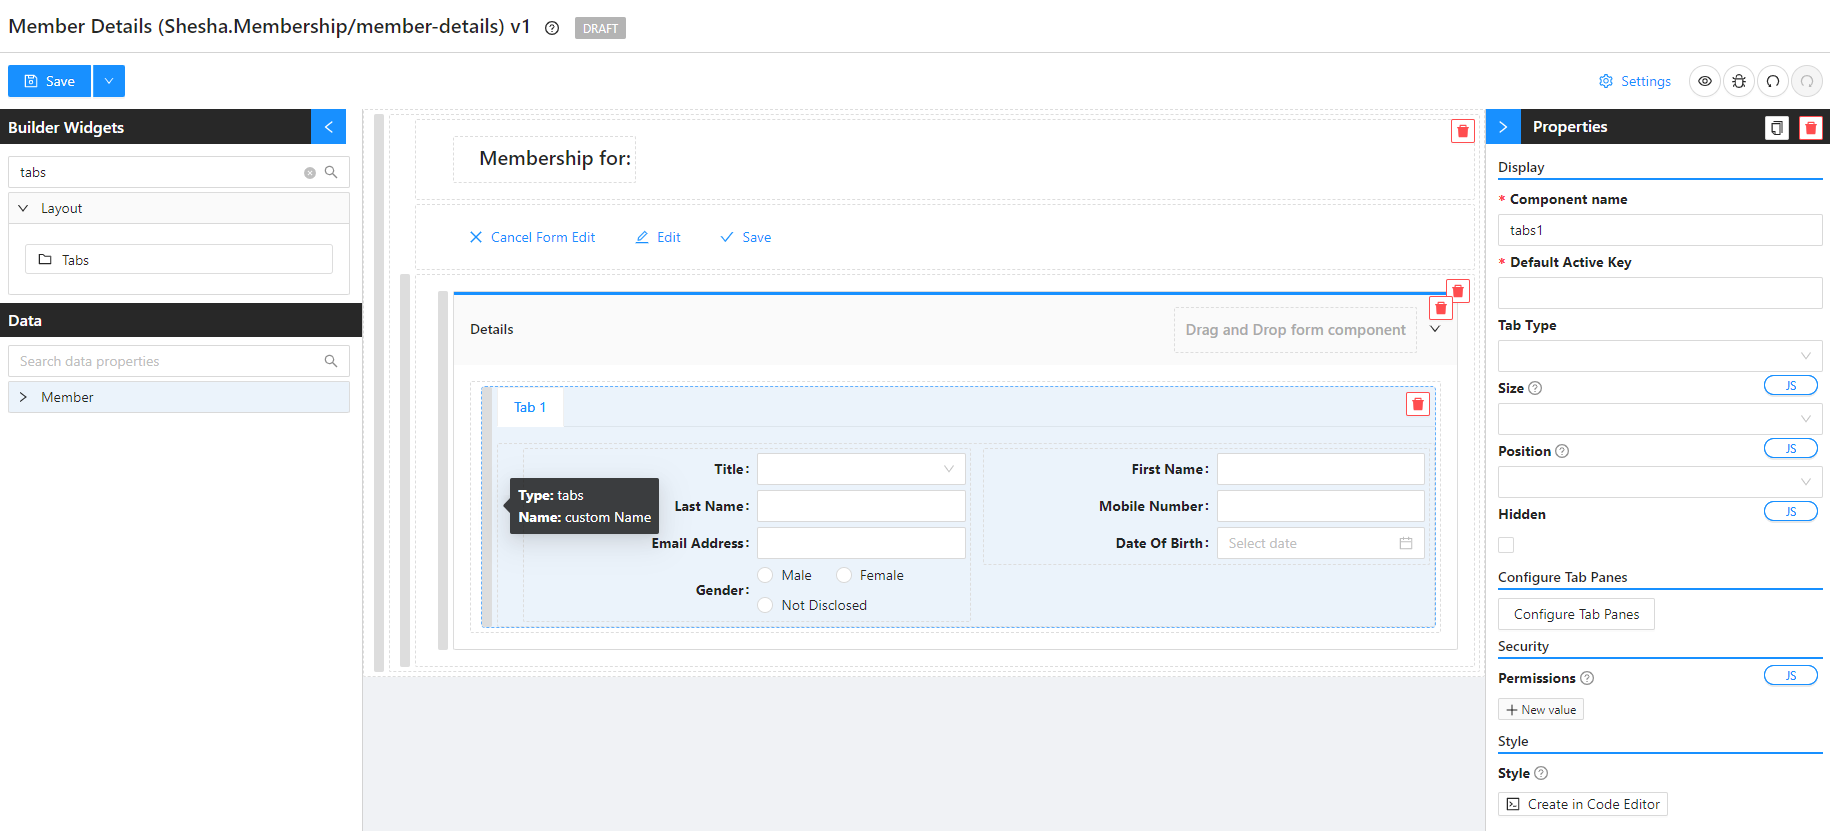
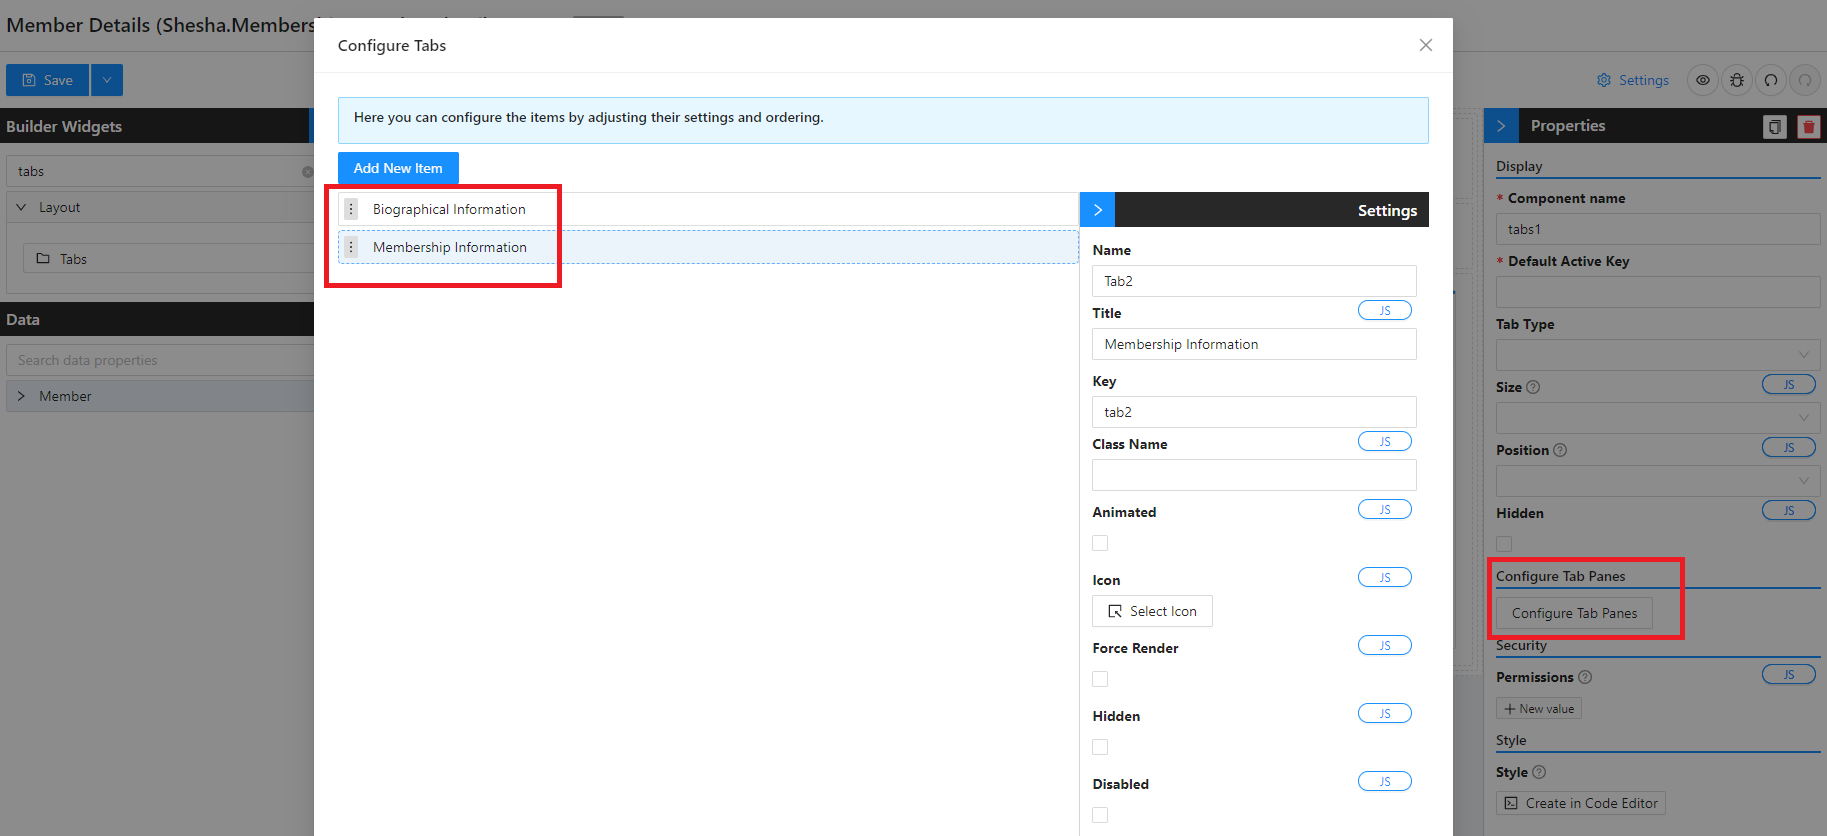
- Click Configure Tab Panes and create two tabs:
| Tab | Name |
|---|---|
1 | Biographical Information |
2 | Membership Information |
Biographical Information Tab
Drag in a File component for the ID document (see the File component reference):
| Field | Value |
|---|---|
Property Name | idDocument |
Label | Id Document |
Owner Id | {data.id} |
Owner Type | Shesha.Membership.Domain.Domain.Member |
To display the linked Address, you have several options:
| Option | When to use |
|---|---|
Autocomplete | When users will search by typing. See Autocomplete. |
Entity Picker | When users will pick from a paged list. See Entity Picker. |
Entity Reference | When you want to display the value and optionally open a modal to edit it. See Entity Reference. |
Sub Form | When you want to embed a full form for the related entity. See Sub Form. |
For this tutorial, use Entity Reference.
Drag in an Entity Reference and configure:
| Field | Value |
|---|---|
Property Name | address |
Label | Address |
Get Entity Url | /api/dynamic/Shesha/Address/Get |
Entity Type | Shesha.Domain.Address (Shesha.Core.Address) |
Display Property | fullAddress |
Entity Reference Type | Modal Dialog Box |
Form Selection Mode | Name |
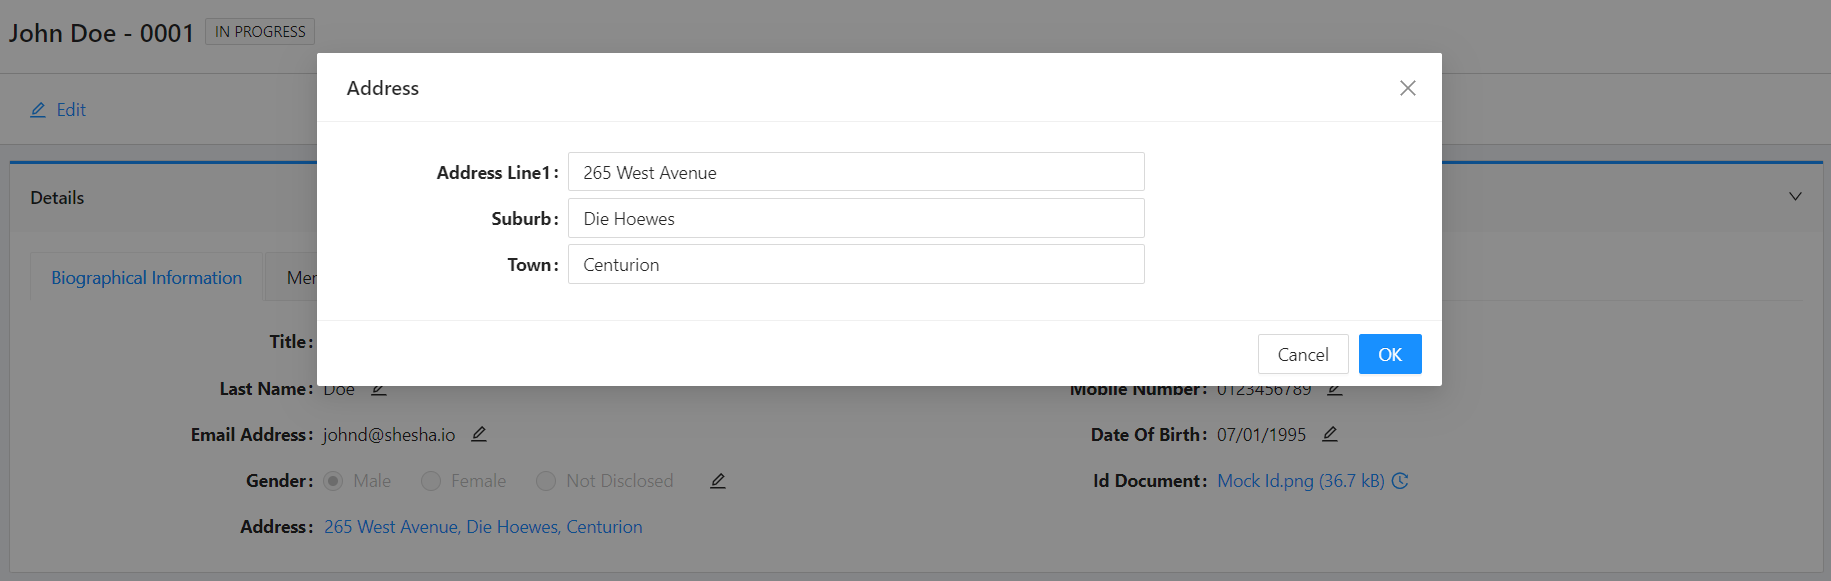
Form | address-create |
Then set the Dialog Settings:
| Field | Value |
|---|---|
Title | Address |
Show Modal Buttons | true |
Submit Http Verb | PUT |
Handle Success | Designer Form > Refresh |
Membership Information Tab
Switch to the Membership Information tab and drag in:
| Property |
|---|
membershipNumber |
membershipStartDate |
membershipEndDate |
membershipStatus |
Personalising the Header
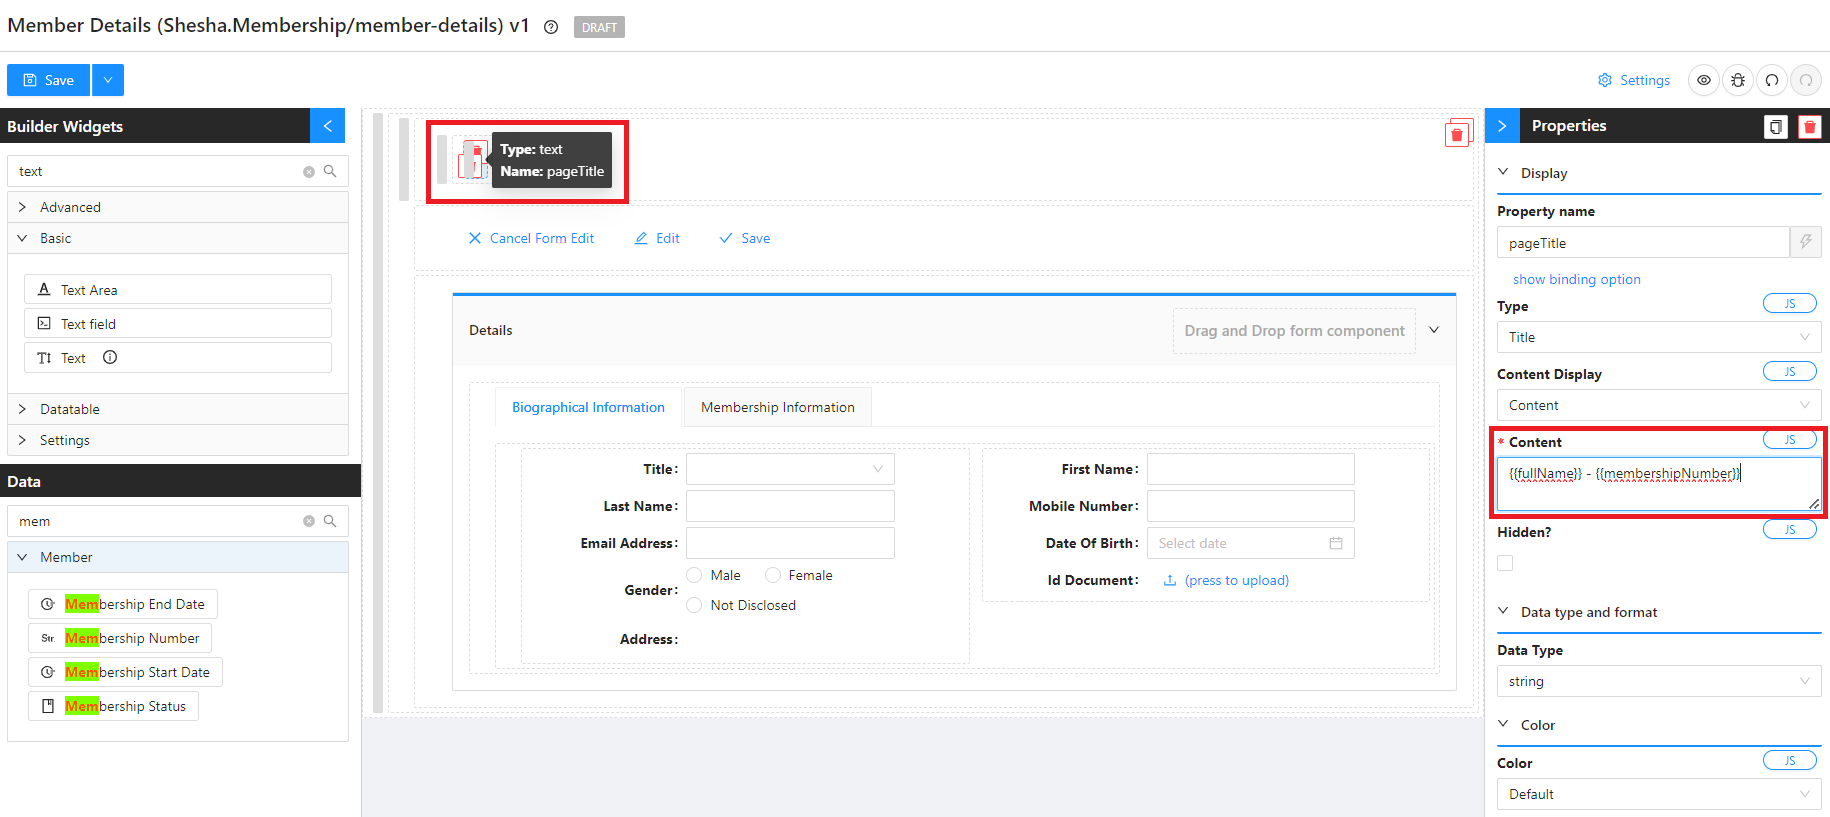
- Select the text title component and change its Content to:
{{fullName}} - {{membershipNumber}}
- Drag a Reference List Status component (see the Reference List Status reference) next to the title.
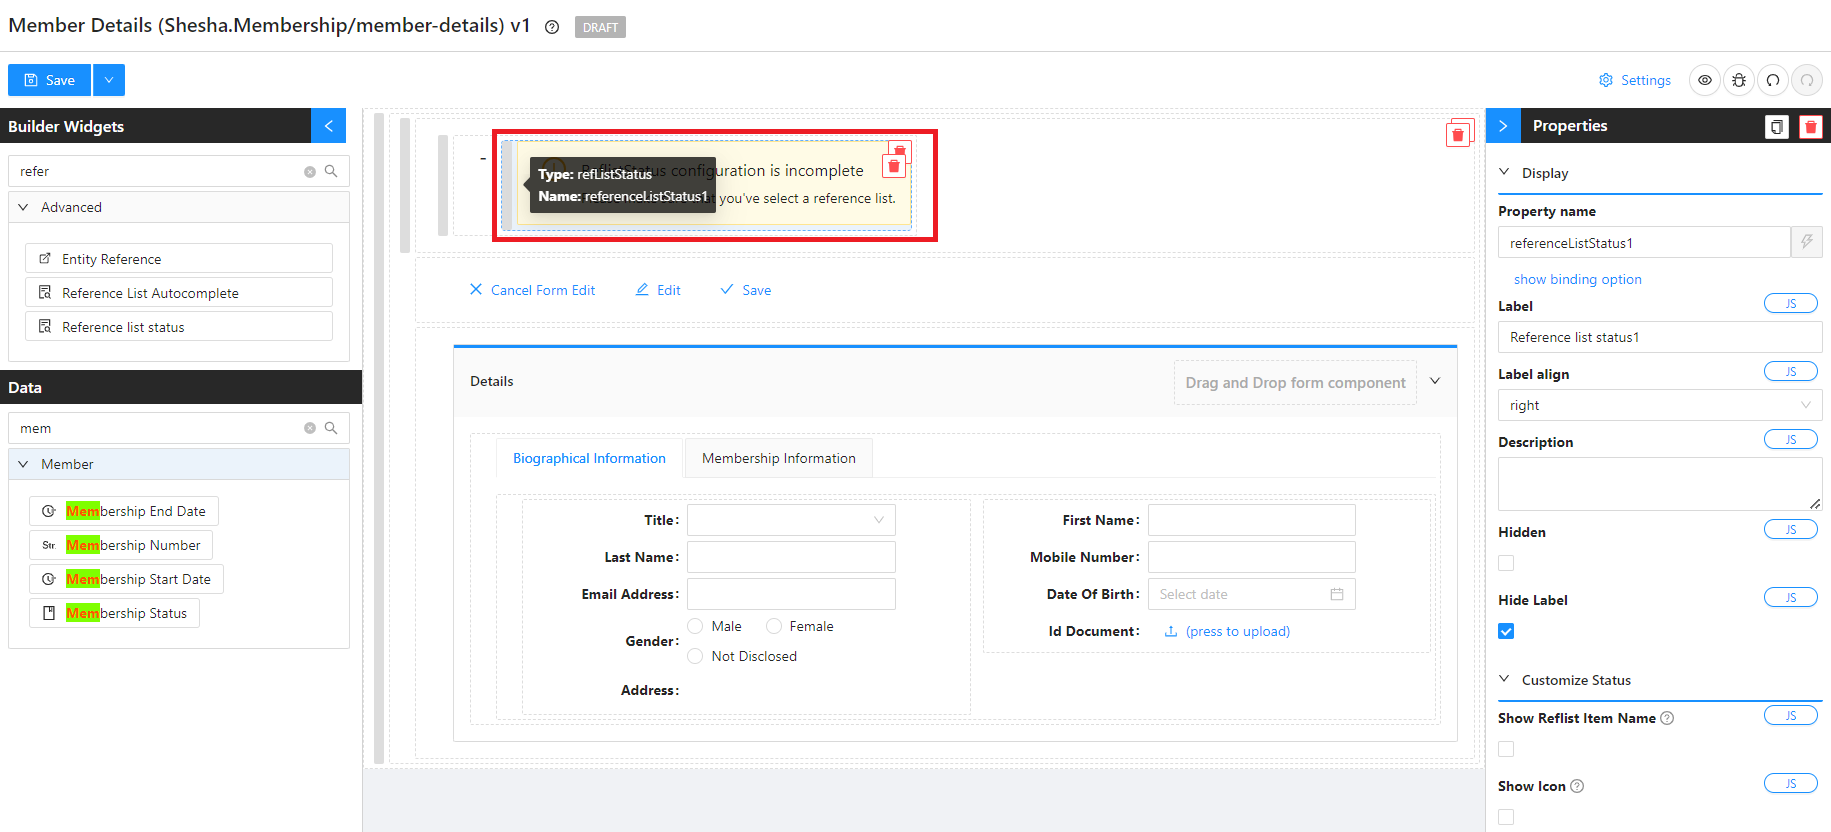
- Configure the Reference List Status:
| Field | Value |
|---|---|
Property Name | membershipStatus |
Reference List | MembershipStatuses |
- Save the form.
Test It
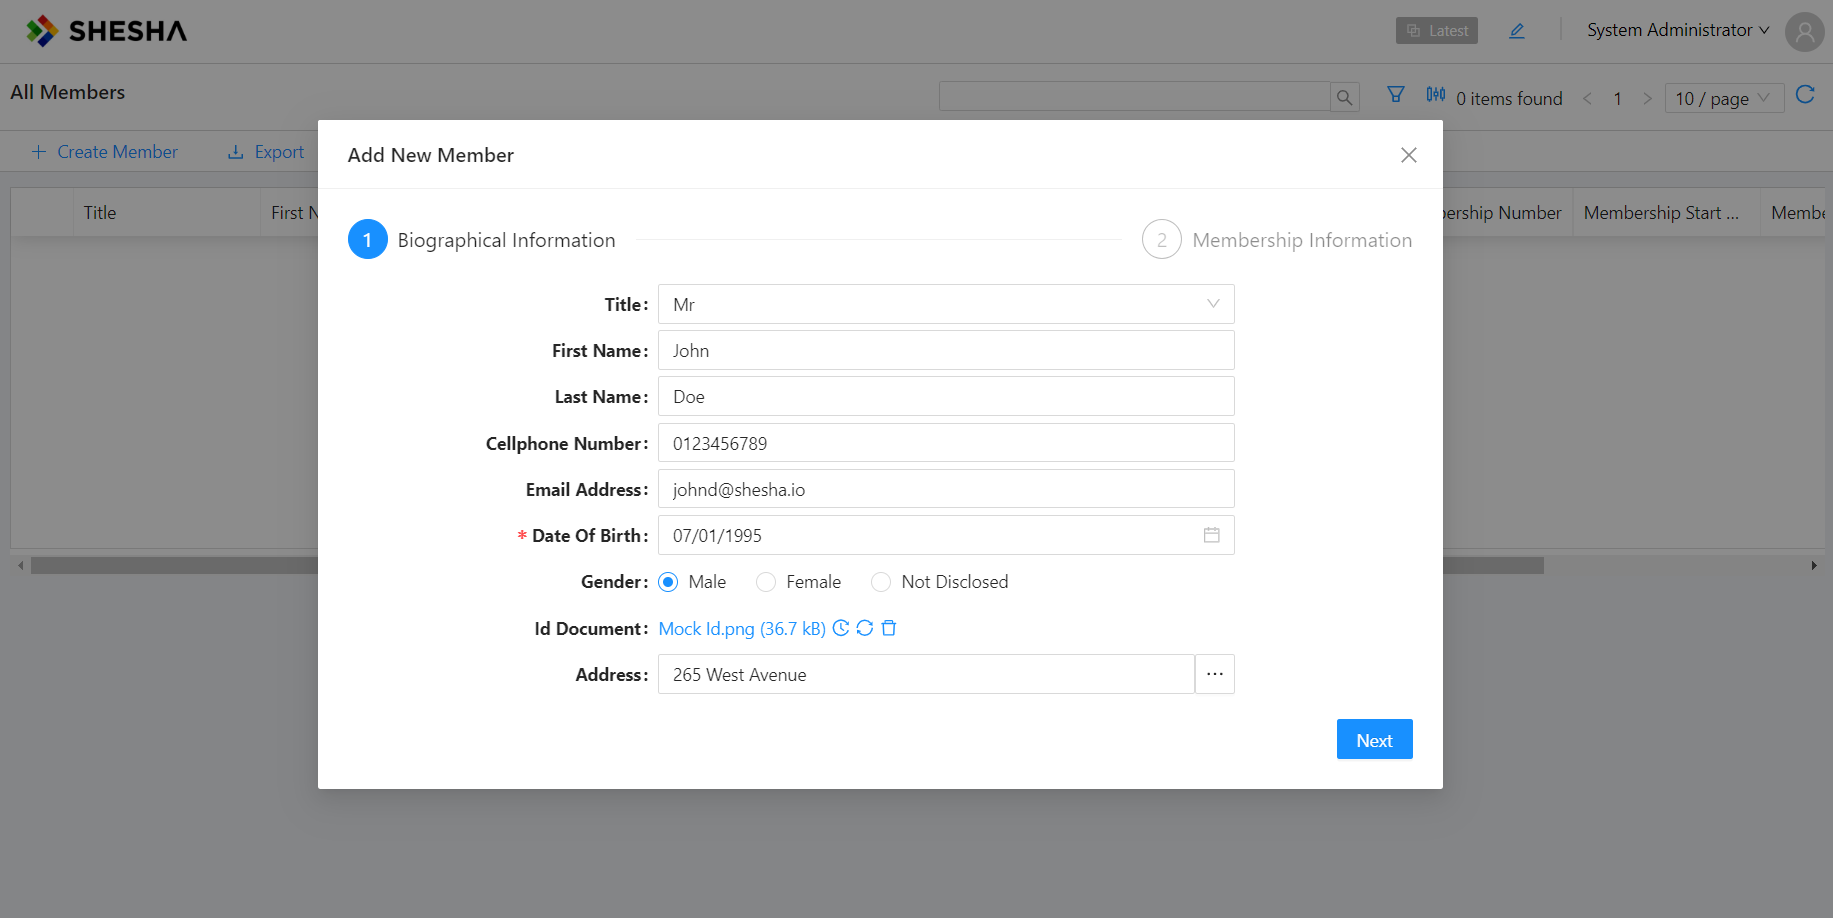
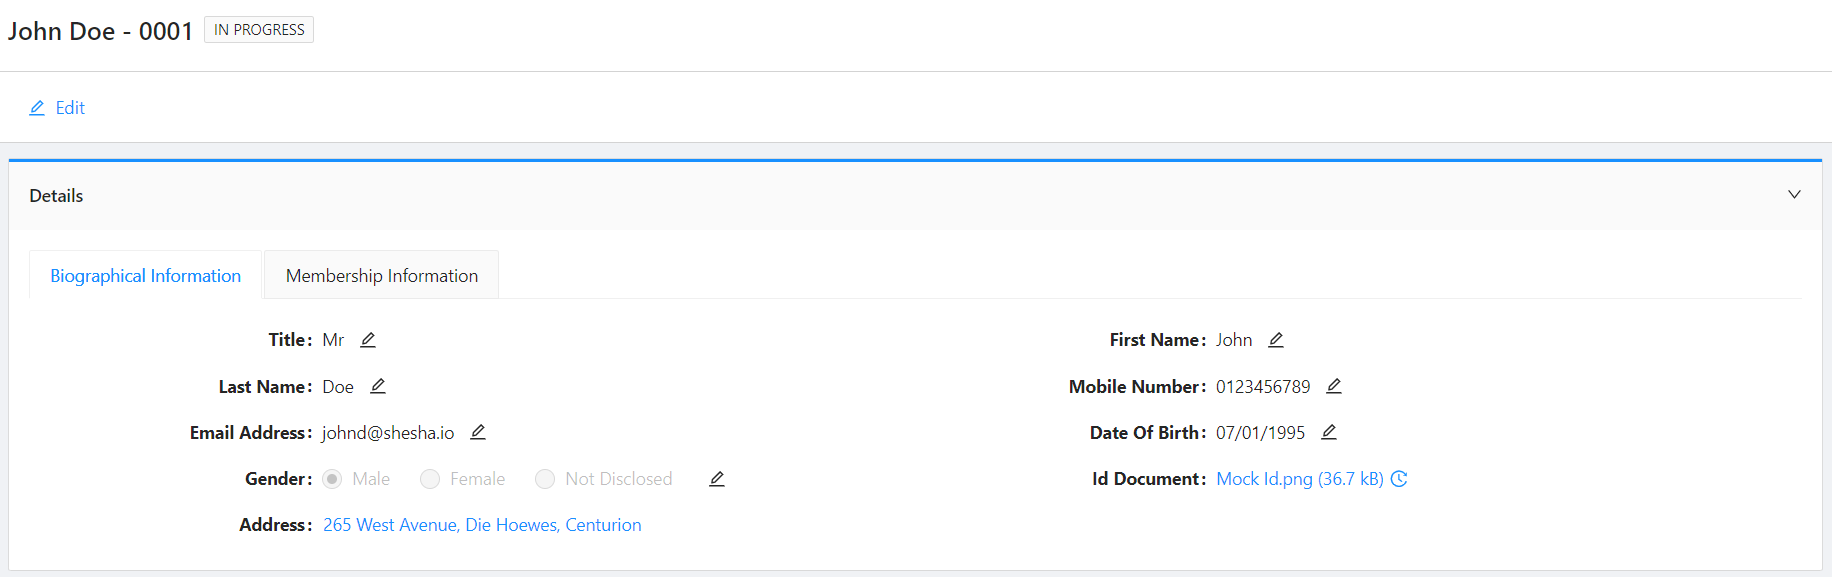
- From the main menu, navigate to the members-table and refresh.
- Register a new member through the wizard.
- Confirm the new fields appear on both the table and the details view.
Next Step
Continue with Adding New Entities and Child Tables to create a MembershipPayment entity and wire it up as a child table on the member's details view.