Form Settings
Every form in Shesha has a set of Form Settings that control three things: how the form looks, how it loads and saves data, and who is allowed to use it.
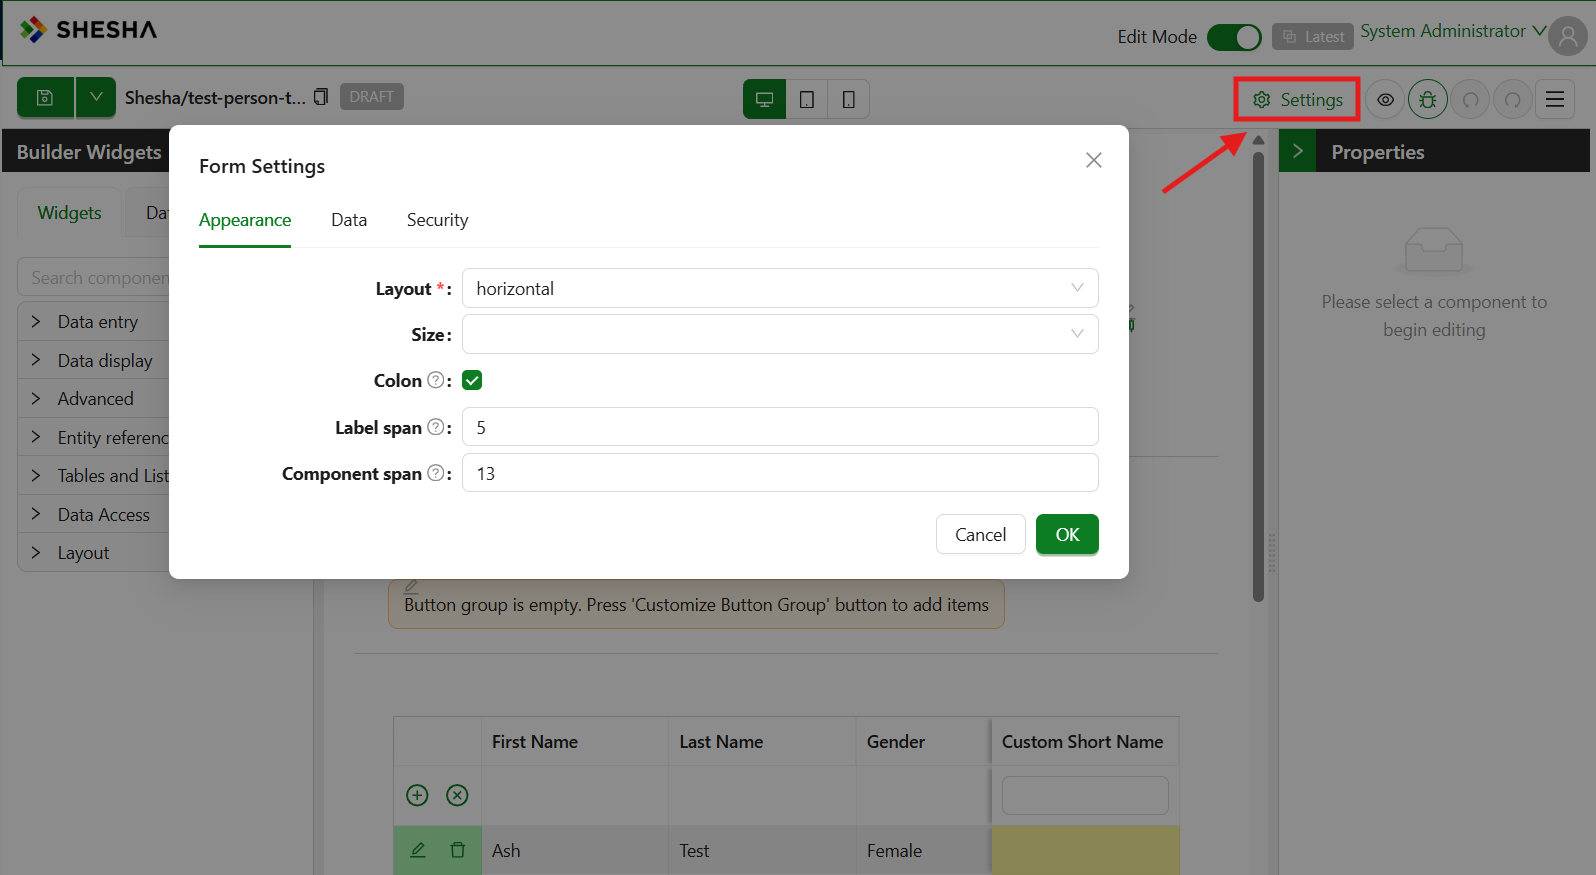 Click Settings to open the Form Settings.
Form Settings Groups
To access the lifecycle settings, open a form in the designer and click Form Settings. You will see three groups:
| Group | What it controls |
|---|---|
| Appearance | How the form looks - layout, size, styling |
| Data | How the form loads and saves data (the lifecycle) |
| Security | Who is allowed to view or use the form |
This guide covers all three tabs with explanations and code examples using the Person entity.
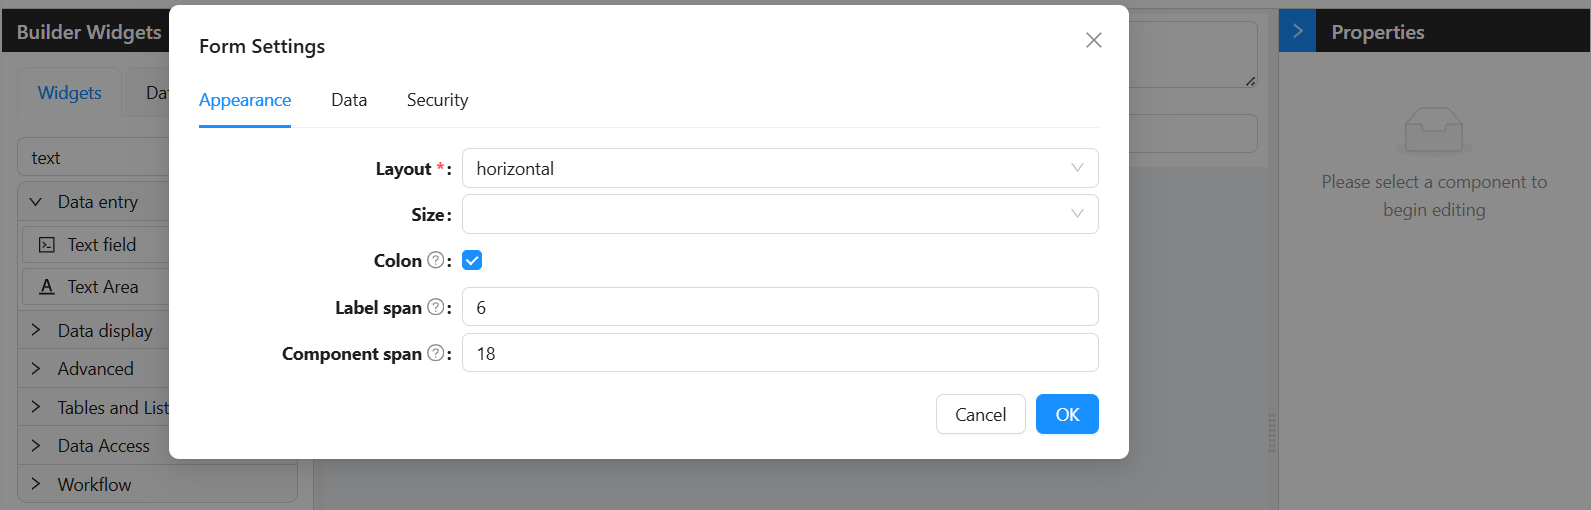
Appearance Tab
The Appearance tab controls how the form is laid out and how much space each part takes up. These settings apply to the whole form - they are not per-component.
Layout
Layout is required and has two options:
| Option | What it does |
|---|---|
vertical | Labels appear above their inputs, stacked. This is the default and works well for most forms. |
horizontal | Labels appear to the left of their inputs, on the same line. Use this for compact data-entry forms. |
Size
Size sets the overall density of all form items at once. If left blank, the default Ant Design size is used.
| Option | When to use |
|---|---|
Small | Dense admin interfaces with many fields |
Middle | Standard forms - the most common choice |
Large | Accessible or touch-friendly forms that need more spacing |
You can clear the Size setting entirely by clicking the X next to the dropdown. This lets the form inherit the application-level size setting.
Colon
A toggle. When turned on, Shesha appends a colon after every field label (for example, "First Name:"). This only has a visible effect when Layout is set to horizontal.
Label Span
A number from 0 to 24. This uses the Ant Design raster grid, where 24 is the full width of the row. Label Span sets how wide the label column is.
For example, a Label Span of 6 makes the label take up 25% of the row. Setting it to 0 hides the label column entirely.
Label Span only has an effect when Layout is horizontal. In vertical layout, labels always take the full row width.
Component Span
The same 0-24 raster grid as Label Span. This sets how wide the input column is.
If you set Label Span to 6, set Component Span to 18 so the input fills the remaining 75% of the row. The two values do not need to add up to 24, but leaving gaps or overlapping them will affect the layout.
Data Tab
The Data tab is split into three sections:
- Data Load - controls how data is fetched and placed onto the form when it opens
- Data Save - controls how data is sent to the server when the user submits the form
- Events - contains handlers that fire in response to user interactions while the form is open, such as a field value changing
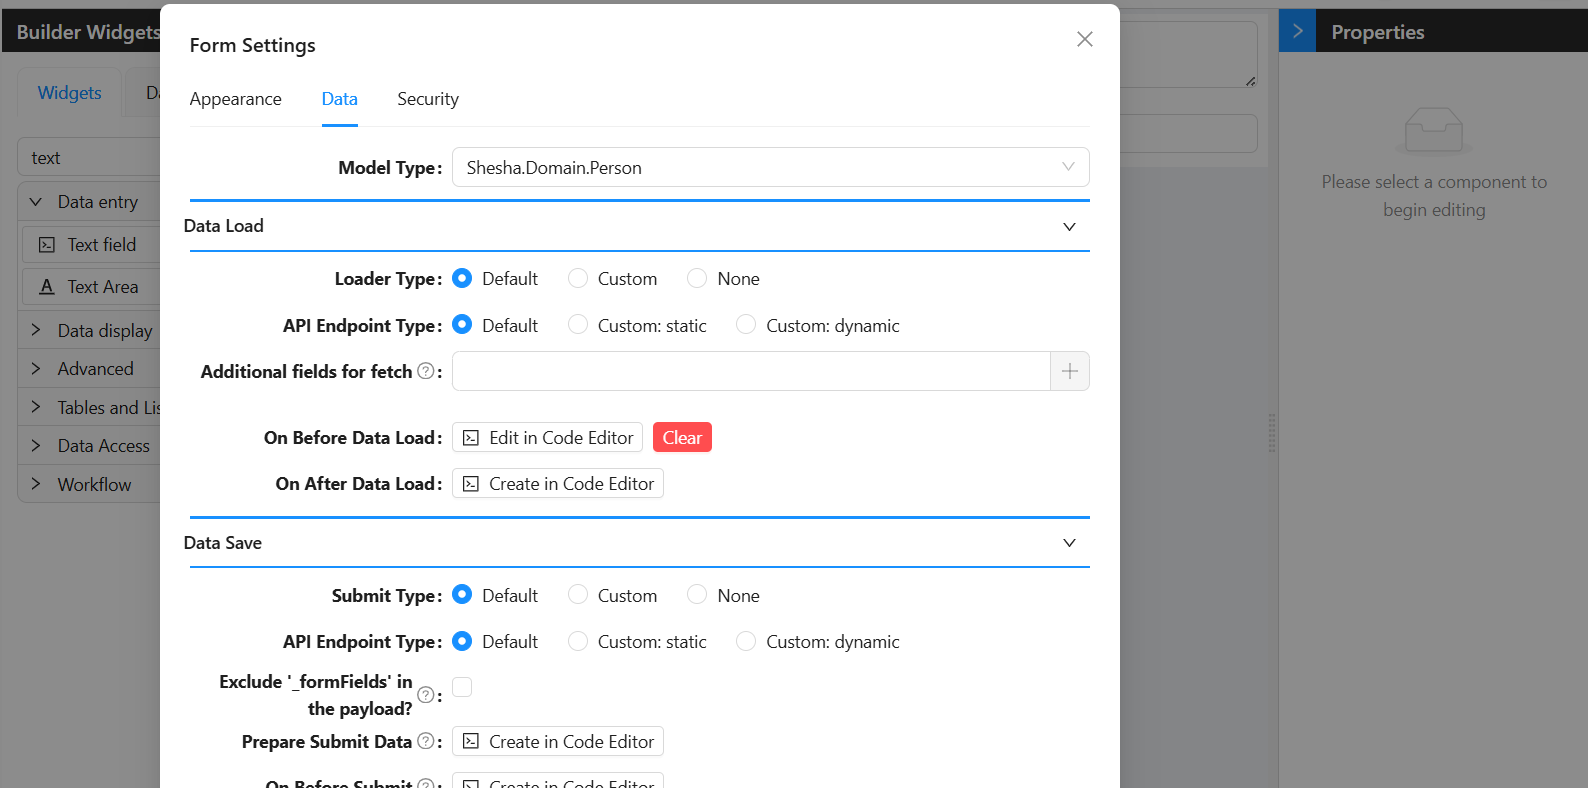
Model Type
Before configuring any of the Data settings, you should set the Model Type. This is the most fundamental setting on the form - it tells Shesha which entity the form is working with.
For example, if you are building a form to view or edit a person's details, you would set the Model Type to Person. Once this is set, Shesha knows which API endpoints to use for loading and saving, which fields are available for selection throughout the designer, and how to handle default CRUD operations automatically.
You will find the Model Type setting at the top of the Data tab in Form Settings. Type the name of your entity (e.g. Shesha.Domain.Person) and select it from the list.
Almost everything in the Data group - the Default Loader, Default Submit, form.defaultApiEndpoints, and even field pickers - depends on the Model Type being set correctly. If data is not loading or saving as expected, the Model Type is the first thing to check.
Data Load
When a form opens, Shesha needs to know where to get the data to display. The Data Load section is where you configure that.
Loader Type
The Loader Type is the first thing you set. It tells Shesha how to fetch data for the form. There are three options:
| Option | Use this when... |
|---|---|
Default | Your form is for a standard Shesha entity (like Person) and you want Shesha to handle fetching automatically. |
Custom | You need to write your own code to fetch the data, for example from a non-standard API. |
None | The form is a create form - there is no existing record to load, so the form should start empty. |
Default Loader
This is the simplest option. You tell Shesha which entity the form is for, and it automatically calls the right API to fetch the record. The record ID is taken from the URL (e.g. ?id=abc123).
When Loader Type is set to Default, an additional API Endpoint Type setting appears.
Custom Loader
Use this when the Default loader is not enough - for example, when your data comes from a custom API, or when you need to combine data from more than one source before the form can display it.
You write an async JavaScript function in the code editor. Whatever object you return from that function becomes the data on the form.
Example - Fetch a Person by ID from a custom endpoint:
const response = await http.get(`/api/dynamic/Shesha/Person/Crud/Get?id=${query.id}`);
return response.data.result;
None (No Loader)
Choose None when the form is used to create a brand new record. Since there is no existing record to fetch, the form starts completely empty and the user fills everything in themselves.
To set up: Set Loader Type to None.
API Endpoint Type
This setting appears when Loader Type is set to Default. It controls which URL Shesha calls to fetch the record.
| Option | When to use |
|---|---|
Default | Shesha uses its built-in GET endpoint for the entity. This is the right choice for most forms. |
Custom: static | You type a URL yourself. The same URL is used every time the form opens. Only GET is supported. |
Custom: dynamic | You write a JavaScript function that returns the URL and HTTP method at runtime. |
Default
Leave the endpoint type on Default for any standard entity form. Shesha automatically calls /api/dynamic/{Namespace}/{Entity}/Crud/Get?id={id} using the record ID from the URL.
Custom (Static)
Use this when you want to fetch from a specific fixed endpoint - for example, a custom backend action that returns a shaped response rather than the standard entity fields. You type the URL directly into the Endpoint field. It does not change at runtime.
Form type to use: Details View or Edit Form - use when loading an existing record from a fixed endpoint.
Example - Load a Person using a custom read action:
/api/dynamic/Shesha/Person/Crud/Get?id=${query.id}
Custom (Static) only supports GET requests in the Data Load section. If you need runtime logic or a different HTTP method, use Custom (Dynamic).
Custom (Dynamic)
Use this when the URL needs to be calculated at runtime - for example, when it depends on a query parameter, a field value, or a user role.
You write an async JavaScript function that returns an object with a url and httpVerb property:
{ url: string; httpVerb: string }
Form type to use: Edit Form or Details View - use when the endpoint changes depending on context.
Additional Fields for Fetch
By default, Shesha only fetches the fields that are actually placed on your form as components. If your lifecycle code needs a field that is not displayed on the form, you need to tell Shesha to include it in the fetch.
For example, if you have a Person form but your On After Data Load script needs address.addressLine1 even though there is no address field on the form, you would add address.addressLine1 here. Use the field picker to choose the fields you need. Use a dot (.) to navigate into nested or related fields (e.g. address.addressLine1).
On Before Data Load
This event runs before Shesha fetches any data. It is the very first thing that happens in the form lifecycle.
Use it when you need to do something before the data arrives - for example, checking that the URL contains a valid ID, setting up some initial state, or stopping the form from loading if a condition is not met.
When this event runs, no data has been fetched yet. Your code runs first, and only once it finishes does Shesha move on to fetch the data. If you call throw new Error(...) inside this event, the data load stops completely - nothing gets fetched.
Example - Stop the details form from loading if the person has no address:
This is a common scenario when drilling into a Person details form from a table view. Before the form loads, fetch the person record and check whether they have an address. If they do not, show an error and stop the load.
const response = await http.get(`/api/dynamic/Shesha/Person/Crud/Get?id=${query.id}`);
const person = response.data.result;

if (!person.address?.id) {
  message.error('This person does not have an address. Cannot open details.');
  throw new Error('Person has no address.');
}
Example - Show a placeholder name while data is being fetched:
form.setFieldsValue({ fullName: 'Loading name...' });
On After Data Load
This event runs after Shesha has fetched the data and placed it on the form, but before the user sees it. This is your chance to adjust, add to, or override the data before it is displayed.
Use it when you need to set a computed value based on the loaded data (like combining first and last name into a display name), fill in a default value for a field that came back empty, or fetch extra related data that was not included in the main load.
Your code runs after the data is on the form. You can use form.setFieldsValue({ ... }) to add or change values. The form waits for your code to finish before showing anything to the user.
Example - Build a display name from the loaded Person's first and last name:
const fullName = `${data.firstName} ${data.lastName}`;
form.setFieldsValue({ fullName });
Example - Set a default value if the field came back empty from the server:
if (!data.preferredContactMethod) {
  form.setFieldsValue({ preferredContactMethod: 1});
}
Data Save
When the user fills in the form and clicks Save, Shesha needs to know how to send that data to the server. The Data Save section is where you configure that.
Submit Type
The Submit Type tells Shesha how to submit data when the form is saved. The options mirror those of the Loader Type:
| Option | Use this when... |
|---|---|
Default | Your form is for a standard Shesha entity and you want Shesha to handle saving automatically. |
Custom | You need to write your own code to control how the data is saved. |
None | The form is read-only and should never submit any data. |
Default Submit
This is the simplest option. Shesha looks at the form data and automatically decides whether to create or update the record:
- If the data has an
idfield, Shesha sends aPUTrequest to update the existing record. - If there is no
id, Shesha sends aPOSTrequest to create a new record.
When Submit Type is set to Default, an additional API Endpoint Type setting appears.
Custom Submit
Use this when the Default submit is not enough - for example, when you need to call a non-standard API, split the data across multiple endpoints, or apply conditional logic before saving.
You write the entire submission logic yourself in an async JavaScript function.
Custom submit currently does not work
None (No Submit)
Choose None when the form is purely for viewing data. No data will be sent to the server when the user interacts with the form.
API Endpoint Type
This setting appears when Submit Type is set to Default. It controls which URL Shesha posts the data to when the form is saved.
| Option | When to use |
|---|---|
Default | Shesha uses its built-in create or update endpoint for the entity. This is the right choice for most forms. |
Custom: static | You type a URL yourself and choose the HTTP method. The same URL and method are used every time the form submits. |
Custom: dynamic | You write a JavaScript function that returns the URL and HTTP method at runtime. |
Default
Leave the endpoint type on Default for any standard entity form. Shesha automatically selects POST for new records (no id) and PUT for existing ones (has an id).
Custom (Static)
Use this when you want to submit to a fixed custom endpoint - for example, a backend action rather than the standard CRUD endpoint. You type the URL directly and choose the HTTP verb (POST, PUT, PATCH, or DELETE).
Form type to use: Edit Form or Create Form - use when always posting to the same custom endpoint.
Example - Submit to a custom registration action:
POST /api/dynamic/Shesha/Person/RegisterAndNotify
Unlike the Data Load static endpoint (which is always GET), the Data Save static endpoint lets you choose any HTTP verb: POST, PUT, PATCH, or DELETE.
Custom (Dynamic)
Use this when the endpoint needs to be calculated at runtime - for example, picking between create and update based on the form data, or building a URL that includes a calculated value.
You write an async JavaScript function that returns an object with a url and httpVerb property:
{ url: string; httpVerb: string }
Form type to use: Edit Form or Create Form - use when the endpoint or HTTP method changes depending on the data.
Example - Pick the right endpoint based on whether the record already has an ID:
return data?.id
  ? { url: `/api/dynamic/Shesha/Person/Crud/Update`, httpVerb: 'put' }
  : { url: `/api/dynamic/Shesha/Person/Crud/Create`, httpVerb: 'post' };
Example - Use form.defaultApiEndpoints to avoid hardcoding the URL:
// form.defaultApiEndpoints gives you the standard endpoints for the form's entity
return data?.id
  ? form.defaultApiEndpoints.update
  : form.defaultApiEndpoints.create;
form.defaultApiEndpoints covers the form's own entity. To get the endpoints of a different entity, use the getApiEndpointsAsync() method available on entities through the application API.
const defaultEndpoints =
  await application.entities.shesha.Person.getApiEndpointsAsync();
return data?.id ? defaultEndpoints.update : defaultEndpoints.create;
If you need to do something unusual - like submitting a deletion confirmation with a reason field - you can point the form at a custom endpoint using Custom (Static) or Custom (Dynamic).
Exclude _formFields in the Payload
Shesha normally includes a _formFields list in the payload when submitting. This tells the server which fields were actually present on the form, enabling partial updates - only those fields get written on the server, and the rest are left untouched.
Turn this on when:
- You are calling a non-Shesha or custom API that does not understand the
_formFieldsconvention and may reject or ignore it. - You want a full replace - you want the server to overwrite all fields in the payload rather than only the ones listed in
_formFields. - You are using Prepare Submit Data to manually build the payload, so
_formFieldsno longer accurately reflects what you are sending.
Leave it off (the default) when:
- You are using Default Submit on a standard Shesha entity form.
- Your form only shows a subset of the entity's fields -
_formFieldsprotects the fields that are not on the form from being accidentally nulled out on save.
This functionality may be reviewed in the next major release.
Prepare Submit Data
This handler lets you reshape or clean up the data right before it is sent to the server. It runs after On Before Submit but before the actual API call is made.
Use it when the form's data structure does not match what the API expects - for example, when the form has UI-only fields that should not be sent, or when the API expects a flat structure but the form has nested objects.
Your code must return the complete data object you want to send. Shesha will use exactly what you return - it will not add anything back from the original form data. Think of it as: "what you return here is what gets posted to the server."
Example - Strip out UI-only fields and reshape the address before saving:
return {
  id: data.id,
  firstName: data.firstName,
  lastName: data.lastName,
  emailAddress1: data.emailAddress1,
  mobileNumber1: data.mobileNumber1,
  address: data.address?.addressLine1,
};
On Before Submit
This event runs before the form sends any data to the server. It is your last chance to check the data and stop the submission if something is wrong.
Use it to validate what the user entered, ask the user to confirm before saving, or log what is about to be submitted.
If you call throw new Error(...) inside this event, the submission stops and nothing is sent to the server. The user stays on the form and can correct any issues.
Example - Check that required field is filled before saving:
if (!data.firstName) {
  message.error('First name is required.');
  throw new Error('Validation failed: missing required field.');
}
Pre-submission confirmation dialogs (e.g. "Are you sure?") are not available directly in lifecycle scripts. Configure a Confirmation Dialog step in your form's action button settings in the designer instead.
On Submit Success
This event runs after the data has been successfully saved to the server. Use it to tell the user that their save worked, send them to another page, or trigger any follow-up actions.
At this point the save is complete. You have access to the submitted data via data.
Example - Show a success message
message.success(`${data.firstName} ${data.lastName} has been saved successfully.`);
The server response is not available in On Submit Success when using the Default submit type. If you need the response (e.g. to get the ID of a newly created record), use Custom Submit and handle the response yourself in the submit code.
On Submit Failed
This event runs when the save fails - for example, if the server returns an error or the network is unavailable. Use it to show the user a clear, helpful error message instead of leaving them with a blank or confusing screen.
When using the Default submit type, this handler is called with no arguments. The error object is not passed in. Use it to show a generic failure message or display validation errors on the form.
Example - Show a generic failure message:
message.error('Could not save the person record. Please check your input and try again.');
If you need access to the specific server error (e.g. to show the error message text or branch on HTTP status codes), use Custom Submit and wrap your http.put / http.post call in a try/catch block. That way the error is available directly in your own code.
Events
The Events section of the Data group contains handlers that fire in response to things the user does while the form is open - not just when it loads or saves. These are useful for reacting to changes in real time, such as recalculating a value when a field changes or triggering a lookup when a selection is made.
On Values Update
This event fires every time a field value changes on the form - whether the user types something, selects an option, clears a field, or a script updates a value programmatically.
Use it when you want the form to react instantly to what the user is doing. Common examples include:
- Recalculating a derived field (e.g. computing a full name when first or last name changes)
- Triggering a lookup when a reference field is selected (e.g. loading an address when a person is picked)
- Showing or hiding parts of the form based on a selected value
- Keeping a running total or summary up to date as the user edits fields
This event receives the updated values as they are after the change. You can use data to read the current state of all fields on the form, and setFormData to push updates back.
If your On Values Update code calls setFormData, that will trigger On Values Update again. Only update fields that are different from what you are reacting to, and always guard your setFormData calls with a condition check.
Example - Automatically build a full name whenever first or last name changes:
// Rebuild the display name any time either name field changes
const fullName = `${data.firstName ?? ''} ${data.lastName ?? ''}`.trim();

if (fullName !== data.fullName) {
  form.setFieldsValue({ fullName });
}
Security Tab
The Security tab controls who is allowed to open the form. Access is checked before the form loads.
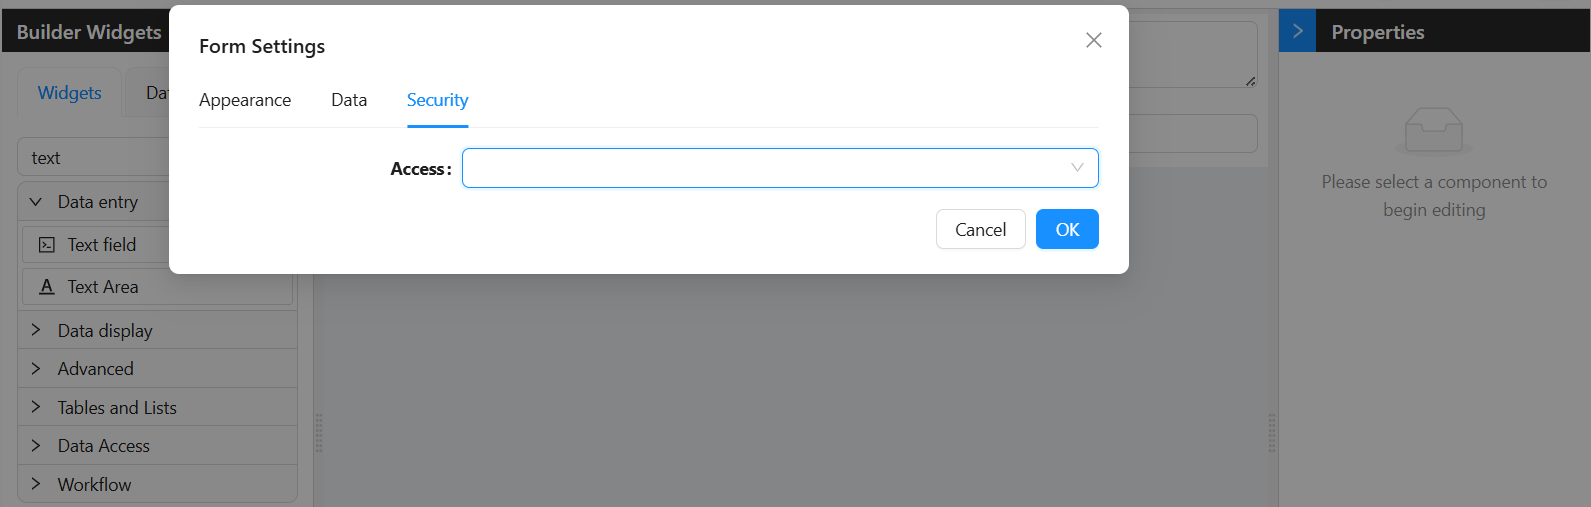
Access
Access determines which users can view and use the form. There are three options:
| Option | Value | Who can open the form |
|---|---|---|
| Any authenticated | 3 | Any user who is logged in |
| Requires permissions | 4 | Only users who hold at least one of the listed permissions |
| Allow anonymous | 5 | Anyone, including users who are not logged in |
| When you select Requires permissions, the Permissions field appears below. |
Setting Access to Allow anonymous means the form is publicly accessible without a login. Only use this for genuinely public-facing forms, such as a contact or registration form.