Notifications
Shesha provides a built-in notification framework for sending messages through multiple channels such as Email, SMS, and Push notifications. The framework is designed to be:
- Multi-channel. SMS and Email are included out of the box, with a plugin architecture that makes it straightforward to add custom channels such as Slack, Teams, or WhatsApp.
- Reliable. Notifications are queued for background processing with automatic retries (up to three attempts) on failure.
- Auditable. Every notification sent is recorded with full details, including status, timestamps, and error messages.
- Configurable. An admin UI lets you manage notification types, templates, and channel settings without code changes.
- Flexible. It supports both asynchronous (queued) and synchronous (immediate) delivery for time-sensitive messages such as OTPs.
Key concepts
Channels
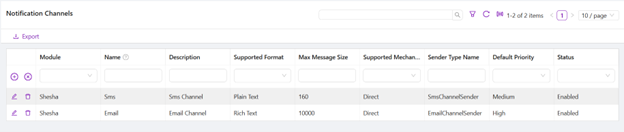
A channel represents a delivery mechanism such as Email or SMS. Each channel is defined by a NotificationChannelConfig entity with the following key properties.
| Property | Description |
|---|---|
| Name | Display name (for example "Email" or "SMS"). |
| SupportedFormat | Message format the channel accepts: PlainText, RichText, or EnhancedText. |
| SupportedMechanism | Direct, BulkSend, or Broadcast. |
| MaxMessageSize | Maximum message length (useful for SMS). |
| SupportsAttachment | Whether the channel supports file attachments. |
| Status | Enabled, Disabled, or Suppressed. |
Shesha ships with two pre-configured channels: SMS and Email.
Registering a channel
Channels are registered in Startup.cs via dependency injection:
services.AddTransient<INotificationChannelSender, EmailChannelSender>();
services.AddTransient<INotificationChannelSender, SmsChannelSender>();
To add a custom channel, implement the INotificationChannelSender interface and register it the same way. See Custom Notification Channels for a full guide.
Notification types and templates
A notification type (NotificationTypeConfig) defines a category of notification, such as "Welcome Email" or "Password Reset". Each type has one or more templates that define the actual message content for different channels.
The notification type properties are:
| Property | Description |
|---|---|
| Name | Unique name identifying the notification type. |
| Description | Human-readable description. |
| Disable | Globally disable this notification type. |
| CanOptOut | Whether users can opt out of receiving this notification. |
| IsTimeSensitive | If true, sends immediately (synchronously) instead of queuing. |
| AllowAttachments | Whether attachments can be included. |
| OverrideChannels | Force specific channels, bypassing the default channel selection logic. |
| Category | Optional grouping label for analysis. |
The template properties are:
| Property | Description |
|---|---|
| TitleTemplate | Subject or title using Mustache syntax (for example Dear {{FullName}}). |
| BodyTemplate | Message body using Mustache syntax. |
| MessageFormat | PlainText or RichText (HTML). Must match the channel's supported format. |
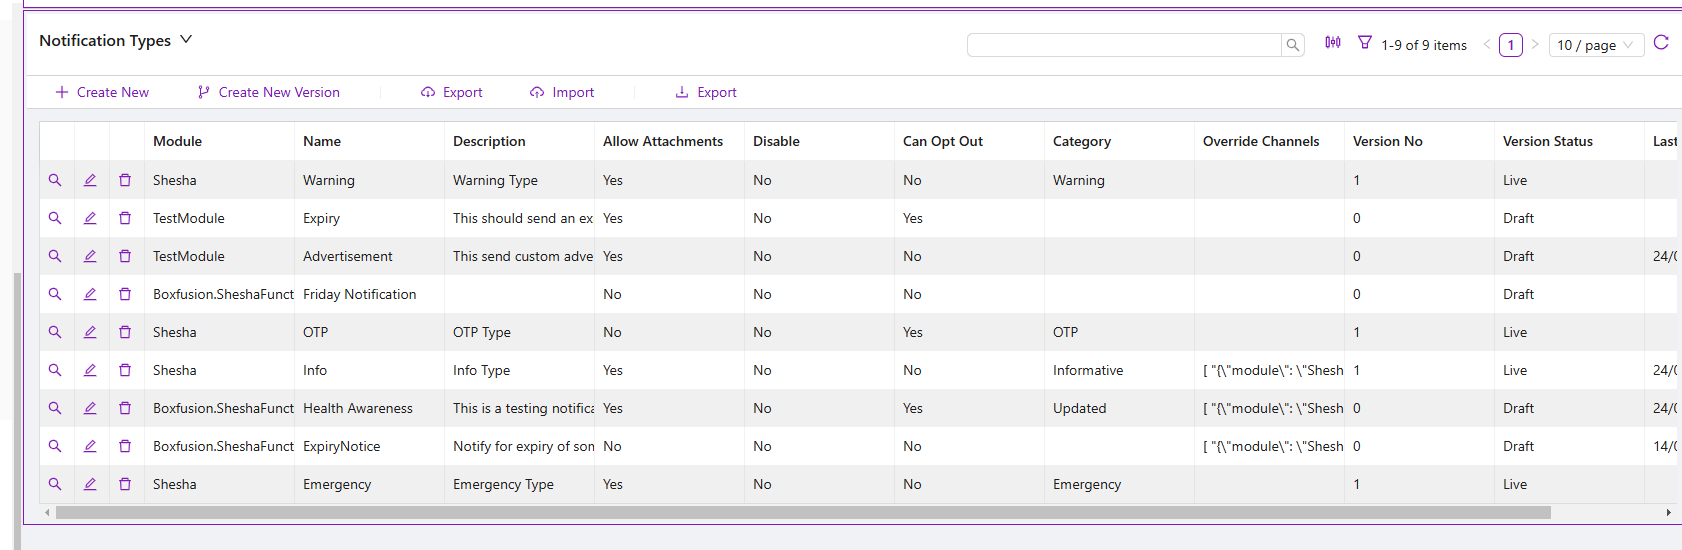
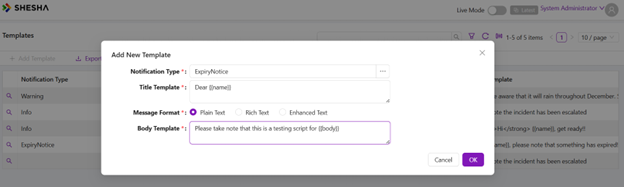
Notification types and templates can be managed through the admin UI. Navigate to the Notification Types configuration section to create, edit, or disable notification types and their associated templates.
Each template's MessageFormat must be compatible with the channel it is used on. For example, an Email channel typically supports RichText (HTML), while an SMS channel supports PlainText. If a notification type can be sent through both Email and SMS, create separate templates, one with RichText for Email and one with PlainText for SMS.
Channel selection logic
When a notification is sent, the framework decides which channel or channels to use through this priority hierarchy:
- Explicit channel. If a channel is passed directly in the
SendNotificationAsynccall, only that channel is used. - User preferences. If the recipient has set a
UserNotificationPreferencefor this notification type, that channel is used. - Override channels. If the notification type has
OverrideChannelsconfigured, those are used.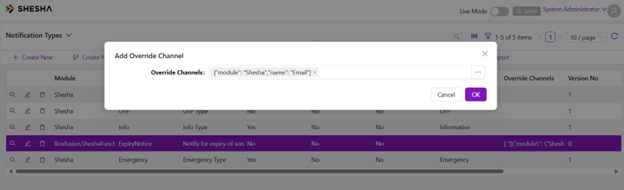
- System defaults. Falls back to the default channels configured per priority level (High, Medium, or Low) in the notification settings.
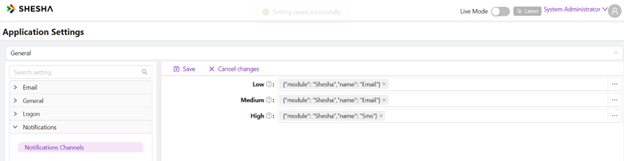
Application-level settings
Global notification settings are configured under the Notifications settings category (Shesha.Notification.Settings). The settings editor form (notification-settings) lets you configure:
| Setting | Description |
|---|---|
| Low priority channels | Default channel or channels for low-priority notifications. |
| Medium priority channels | Default channel or channels for medium-priority notifications. |
| High priority channels | Default channel or channels for high-priority notifications. |
| Test channel | Channel used for testing notifications. |
Each channel type also has its own settings:
- Email settings: SMTP configuration, an enable/disable flag, and a
RedirectAllMessagesTooption for routing all emails to a test address during development. - SMS settings: Gateway configuration, an enable/disable flag, and a similar
RedirectAllMessagesTooption for testing.
INotificationSender service
INotificationSender is the primary service for sending notifications from your application code. It provides two overloads of SendNotificationAsync.
The first is person-based and is the simplest. The most common usage passes Person entities for the sender and recipient.
Task SendNotificationAsync<TData>(
    NotificationTypeConfig type,        // The notification type to send
    Person? sender,                     // Sender (nullable)
    Person receiver,                    // Recipient
    TData data,                         // Template data (extends NotificationData)
    RefListNotificationPriority priority,
    List<NotificationAttachmentDto>? attachments = null,
    string? cc = null,                  // CC addresses (semicolon-delimited)
    GenericEntityReference? triggeringEntity = null,
    NotificationChannelConfig? channel = null,  // Force a specific channel
    string? category = null
) where TData : NotificationData;
The second is participant-based and is for advanced scenarios. When you need to send to a raw address (such as an email or phone number not linked to a Person entity), use IMessageSender and IMessageReceiver participants.
Task SendNotificationAsync<TData>(
    NotificationTypeConfig type,
    IMessageSender? sender,
    IMessageReceiver receiver,
    TData data,
    RefListNotificationPriority priority,
    List<NotificationAttachmentDto>? attachments = null,
    string? cc = null,
    GenericEntityReference? triggeringEntity = null,
    NotificationChannelConfig? channel = null,
    string? category = null
) where TData : NotificationData;
There are two message participant types:
PersonMessageParticipantwraps aPersonentity. The channel extracts the address automatically (for exampleEmailAddress1for email orMobileNumber1for SMS).RawAddressMessageParticipantwraps a raw address string (for example"user@example.com"or"+27821234567"). This is useful when you do not have aPersonrecord.
Example - Send to a raw email address:
var receiver = new RawAddressMessageParticipant("user@example.com");
await _notificationSender.SendNotificationAsync(type, null, receiver, data, priority);
Implementation guide
Project structure
Place notification-related classes in a Notifications folder within your Application project:
MyProject.Application/
└── Notifications/
├── IOrderNotificationSender.cs // Interface
├�── OrderNotificationSender.cs // Implementation
└── OrderNotificationModel.cs // Template data model
Step 1: Define the template data model
Create a class extending NotificationData with properties that map to your template placeholders:
using Abp.Notifications;

namespace MyProject.Notifications
{
    public class OrderNotificationModel : NotificationData
    {
        public string CustomerName { get; set; }
        public string OrderNumber { get; set; }
        public string OrderDate { get; set; }
    }
}
The property names must match the Mustache placeholders in your templates (for example {{CustomerName}}).
For simple cases you can skip creating a model class and use NotificationData directly as a dictionary:
var data = new NotificationData();
data["CustomerName"] = "John Smith";
data["OrderNumber"] = "ORD-001";
Step 2: Create notification types and templates
Notification types and templates are stored in the database. You have two options.
The first is the admin UI. Create them directly through the admin UI, which is recommended for non-developers or when you want to iterate on template text without redeploying.
The second is a database migration. Use FluentMigrator with Shesha's helper methods to seed notification types and templates as part of your deployment.
Example - Seed a notification type with email and SMS templates:
using FluentMigrator;
using Shesha.FluentMigrator;

[Migration(20250226120000)]
public class M20250226120000 : Migration
{
    public override void Up()
    {
        // Create a notification type with an Email template
        this.Shesha().NotificationCreate("MyModule", "Order Confirmed")
            .SetDescription("Sent when a customer's order is confirmed.")
            .AddEmailTemplate(
                "A1B2C3D4-E5F6-7890-ABCD-EF1234567890".ToGuid(),
                "Order Confirmation Email",                          // Template name
                "Your order {{OrderNumber}} has been confirmed",     // Subject template
                @"<p>Dear {{CustomerName}},</p>
                  <p>Your order <strong>{{OrderNumber}}</strong> placed on {{OrderDate}}
                  has been confirmed.</p>");

        // Add an SMS template for the same notification type
        this.Shesha().NotificationUpdate("MyModule", "Order Confirmed")
            .AddSmsTemplate(
                "B2C3D4E5-F6A7-8901-BCDE-F12345678901".ToGuid(),
                "Order Confirmation SMS",
                "Hi {{CustomerName}}, your order {{OrderNumber}} is confirmed.");
    }

    public override void Down()
    {
        throw new NotImplementedException();
    }
}
The available migration helper methods are:
| Method | Description |
|---|---|
NotificationCreate(module, name) | Create a new notification type. |
NotificationUpdate(module, name) | Update an existing notification type. |
.SetDescription(text) | Set the type's description. |
.AddEmailTemplate(id, name, subject, body) | Add an email template (RichText format). |
.AddSmsTemplate(id, name, body) | Add an SMS template (PlainText format). |
.AddPushTemplate(id, name, subject, body) | Add a push notification template. |
NotificationTemplateUpdate(id) | Update an existing template. |
NotificationTemplateDelete(id) | Delete a template. |
Template IDs are GUIDs that must be unique. Generate them with any GUID generator.
Step 3: Implement the notification sender
Create an interface and implementation class that encapsulates the notification logic for your domain.
The interface:
namespace MyProject.Notifications
{
    public interface IOrderNotificationSender
    {
        Task NotifyOrderConfirmedAsync(Guid orderId);
    }
}
The implementation:
using Abp.Dependency;
using Abp.Domain.Repositories;
using Shesha.Domain;
using Shesha.Domain.Enums;
using Shesha.Notifications;

namespace MyProject.Notifications
{
    public class OrderNotificationSender : IOrderNotificationSender, ITransientDependency
    {
        private readonly INotificationSender _notificationSender;
        private readonly IRepository<NotificationTypeConfig, Guid> _notificationTypeRepo;
        private readonly IRepository<Person, Guid> _personRepo;
        private readonly IRepository<Order, Guid> _orderRepo;

        public OrderNotificationSender(
            INotificationSender notificationSender,
            IRepository<NotificationTypeConfig, Guid> notificationTypeRepo,
            IRepository<Person, Guid> personRepo,
            IRepository<Order, Guid> orderRepo)
        {
            _notificationSender = notificationSender;
            _notificationTypeRepo = notificationTypeRepo;
            _personRepo = personRepo;
            _orderRepo = orderRepo;
        }

        public async Task NotifyOrderConfirmedAsync(Guid orderId)
        {
            var order = await _orderRepo.GetAsync(orderId);
            var notificationType = await _notificationTypeRepo.FirstOrDefaultAsync(
                x => x.Name == "Order Confirmed");

            if (notificationType == null)
                return;

            var data = new OrderNotificationModel
            {
                CustomerName = order.Customer.FullName,
                OrderNumber = order.OrderNumber,
                OrderDate = order.OrderDate.ToString("dd MMM yyyy")
            };

            await _notificationSender.SendNotificationAsync(
                notificationType,
                sender: null,
                receiver: order.Customer,
                data: data,
                priority: RefListNotificationPriority.Medium);
        }
    }
}
Step 4: Call the notification sender
Inject your notification sender and call it from your application service or workflow:
public class OrderAppService : SheshaAppServiceBase
{
    private readonly IOrderNotificationSender _orderNotificationSender;

    public OrderAppService(IOrderNotificationSender orderNotificationSender)
    {
        _orderNotificationSender = orderNotificationSender;
    }

    public async Task ConfirmOrderAsync(Guid orderId)
    {
        // ... order confirmation logic ...

        await _orderNotificationSender.NotifyOrderConfirmedAsync(orderId);
    }
}
Common scenarios
Sending to multiple recipients
To notify several people, loop through the recipients:
foreach (var person in recipients)
{
    await _notificationSender.SendNotificationAsync(
        notificationType, sender: null, receiver: person, data, priority);
}
Forcing a specific channel
Pass a NotificationChannelConfig to override the default channel selection:
var emailChannel = await _channelRepo.FirstOrDefaultAsync(x => x.Name == "Email");

await _notificationSender.SendNotificationAsync(
    notificationType, sender: null, receiver: person, data,
    RefListNotificationPriority.Medium,
    channel: emailChannel);
Including attachments
Pass a list of NotificationAttachmentDto referencing stored files:
var attachments = new List<NotificationAttachmentDto>
{
    new NotificationAttachmentDto
    {
        FileName = "invoice.pdf",
        StoredFileId = storedFile.Id
    }
};

await _notificationSender.SendNotificationAsync(
    notificationType, sender: null, receiver: person, data,
    RefListNotificationPriority.Medium, attachments: attachments);
Attachments are only sent if the notification type has AllowAttachments set to true and the channel supports attachments (SupportsAttachment = true).
Linking a triggering entity
Use GenericEntityReference to link the notification to the entity that triggered it, which is useful for audit trails:
await _notificationSender.SendNotificationAsync(
    notificationType, sender: null, receiver: person, data,
    RefListNotificationPriority.Medium,
    triggeringEntity: new GenericEntityReference(order));
Asynchronous vs synchronous delivery
By default, notifications are queued for background processing. This suits most cases, such as confirmations and reminders.
For time-sensitive messages such as OTPs and security alerts, set IsTimeSensitive = true on the notification type. This causes the notification to be sent immediately in the current thread, bypassing the background queue.
Retry behaviour
Failed notifications are retried automatically up to three times, with delays of 10, 20, and 20 seconds respectively. The NotificationMessage entity tracks:
RetryCount- the number of attempts made.Status-Preparing,Sent,WaitToRetry, orFailed.ErrorMessage- details of the last failure.
Custom notification channels
The built-in Email and SMS channels cover most use cases. If you need to deliver notifications through a different medium such as Slack, Microsoft Teams, or WhatsApp, Shesha's plugin architecture makes it straightforward to add custom channels. See Custom Notification Channels for a step-by-step guide.