How to Configure an "API Call" Action (Step-by-Step)
This guide walks through configuring the built-in API Call action on a form
component, using a button that creates a Person record as the worked example.
It follows the actual Form Designer UI, step by step.
Step 1: Create a test button and select the API Call action
- Drag a Button component onto your form — a throwaway/test button is fine for trying this out.
- Open the button's On Click action configuration.
- From the action dropdown, select Common: API Call.

Selecting this expands an Arguments panel, which is where the rest of the configuration happens.
Step 2: Choose the HTTP verb and endpoint URL
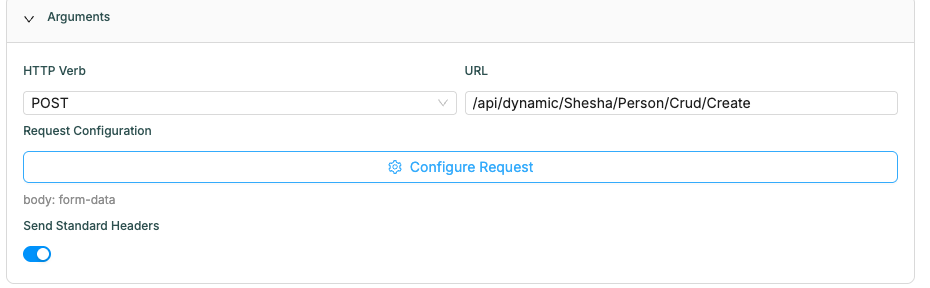
In the Arguments panel:
- Set HTTP Verb to the verb your endpoint expects (GET, DELETE, HEAD,
OPTIONS, PUT, PATCH, PURGE, LINK, POST, ...).
- For this example, select POST, since we're creating a new Person.
- Set URL to the endpoint you want to call. For creating a Person via Shesha's dynamic CRUD endpoint:
/api/dynamic/Shesha/Person/Crud/Create
This works the same way for any endpoint that accepts parameters — pick whichever verb/URL combination matches the endpoint you're targeting.
Step 3: Configure the request payload
Click Configure Request to open the request configuration dialog. This is where you define what actually gets sent with the call — parameters, headers, and body.
Add the parameters to send
- In the Configure Request dialog, add each parameter you want to send to the endpoint by clicking Add Parameter.
- Give each parameter a key and a value (values can reference form
data, e.g. a field bound to
data.firstName). - Click OK to save.
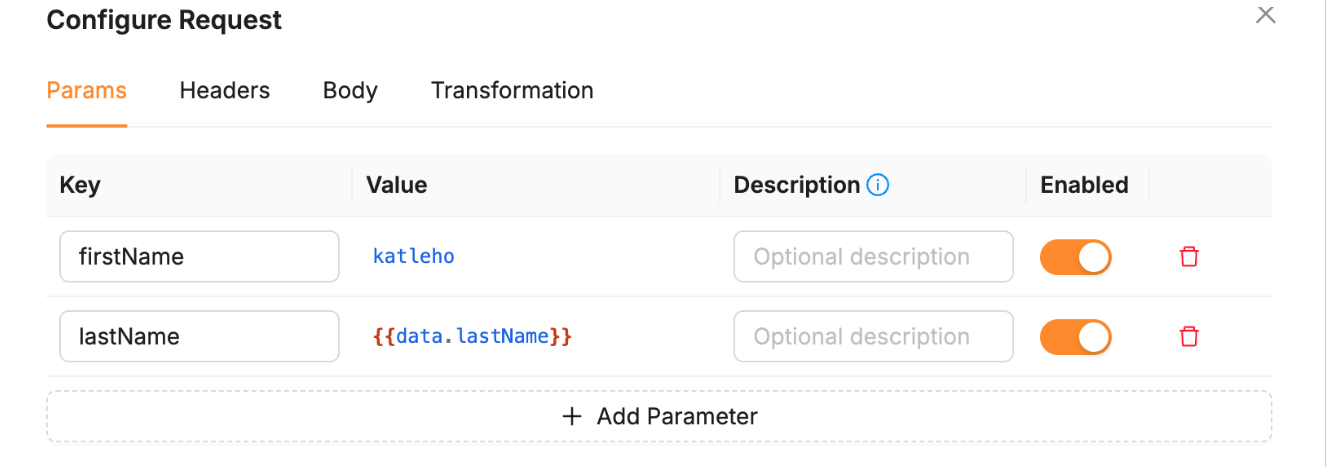
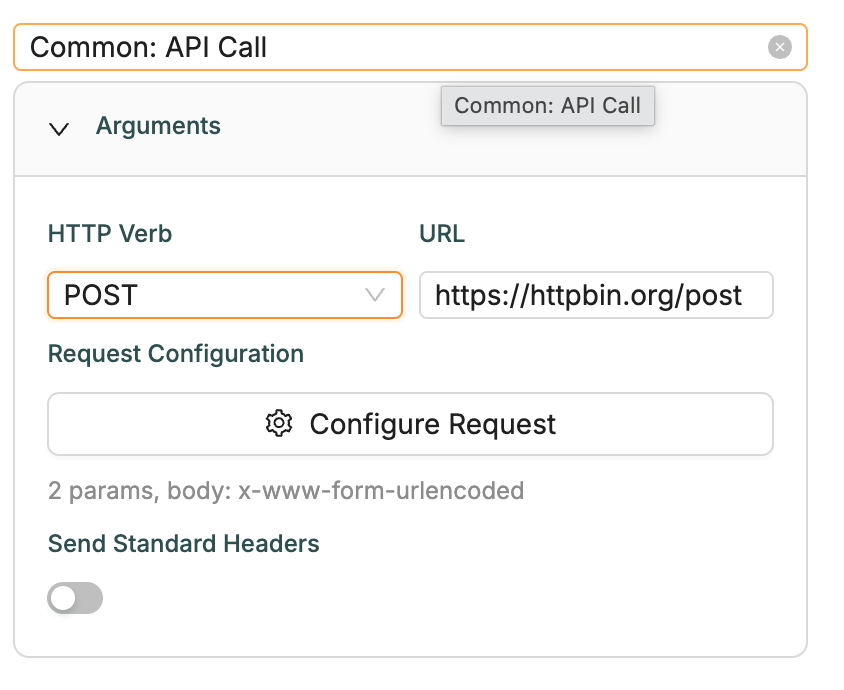
Back on the action configuration panel, you'll see a summary (e.g.
body: form-data) confirming what was configured. When the button is clicked,
these parameters are sent along with the call to the endpoint from Step 2.
Step 4: Configure headers on an endpoint that expects them
Send Standard Headers covers the common case — it attaches the current user's
Authorization: Bearer {token} automatically when calling your own backend
(this is the same Bearer scheme the Shesha API itself defines for
authentication). It's on by default for every new API Call action, so most
of the time there's nothing to configure here at all — you only need to touch
it, or add headers manually via the Headers tab in the Configure
Request dialog, in the two cases below:
-
Calling an external API with its own auth scheme. For example, an address-verification or ID-lookup service you're calling from a "Verify address" button on the Person form.
Send Standard Headersmust be off here (you never send your app's session token to a third party), and instead you add the header the external service actually requires: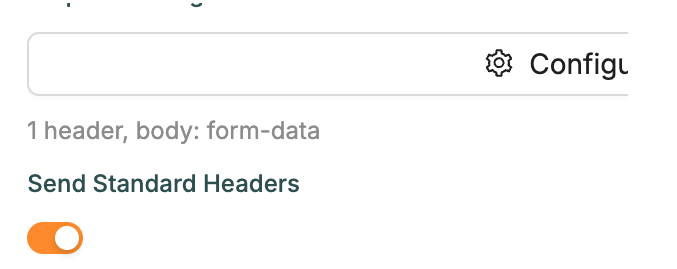
(or
Authorization: Bearer <their-token>,Ocp-Apim-Subscription-Key, etc. — whatever that specific external API documents.) -
Calling your own backend without the current user's session — e.g. from a public/anonymous form where there's no logged-in user, but the endpoint still requires a token (a service account token, for instance):
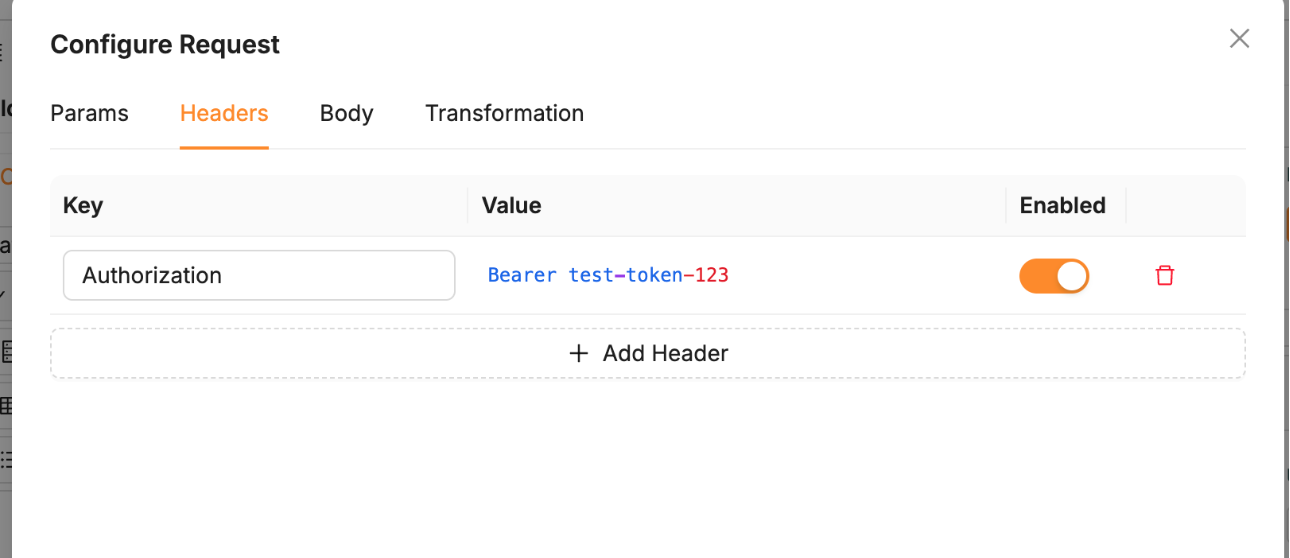
To add one: open Configure Request → Headers tab → Add Header → fill in key and value → OK. Just like parameters, a header's value can reference form/context data (e.g. a token stored earlier in page context) rather than being hard-coded.
Try it yourself: testing an auth header (Bearer token)
The address-verification/API-key example above is realistic, but you
probably don't have a service like that handy to actually test against.
httpbin.org is a free public test service built
for exactly this — no signup, no risk to real data, just point an action
at it. GET https://httpbin.org/bearer checks for an
Authorization: Bearer <token> header and tells you plainly whether it
saw a valid one:
-
HTTP Verb GET, URL
https://httpbin.org/bearer— thehttps://is required here, since a barehttpbin.org/bearerwould be treated as a relative path and sent to your own backend instead of httpbin. -
Send Standard Headers: off (it's an external API — there's no reason to send your app's own session token to it).
-
Configure Request → Headers tab → add:
Key Value AuthorizationBearer test-token-123 -
Run it →
200 OK:{ "authenticated": true, "token": "test-token-123" } -
Now disable that header row (or clear its value) and run the same action again →
401 Unauthorized. That confirms the header — not something else — was what made step 4 succeed.
Want to see the entire header set an action actually sends, e.g. to
check what Send Standard Headers adds when you flip it back on? Point
the same action at GET https://httpbin.org/headers instead — it echoes
back every header it received, verbatim.
Try it yourself: testing a conditional header (ETag)
Most Shesha endpoints don't branch on custom headers, but the built-in file endpoint genuinely does — it's a good one to practice on because you can directly see the response change.
Person.Photo is a StoredFile. Using the file id from a Person's photo:
-
First call — GET, URL
/api/StoredFile/Download, parameterid = <the file id>, no headers. Run it → you get200 OK, the file content, and a responseETagheader equal to the file version's GUID. -
Second call — same action, but on the Headers tab add:
Key Value If-None-Match<the ETag value from step 1's response>Run it again → you get
304 Not Modifiedwith no body, because the header told the server "I already have this exact version."
This is implemented in
shesha-core/src/Shesha.Application/StoredFiles/StoredFileController.cs
(DownloadAsync) — useful to see because it's a real conditional-header code
path in this codebase, not a hypothetical one.
Step 5: Configure the request body
The Configure Request dialog has four tabs: Params, Headers, Body, Transformation. The Body tab controls what payload (if any) gets sent, and offers five options:
-
none — no payload is sent with the request at all.
-
JSON — write the payload directly in a JSON editor. Values can be hard-coded or reference form data via a Mustache expression, e.g.
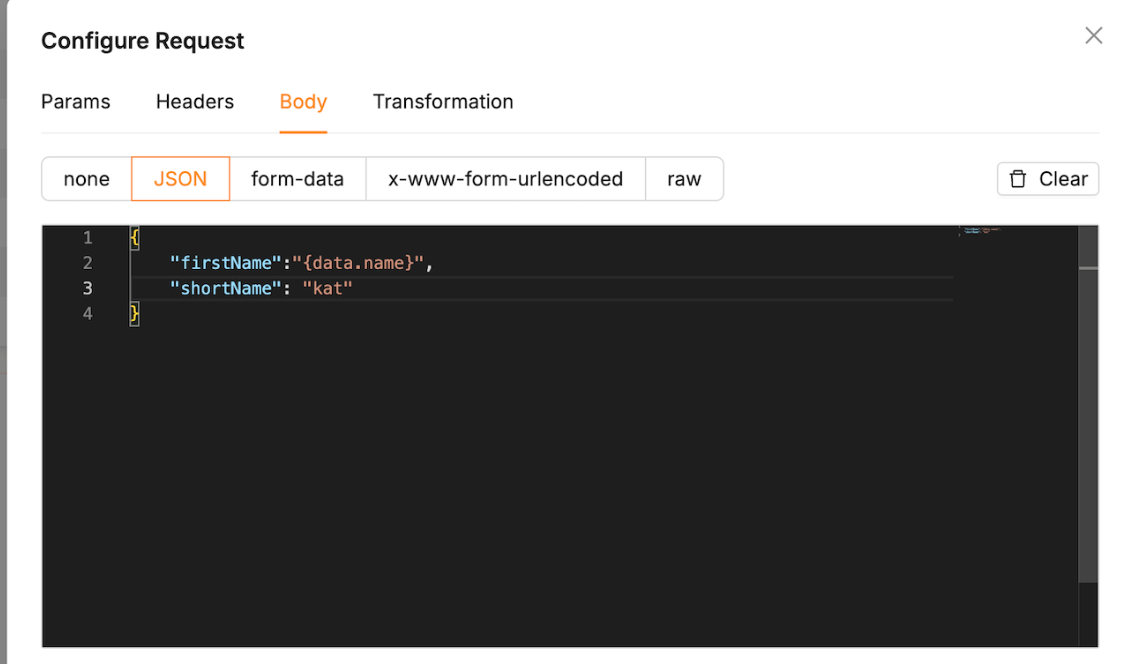
Once you click OK and trigger the button, open your browser's DevTools → Network tab and inspect the request — you'll see exactly the payload you configured going out on the wire.
-
form-data — instead of hand-writing JSON, add fields one at a time via Add Field. The Key column autocompletes against your form's data properties (e.g. typing
firsuggestsFirstName), and Value accepts either a literal value or a{{expression}}referencing form data: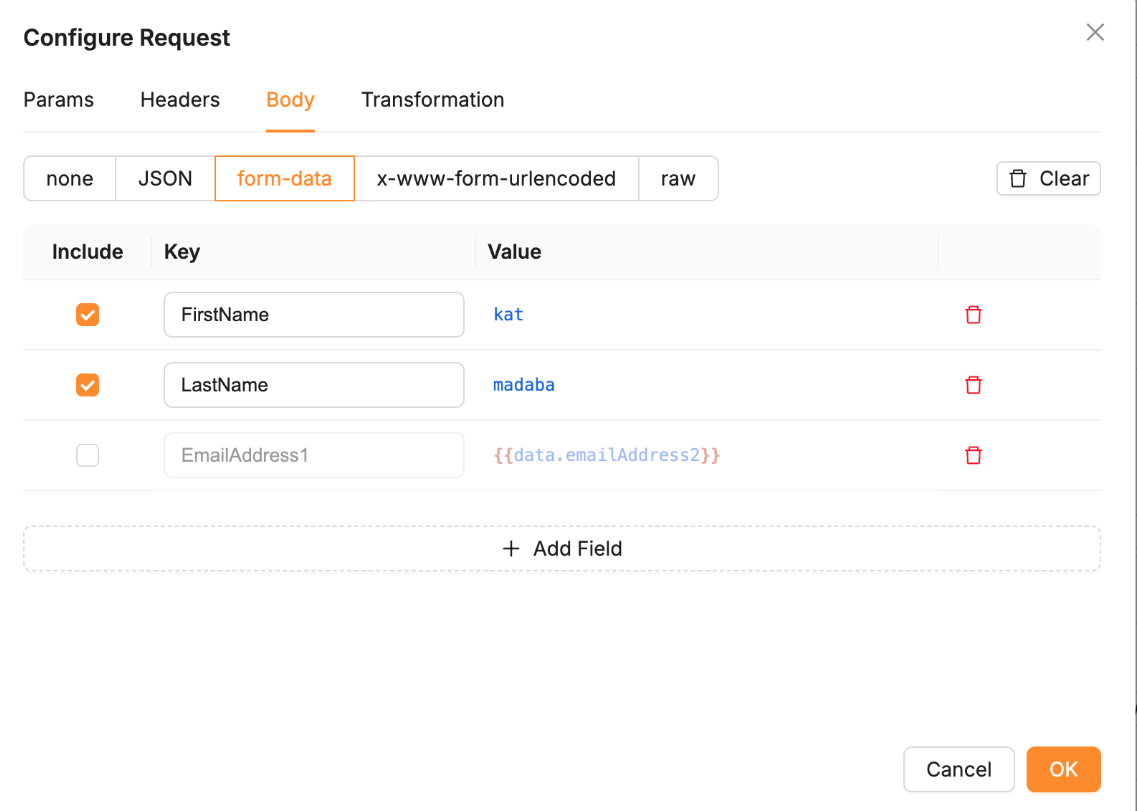
The Include checkbox on the left lets you toggle a field on or off without deleting it — handy for testing different combinations of fields. Only checked rows are actually sent. Click OK to save.
-
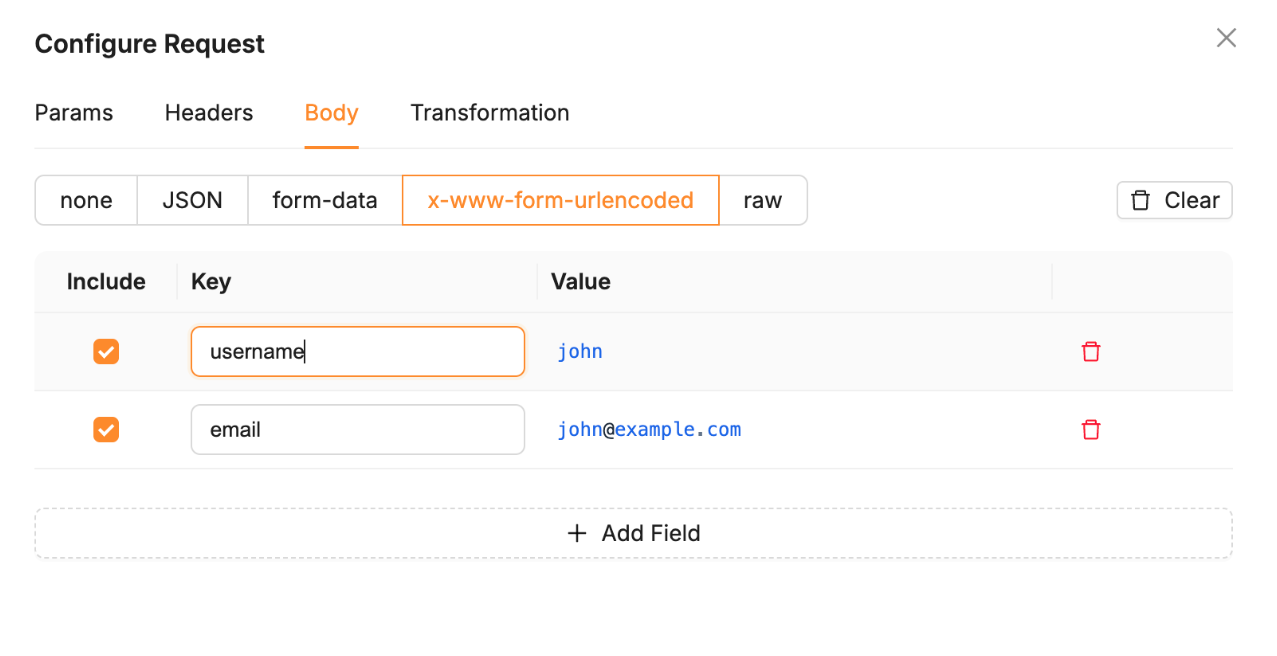
x-www-form-urlencoded — the same field-list UI as form-data, but sent as a URL-encoded form body instead of multipart.
-
raw — write a raw string body, with a sub-type of
text,json,xml, orhtml(Mustache-evaluated), orjavascript— where instead of a static value, you write a script whose return value becomes the payload.
Note: none of Shesha's own dynamic CRUD/app-service endpoints accept
x-www-form-urlencodedorrawbodies right now — they expect JSON. To practice these two body types, point the action at an external API that actually accepts that format (e.g. a public test endpoint likehttps://httpbin.org/post, or a third-party service that documentsx-www-form-urlencoded/raw support) rather than a Shesha endpoint in this codebase. The equivalent call on the command line is:curl -X POST https://httpbin.org/post \
-H "Content-Type: application/x-www-form-urlencoded" \
--data "username=john&email=john@example.com"
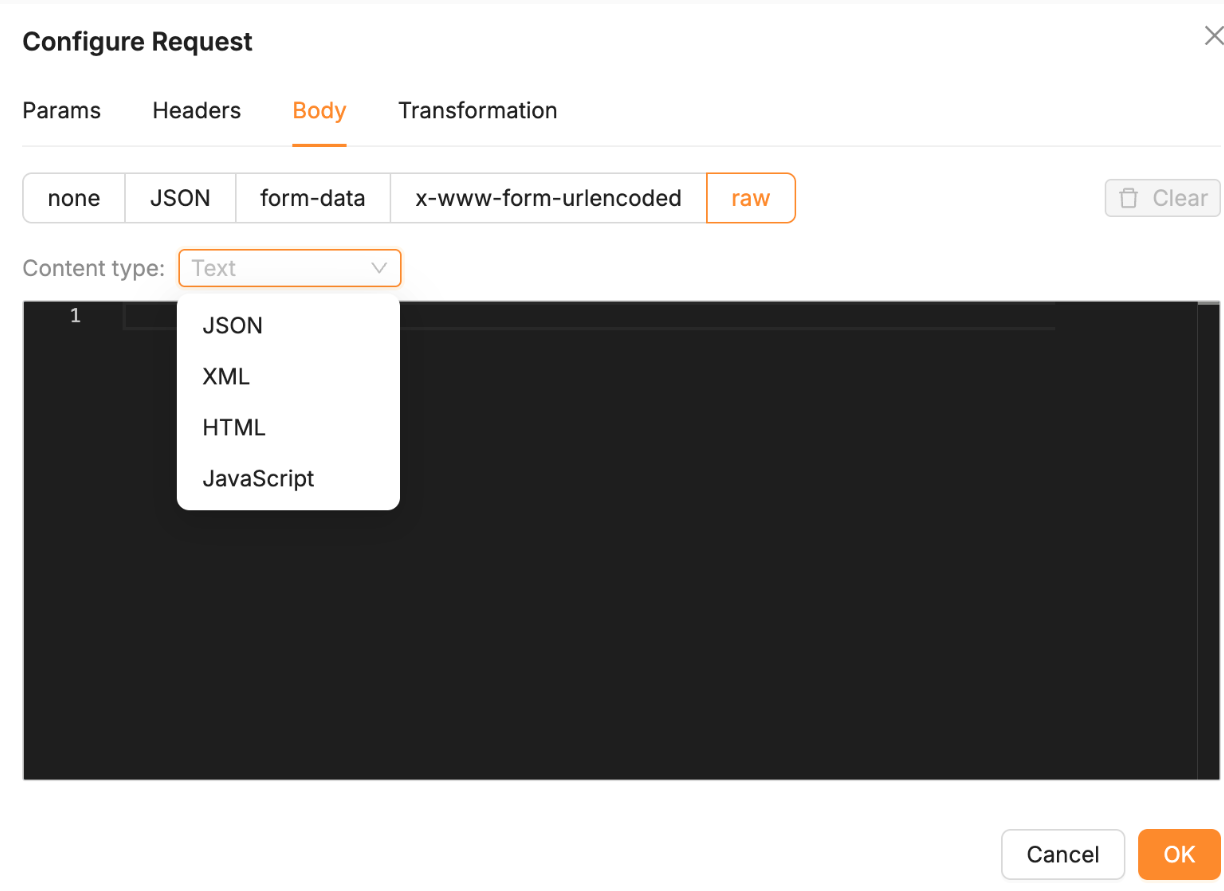
Understanding the raw body type
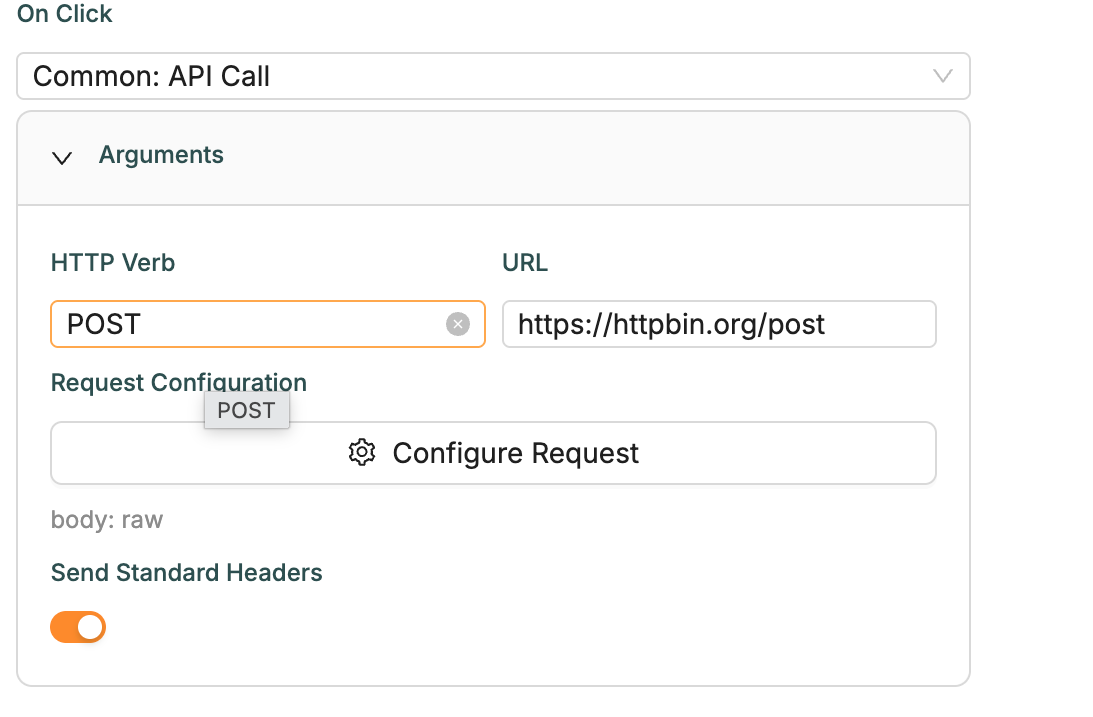
raw is different from the other options — instead of a structured,
field-based format (form-data's key/value rows, or JSON's fixed structure),
it sends the body as a plain string you fully control. Picking raw gives
you a sub-type selector: text, json, xml, html, or javascript.
That sub-type changes how the content you type is treated:
-
text/json/xml/html— the content is a static template. It's run through the same Mustache evaluation as everywhere else (so{{data.firstName}}gets replaced with real form data), then sent as-is. TheContent-Typeheader is set to match automatically (text/plain,application/json,application/xml,text/htmlrespectively) unless you've already set your ownContent-Typeon the Headers tab. This is handy when the JSON body tab's structured editor is too rigid — e.g. sending XML/HTML, or hand-assembling a JSON string with parts that don't map cleanly to fields.Try it yourself: HTTP Verb POST, URL
https://httpbin.org/post, Body tab →raw→ sub-type xml: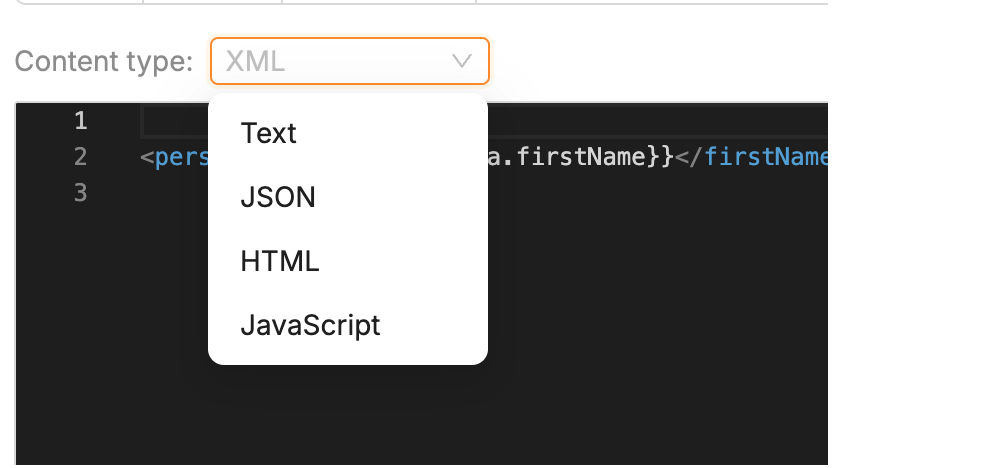
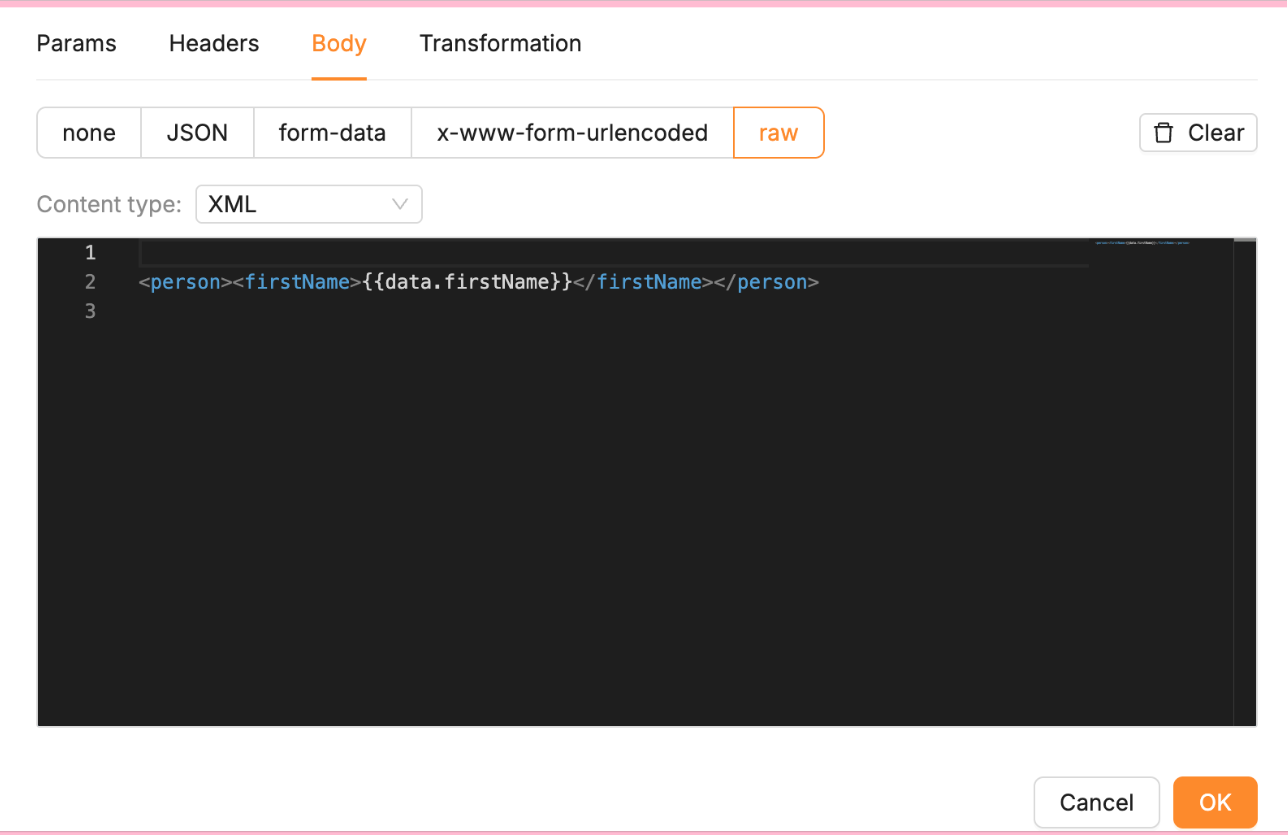
Run it → httpbin's response includes a
"data"key showing your Mustache already substituted with real form data (e.g.<person><firstName>kat</firstName></person>), and a"headers"key confirming"Content-Type": "application/xml"was set for you automatically — no manual header needed. -
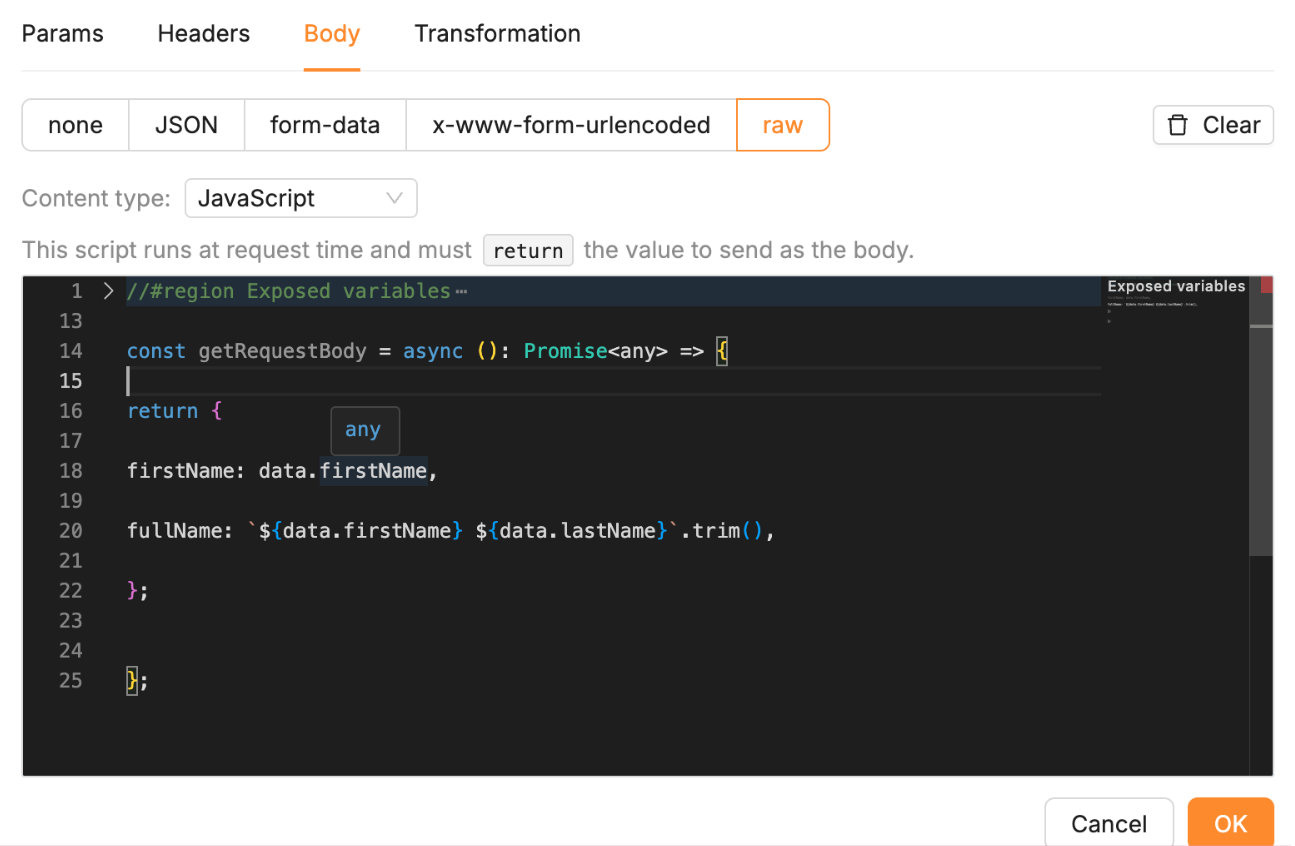
javascript— the content isn't a template at all, it's a script. It runs against the same live context as any other script in the form (data,form,application, etc.), and whatever itreturns becomes the request body. Return an object and it's serialized withContent-Type: application/jsonset automatically; return a string and that string is sent as-is.Try it yourself: same URL/verb as above, sub-type javascript:
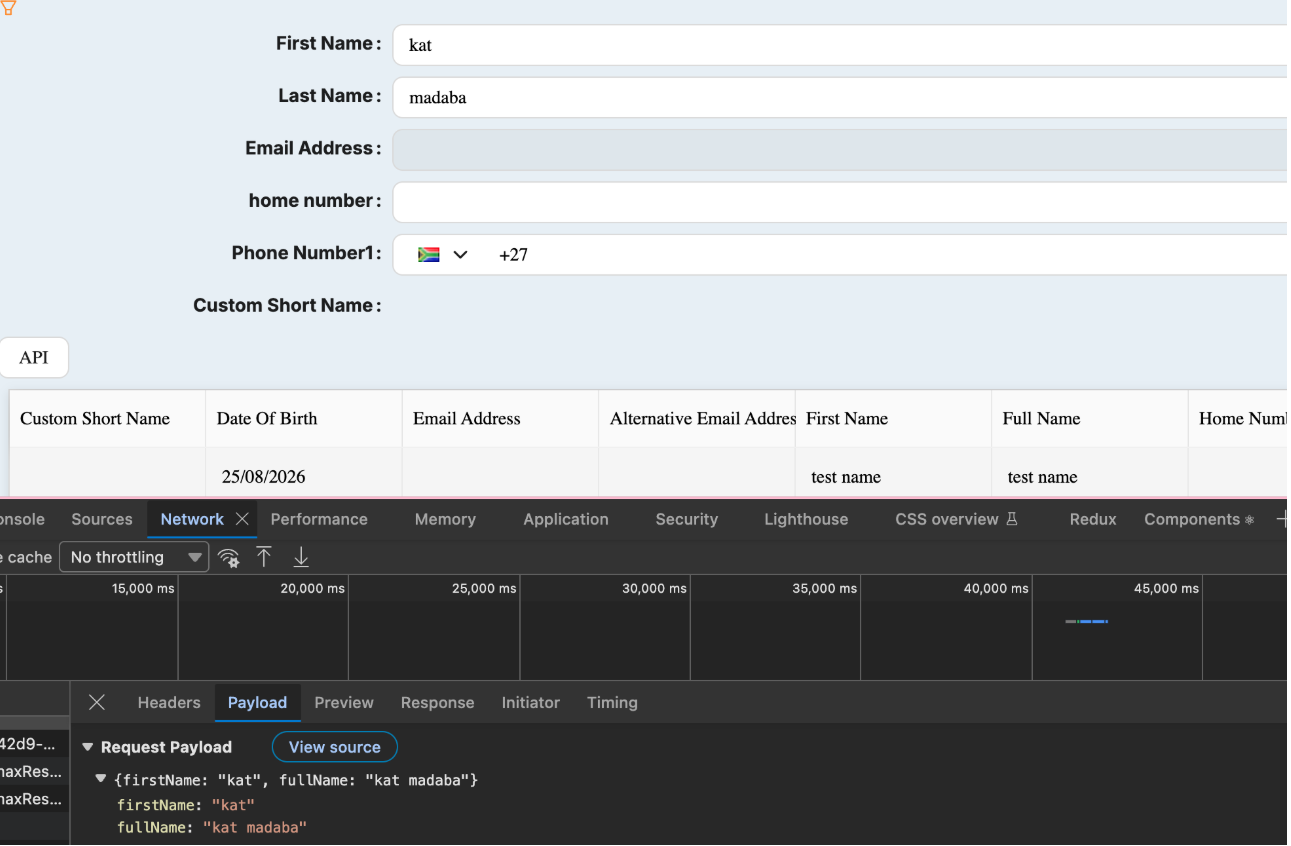

Run it → httpbin's
"json"key shows exactly the object your script returned (e.g.{"firstName": "kat", "fullName": "kat madaba"}), and"headers"confirmsContent-Type: application/json— proof it's the script's return value, not a static string, that became the payload.This is the most flexible body option — reach for it when the payload needs conditional logic or computed values that a static template can't express.
Whichever type you pick, Clear (top-right of the Body tab) resets it back
to none. And as with Step 3, always check the Network tab after saving to
confirm the actual payload matches what you configured — this is the fastest
way to catch a mistyped expression or a field that didn't get included.
Step 6: Transform the response
What is "Transformation"?
The fourth tab in Configure Request — alongside Params, Headers, and Body — is Transformation. Where the other three tabs shape the request going out, Transformation reshapes the response coming back, before anything else sees it.
There's no separate on/off switch — write a script in the tab's editor and it
runs automatically right after the call succeeds: the raw response (already
unwrapped from the backend's response envelope) is handed to your script as
response, along with the same globals every other script in the form gets
(data, form, application, etc.). Whatever your script returns
replaces the response — and that's the value everything downstream sees,
most importantly the onSuccess action's actionResponse.
If the script is left empty, or it throws an error, the original untransformed response is passed through unchanged (an error is only logged to the console) — so a bad script fails safe rather than breaking the call.
Try it yourself: deriving an email address and writing it onto the form
Continuing the Person Create example from Step 2 — trigger it once with the Transformation script still empty, then open your browser's DevTools Network tab and look at the response body. Shesha's dynamic CRUD endpoints wrap every response in an ABP envelope, so it looks like this:
{
  "result": {
    "id": "74d14b7f-b8b7-416e-9e04-9025d2063360",
    "firstName": "kat",
    "lastName": "madaba",
    "emailAddress1": null,
    "…": "…"
  },
  "success": true,
  "error": null
}
Important: by the time your transformation script runs, this envelope
has already been unwrapped for you — response in the script is
result directly. Writing response.data.firstName (treating response
as if it were the raw envelope) is a common mistake, and throws, since
there's no .data layer at this point.
In the Transformation tab:
-
Write a script that both derives an email address and writes it straight onto the visible
emailAddress1field: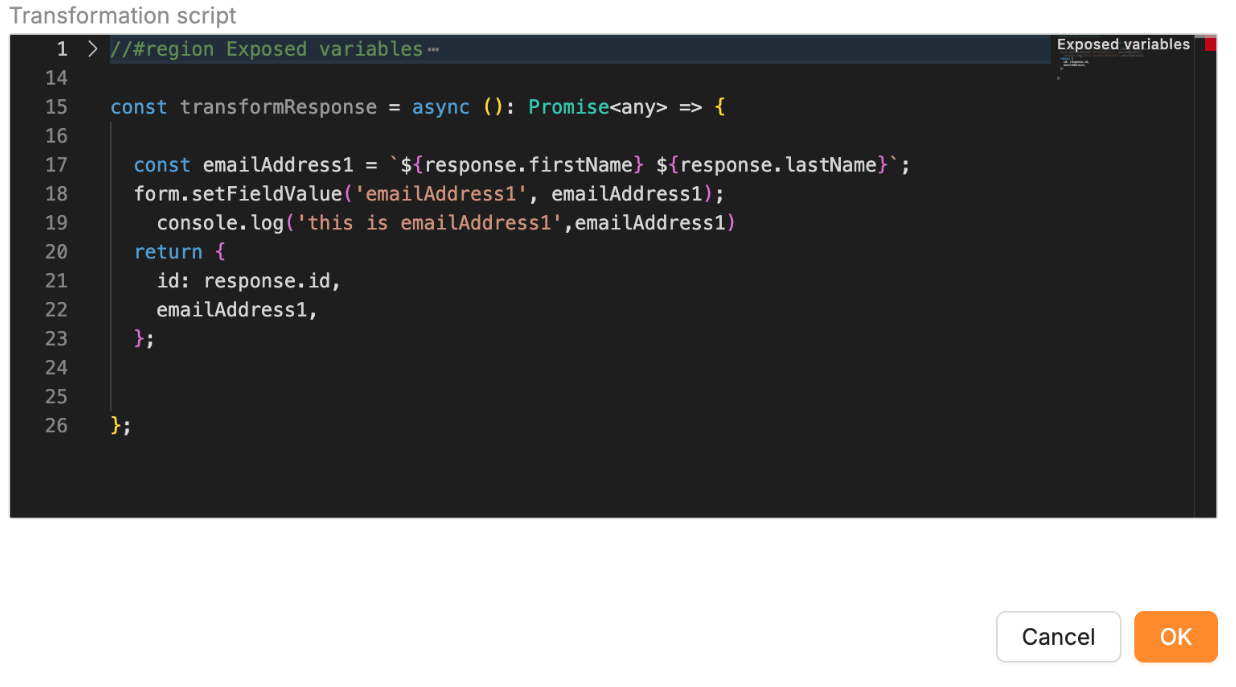
-
Click OK, then trigger the button.
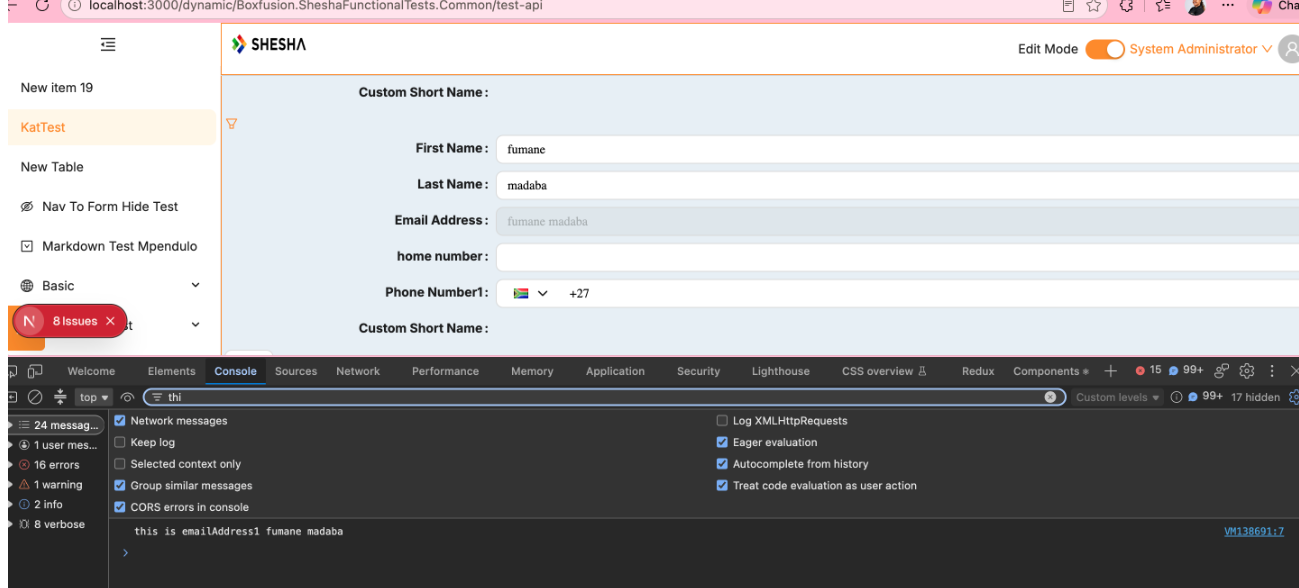
Two things to check, and one thing not to expect:
- The
emailAddress1field on the form should update immediately — that'sform.setFieldValue(...)at work. If it doesn't, double-check that'emailAddress1'is the exactpropertyNamebound to that field (its label isn't enough, and a mismatch fails silently, with no error at all). - Add a
console.log(...)after theform.setFieldValue(...)line and it should print in DevTools. If it doesn't, the line above it threw — check the console forResponse transformation failed, returning original response: <reason>, which names the actual failure. - The Network tab's response will still show the original, untransformed
payload — that's expected, not a bug. Transformation runs entirely in
application memory, after the browser has already recorded what came
over the wire; it only reshapes what flows onward to
actionResponse(and whatever your script does as a side effect, likesetFieldValue), never what DevTools shows actually happened on the network.
Returning a value still matters even when you're also using
setFieldValue: by the time onSuccess runs, actionResponse.emailAddress1
holds the same derived value — ready to reuse in a notification, a
follow-up API Call, or anywhere else that reads the action's result rather
than the form directly.
A more realistic example: summarizing a list response
String concatenation is the simplest case, but Transformation is a real
script — it can filter, map over arrays, and compute values, not just
stitch two fields together. Take a "Check for duplicate" button that calls
GET /api/dynamic/Shesha/Person/Crud/GetAll. A dynamic CRUD list response
looks like:
{
  "totalCount": 2,
  "items": [
    { "id": "…", "firstName": "Katleho", "lastName": "Madaba", "mobileNumber1": "0821234567", "emailAddress1": null },
    { "id": "…", "firstName": "Katleho", "lastName": "M", "mobileNumber1": null, "emailAddress1": "k.m@example.com" }
  ]
}
Rather than have onSuccess dig through items/totalCount itself, the
transformation script can boil that down into exactly what the rest of the
action needs:
return {
  hasDuplicate: response.totalCount > 0,
  matches: (response.items ?? []).map((person) => ({
    id: person.id,
    fullName: [person.firstName, person.lastName].filter(Boolean).join(' '),
    contact: person.mobileNumber1 || person.emailAddress1 || 'No contact info on file',
  })),
};
What this is doing, line by line:
hasDuplicate— a plain boolean, soonSuccesscan just checkactionResponse.hasDuplicateinstead of comparingtotalCountitself..map(...)— reshapes every raw person record in the list into a small, purpose-built object, rather than passing the whole entity through..filter(Boolean).join(' ')— safely builds a full name even if one of the name parts is missing, instead of producing"Katleho undefined".person.mobileNumber1 || person.emailAddress1 || '...'— picks whichever contact detail actually exists, with a sensible fallback if neither does.
onSuccess then only ever has to deal with the clean shape
(actionResponse.hasDuplicate, actionResponse.matches[i].fullName, …)
instead of re-deriving the same logic in every action that consumes this
call.