Application Settings
Application settings let you store configurable values — like feature flags, default numbers, API credentials, or complex option groups — that administrators can change at runtime without redeploying code. Think of them as a key-value store that is strongly typed, editable through the Shesha UI, and accessible from both back-end and front-end code.
When to use settings:
- You need a value that might change between environments or over time (e.g. a default debit day, an SLA duration, a toggle to enable/disable a feature).
- You want administrators to adjust behaviour from the Settings UI without involving a developer.
- You need user-specific preferences (e.g. notification frequency).
Key Concepts
Before diving in, here are the building blocks you'll work with:
| Concept | What it is |
|---|---|
| Setting accessor interface | A C# interface (extending ISettingAccessors) that declares your settings as strongly typed properties. By convention, each Shesha module has one accessor interface — see Organizing settings below. |
ISettingAccessor<T> | The property type for each setting. T is the data type — int, bool, string, or a custom class for compound settings. |
| Setting name | A unique string identifier for each setting (e.g. "Shesha.Membership.DebitDay"). |
| Module registration | A one-line call in your module's Initialize (or PreInitialize) method that tells Shesha about your settings and their default values. |
Organizing settings
Use a single setting accessor per module. Having one interface centralizes all your module's settings in one place, making them easy to find, inject, and maintain. Place it at:
YourModule.Domain/
  Configuration/
    IMembershipSettings.cs        ← accessor interface
    MembershipSettingNames.cs     ← setting name constants
    MembershipPaymentSettings.cs  ← compound setting classes (if any)
The naming convention is I{ModuleName}Settings.cs. For example, a module called Membership would have IMembershipSettings, a module called Leave would have ILeaveSettings, and so on.
You can create more than one accessor interface per module if you have a good reason — for example, separating global settings from user-specific settings, or isolating a large, self-contained feature area. But start with one and only split when a single interface becomes unwieldy.
Simple vs. compound settings
Shesha supports two styles of settings, and compound settings are generally preferred:
- Simple settings — a single primitive value (
int,string,bool). Good for standalone toggles or numbers that don't relate to other settings. - Compound settings — a custom class containing multiple related properties. This is the recommended approach for most cases because:
- Grouping — related values stay together (e.g. all payment-related settings in one object), making the code easier to understand.
- Efficiency — multiple related values are retrieved in a single call instead of one call per setting.
- Richer UI — compound settings use a custom editor form, giving you full control over the layout, validation, and user experience for administrators.
When in doubt, use a compound setting. Even if you start with just two or three related values, a compound setting scales better as requirements grow.
Creating a Simple Setting
A "simple" setting stores a single value — a number, a string, a boolean, etc. We'll walk through creating a Debit Day setting that controls which day of the month a membership payment is processed.
Step 1 — Define setting names
In your Domain layer, create a Configuration folder and add a class to hold your setting name constants:
namespace YourApp.Domain.Configuration
{
    public class MembershipSettingNames
    {
        public const string DebitDay = "Shesha.Membership.DebitDay";
    }
}
Using constants avoids typos and makes it easy to reference the same name everywhere.
Step 2 — Define the setting accessor interface
In the same Configuration folder, create an interface that extends ISettingAccessors. Each property represents one setting. Following the one-accessor-per-module convention, name it I{ModuleName}Settings:
using Shesha.Settings;
using System.ComponentModel;
using System.ComponentModel.DataAnnotations;

namespace YourApp.Domain.Configuration
{
    [Category("Membership")]
    public interface IMembershipSettings : ISettingAccessors
    {
        [Display(Name = "Debit day", Description = "Day of the month when membership payments are debited.")]
        [Setting(MembershipSettingNames.DebitDay)]
        ISettingAccessor<int> DebitDay { get; set; }
    }
}
What the attributes do:
| Attribute | Purpose |
|---|---|
[Category("Membership")] | Groups this setting under "Membership" in the Settings UI. Can be applied at the interface or property level. |
[Display(Name, Description)] | Sets the label and tooltip shown in the Settings UI. |
[Setting(...)] | Links the property to its unique setting name. Also supports optional flags — see Setting attribute options below. |
Step 3 — Register the accessor in your module
Open your module class (the class that extends SheshaModule) and register the setting accessor. This is also where you provide a default value:
public override void Initialize()
{
    var thisAssembly = Assembly.GetExecutingAssembly();
    IocManager.RegisterAssemblyByConvention(thisAssembly);

    // Register settings with default values
    IocManager.RegisterSettingAccessor<IMembershipSettings>(x =>
    {
        x.DebitDay.WithDefaultValue(1);
    });
}
The default value (1) is used when no value has been saved yet — in this case, payments default to the 1st of each month.
Step 4 — Verify in the UI
Run your back-end, then navigate to Configurations > Settings in the Shesha UI. You should see the new Debit day setting under the Membership category:
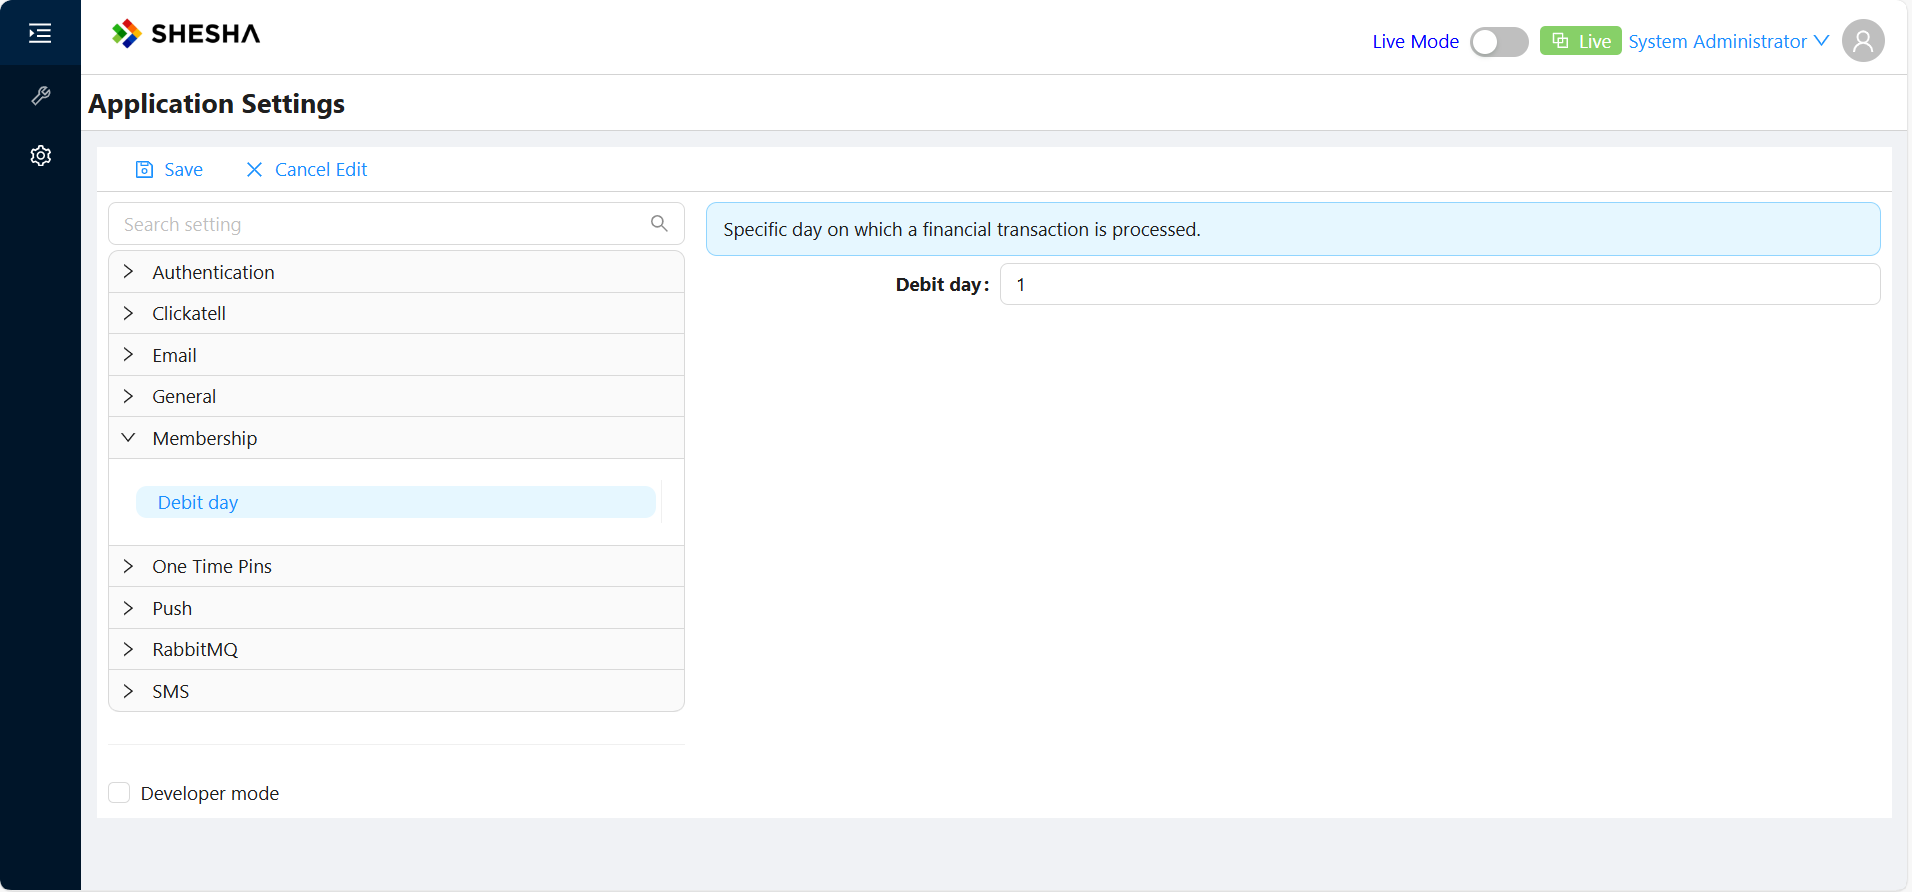
Setting values are managed here, in the Application Settings screen. This is separate from the Configuration Studio, where settings are defined (in code or configuration). Use the Studio to declare a setting, and this screen to view or change its value.
That's it — you have a working application setting.
Reading and Writing Settings in Back-End Code
To use a setting in your services or jobs, inject the accessor interface via constructor injection. Shesha auto-generates the implementation when you call RegisterSettingAccessor.
public class PaymentReminderJob
{
    private readonly IMembershipSettings _membershipSettings;

    public PaymentReminderJob(IMembershipSettings membershipSettings)
    {
        _membershipSettings = membershipSettings;
    }

    public async Task ProcessReminders()
    {
        // Read the current value
        var debitDay = await _membershipSettings.DebitDay.GetValueAsync();

        // Update the value
        await _membershipSettings.DebitDay.SetValueAsync(15);
    }
}
| Method | Description |
|---|---|
GetValueAsync() | Returns the stored value, or the default if none has been saved. |
SetValueAsync(value) | Saves a new value to the database. |
GetValue() | Synchronous version of GetValueAsync(). |
GetValueOrNullAsync() | Returns null instead of the default when no value has been saved. |
In most cases you'll use GetValueAsync and SetValueAsync. The synchronous and nullable variants exist for edge cases where async isn't available or you need to distinguish "not set" from "default".
Reading and Writing Settings on the Front-End
All registered settings are available in form script editors via the application.settings object. Settings are organized by module and group:
application.settings.[module].[group].[setting]
For example, to read and write the stars count setting from a module aliased as functionalTests with a group aliased as common:
const settings = application.settings.functionalTests.common;

// Read
const starsCount = await settings.starsCount.getValueAsync();

// Write
await settings.starsCount.setValueAsync(starsCount + 1);
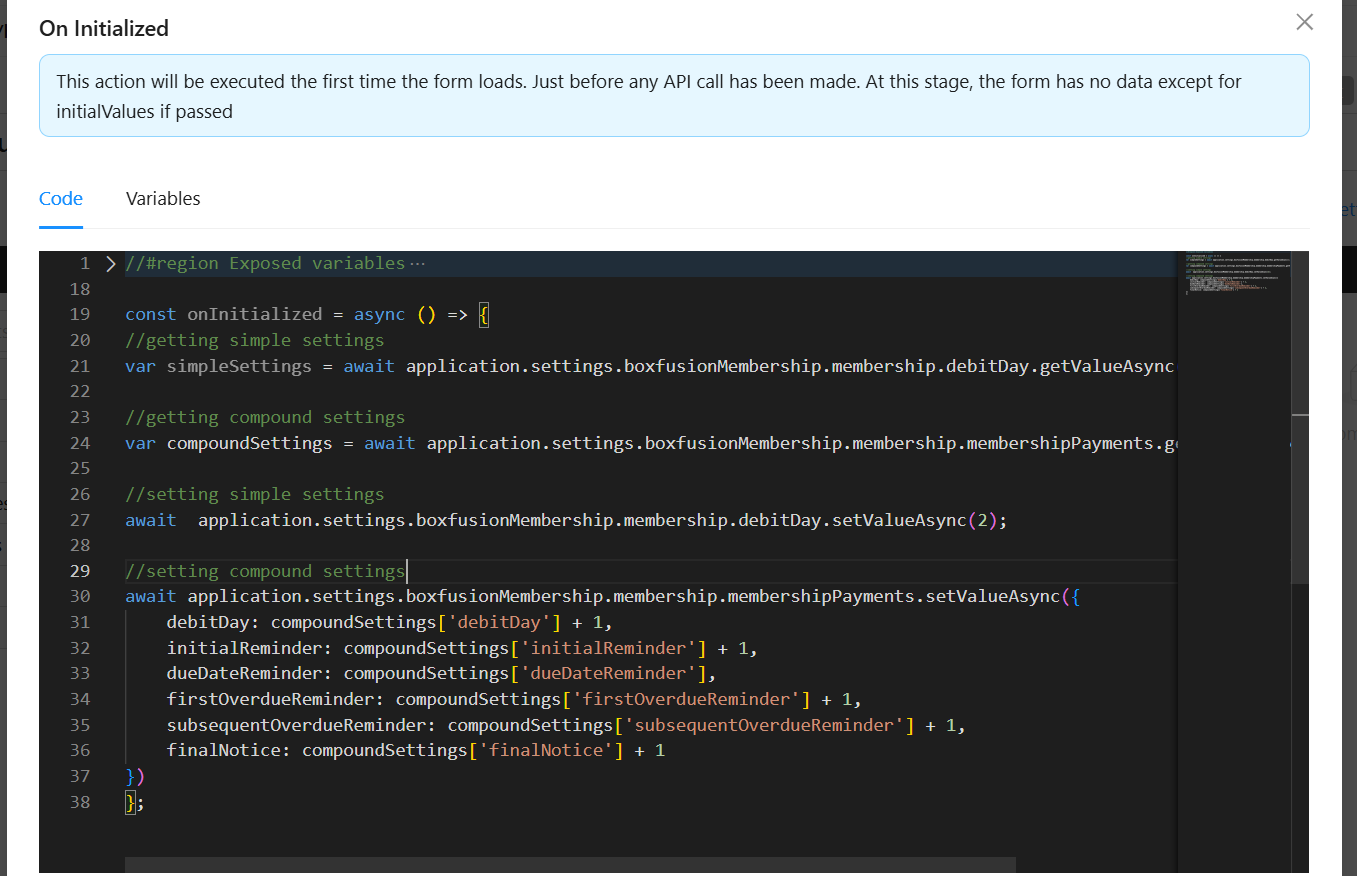
Simple-type settings (number, string, boolean) are strongly typed in the editor, so you get autocomplete and type checking.
- Module: uses the module's
Alias(if set), otherwise the module name in camelCase. - Group: uses the
[Alias]attribute on the interface (if set), otherwise the interface name without theIprefix andSettingssuffix, in camelCase. - Setting: uses the
[Alias]attribute on the property (if set), otherwise the property name in camelCase.
Compound Settings
Compound settings are the recommended approach for most settings in Shesha. Instead of defining many individual simple settings, you group related values into a single class. This keeps related configuration together, retrieves all values in one call, and lets you design a custom editor form for a better admin experience.
For example, rather than separate simple settings for a debit day, reminder intervals, and toggle flags, you define a single MembershipPaymentSettings class that holds all of them.
Step 1 — Create the settings class
Place this in your Configuration folder alongside the accessor interface:
namespace YourApp.Domain.Configuration
{
    public class MembershipPaymentSettings
    {
        /// <summary>
        /// Day of the month when payments are debited.
        /// </summary>
        public int DebitDay { get; set; }

        /// <summary>
        /// Days before the due date to send the initial reminder.
        /// </summary>
        public int InitialReminder { get; set; }

        /// <summary>
        /// Whether to send a reminder on the due date itself.
        /// </summary>
        public bool DueDateReminder { get; set; }

        /// <summary>
        /// Days after the due date to send the first overdue reminder.
        /// </summary>
        public int FirstOverdueReminder { get; set; }

        /// <summary>
        /// Interval in days between subsequent overdue reminders.
        /// </summary>
        public int SubsequentOverdueReminder { get; set; }

        /// <summary>
        /// Days after which a final notice is sent.
        /// </summary>
        public int FinalNotice { get; set; }
    }
}
Step 2 — Add the setting name and accessor property
Add a new constant to your existing setting names class:
public class MembershipSettingNames
{
    public const string DebitDay = "Shesha.Membership.DebitDay";
    public const string MembershipPayments = "Shesha.Membership.Payments";
}
Add the compound setting as a new property on your existing IMembershipSettings interface (keeping everything in one accessor per module). Note the EditorFormName — this tells Shesha which configurable form to use as the editor for this compound setting:
[Category("Membership")]
public interface IMembershipSettings : ISettingAccessors
{
    [Display(Name = "Debit day", Description = "Day of the month when membership payments are debited.")]
    [Setting(MembershipSettingNames.DebitDay)]
    ISettingAccessor<int> DebitDay { get; set; }

    [Display(Name = "Membership Payments", Description = "Payment debit days and reminder frequencies.")]
    [Setting(MembershipSettingNames.MembershipPayments, EditorFormName = "membership-payment-settings")]
    ISettingAccessor<MembershipPaymentSettings> MembershipPayments { get; set; }
}
Step 3 — Register with default values
IocManager.RegisterSettingAccessor<IMembershipSettings>(x =>
{
    x.DebitDay.WithDefaultValue(1);
    x.MembershipPayments.WithDefaultValue(new MembershipPaymentSettings
    {
        DebitDay = 1,
        InitialReminder = 3,
        DueDateReminder = true,
        FirstOverdueReminder = 1,
        SubsequentOverdueReminder = 7,
        FinalNotice = 30
    });
});
Step 4 — Create the editor form
For compound settings, you need a configurable form in Shesha whose form name matches the EditorFormName you specified (membership-payment-settings in this example).
-
Create a new form and set its name to
membership-payment-settings: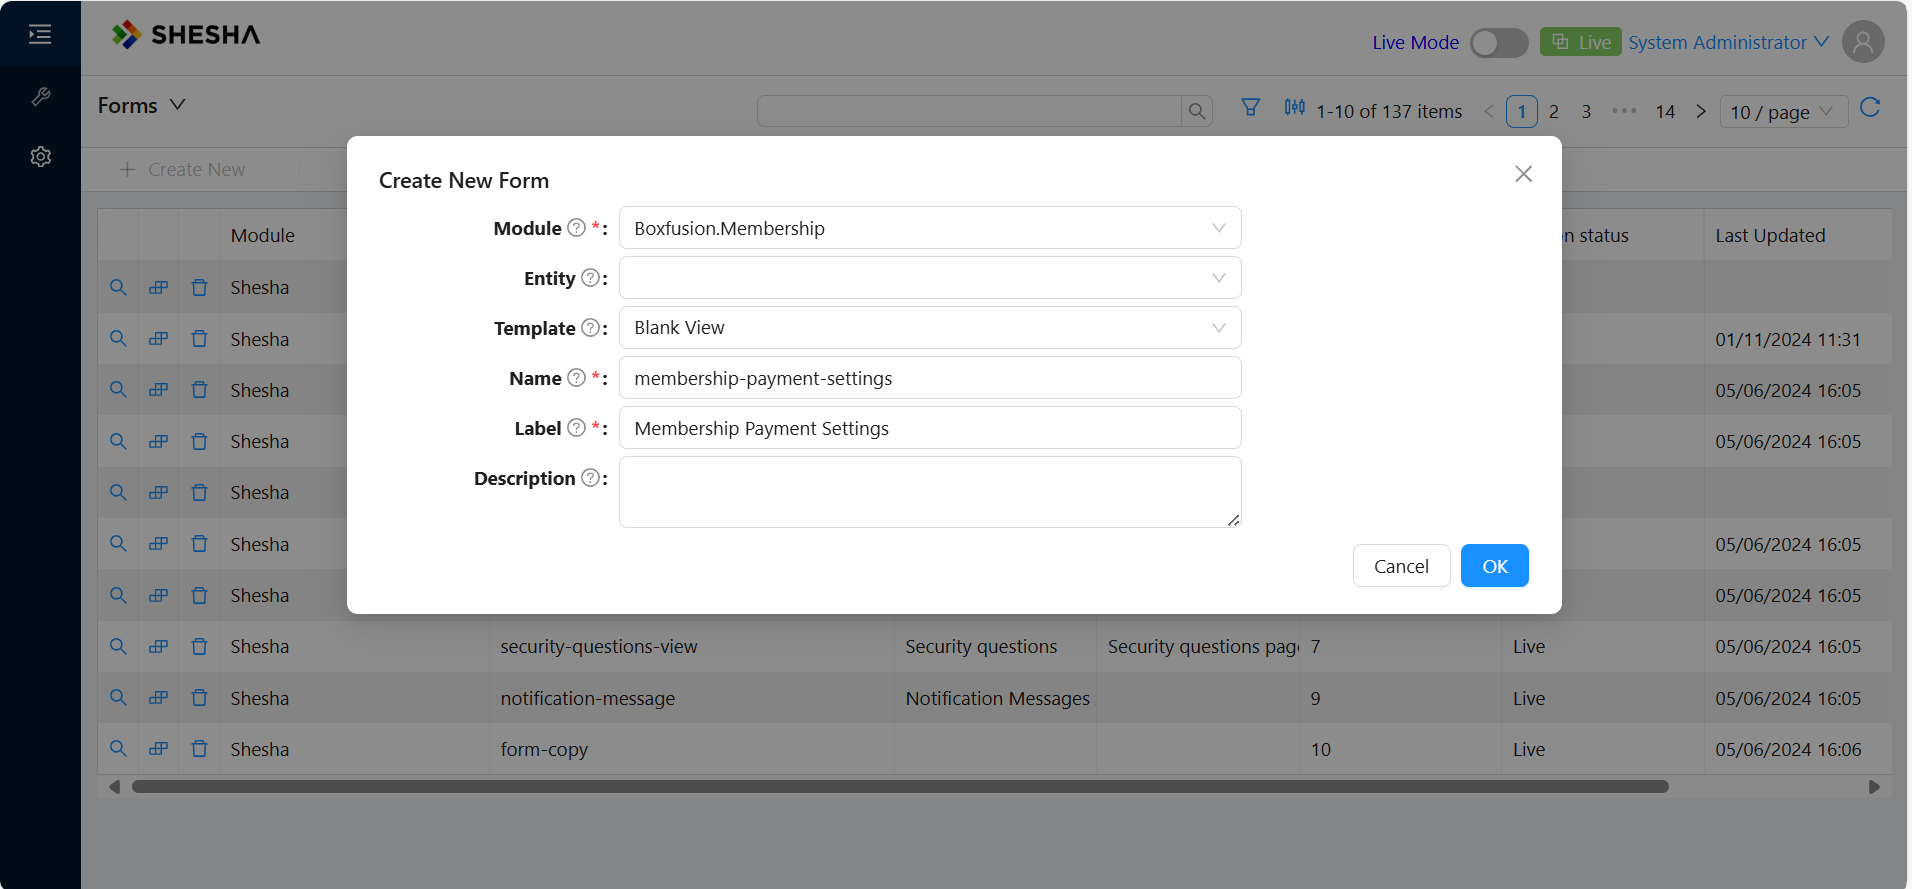
-
Add form fields for each property in
MembershipPaymentSettings. Use camelCase for the property names (e.g.debitDay,initialReminder) and add descriptions so administrators understand what each field does: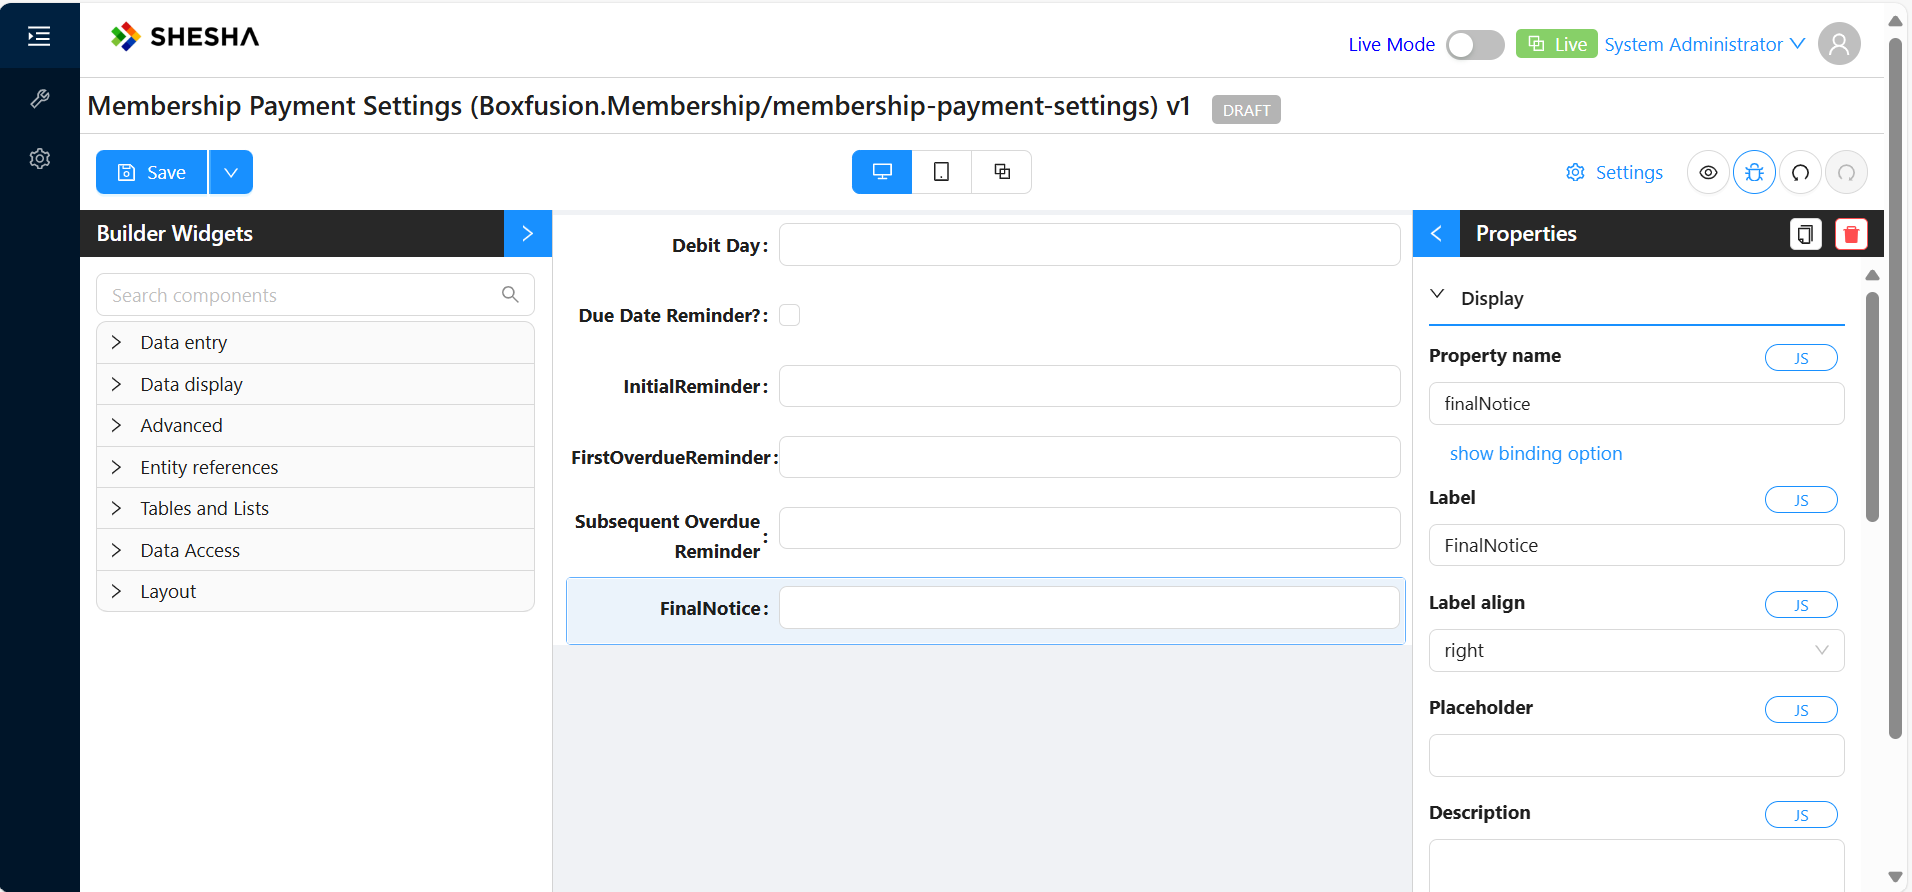
-
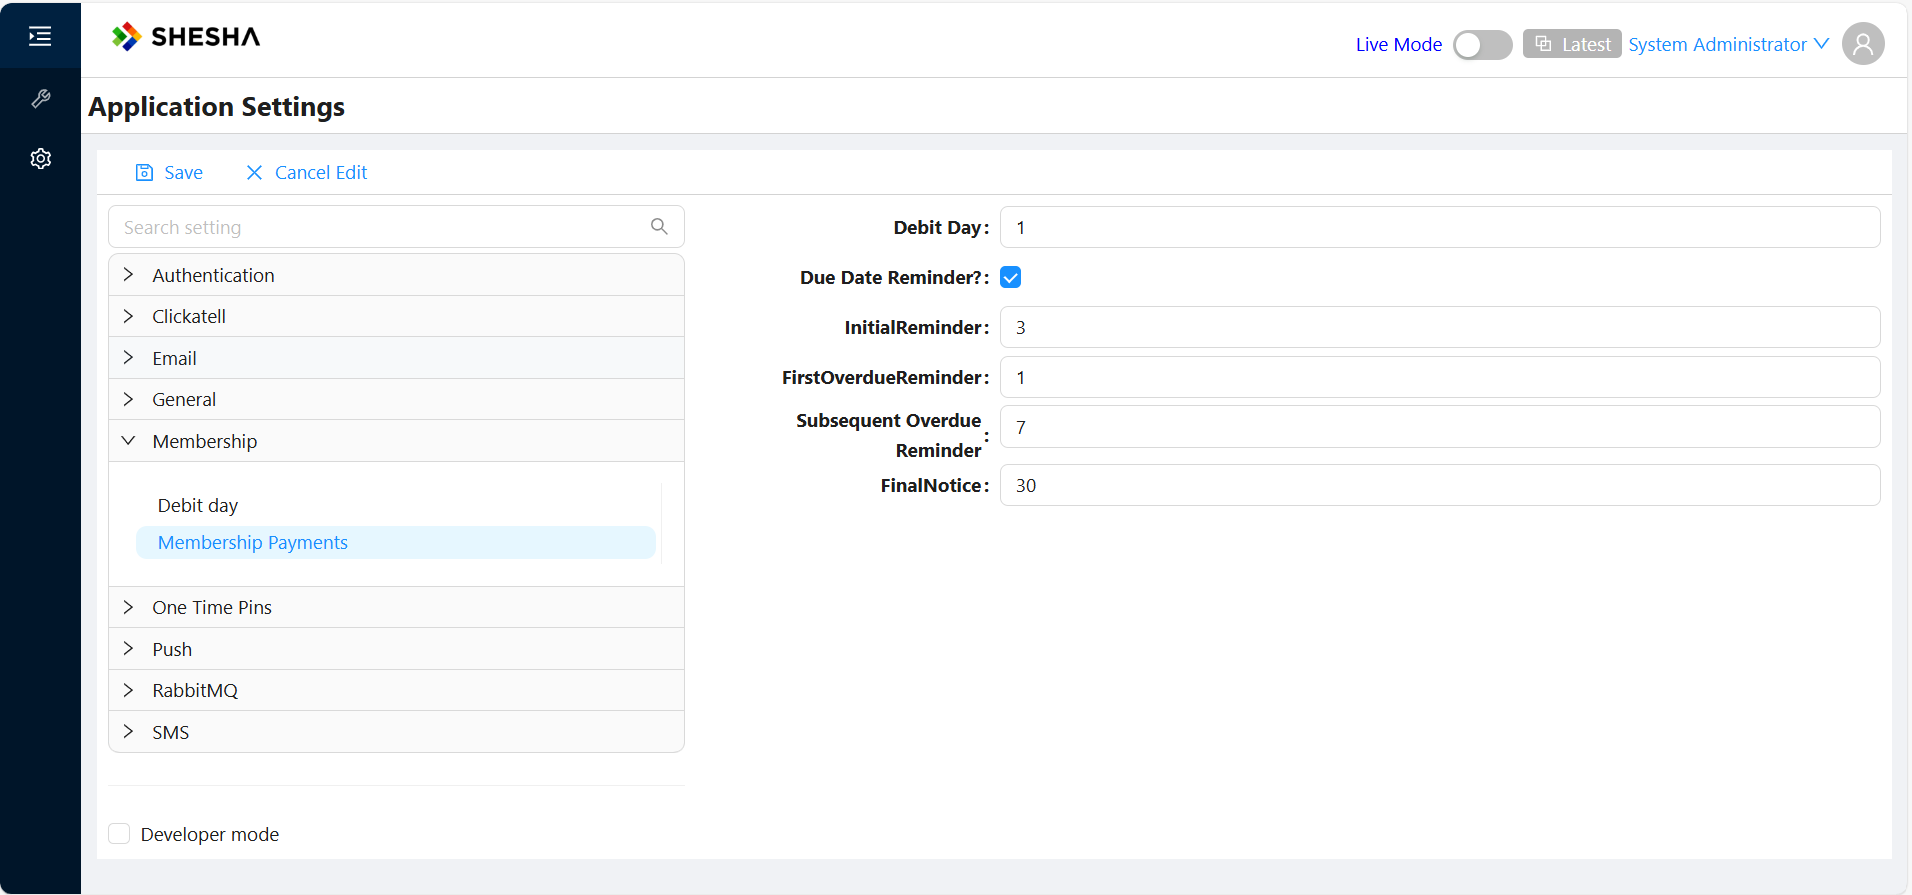
Navigate to Configurations > Settings to see your compound setting:
Reading and writing compound settings in code
// Read — returns the full object
var paymentSettings = await _membershipSettings.MembershipPayments.GetValueAsync();
var finalNotice = paymentSettings.FinalNotice;

// Write — pass a new instance with updated values
await _membershipSettings.MembershipPayments.SetValueAsync(new MembershipPaymentSettings
{
    DebitDay = paymentSettings.DebitDay,
    InitialReminder = paymentSettings.InitialReminder + 1,
    DueDateReminder = paymentSettings.DueDateReminder,
    FirstOverdueReminder = paymentSettings.FirstOverdueReminder,
    SubsequentOverdueReminder = paymentSettings.SubsequentOverdueReminder,
    FinalNotice = paymentSettings.FinalNotice
});
User-Specific Settings
By default, settings are global — they apply to the entire application. Shesha also supports user-specific settings that store a separate value per user. This is useful for personal preferences like notification frequency or UI preferences.
Defining user-specific settings
The process is the same as global settings, with one addition: set IsUserSpecific = true on the [Setting] attribute.
public class UserSettingNames
{
    public const string NotificationFrequency = "Shesha.User.NotificationFrequency";
    public const string EnablePushNotifications = "Shesha.User.EnablePushNotifications";
}

[Category("Notification Preferences")]
public interface IUserNotificationPreferenceSettings : ISettingAccessors
{
    [Display(Name = "Notification Frequency",
             Description = "How often the user receives email updates (e.g. daily, weekly, instant).")]
    [Setting(UserSettingNames.NotificationFrequency, IsUserSpecific = true)]
    ISettingAccessor<string> NotificationFrequency { get; set; }

    [Display(Name = "Enable Push Notifications",
             Description = "Whether push notifications are enabled for this user.")]
    [Setting(UserSettingNames.EnablePushNotifications, IsUserSpecific = true)]
    ISettingAccessor<bool> EnablePushNotifications { get; set; }
}
Register with defaults as usual:
IocManager.RegisterSettingAccessor<IUserNotificationPreferenceSettings>(x =>
{
    x.NotificationFrequency.WithDefaultValue("Weekly");
    x.EnablePushNotifications.WithDefaultValue(true);
});
Reading and writing user-specific settings in back-end code works exactly the same way (GetValueAsync / SetValueAsync) — Shesha automatically scopes the value to the current user.
Front-end API for user settings
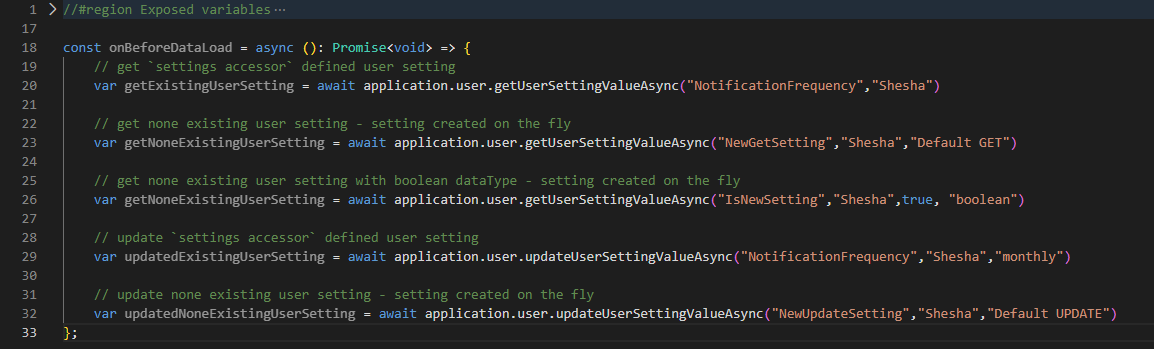
User settings are accessible via the application.user object in form script editors:
// Read a user setting
const frequency = await application.user.getUserSettingValueAsync(
    "NotificationFrequency",  // setting name
    "Shesha.User",            // module name
    "Weekly"                  // default value (optional)
);

// Update a user setting
await application.user.updateUserSettingValueAsync(
    "NotificationFrequency",
    "Shesha.User",
    "Daily"
);
REST API endpoints
If you need to call the API directly (e.g. from a custom front-end):
| Action | Method | URL | Key Parameters |
|---|---|---|---|
| Get value | GET | /api/services/app/Settings/GetUserValue | moduleName, settingName, defaultValue (optional), dataType (optional) |
| Update value | POST | /api/services/app/Settings/UpdateUserValue | moduleName, settingName, defaultValue, dataType (optional) |
Both endpoints automatically create the setting for the user if it doesn't exist yet, using the provided default or the registered default.
Deploying Settings Across Environments (Configuration Migrations)
When you configure a compound setting's editor form in one environment (e.g. dev), you'll want to deploy it to other environments (test, QA, production) without manual re-creation.
-
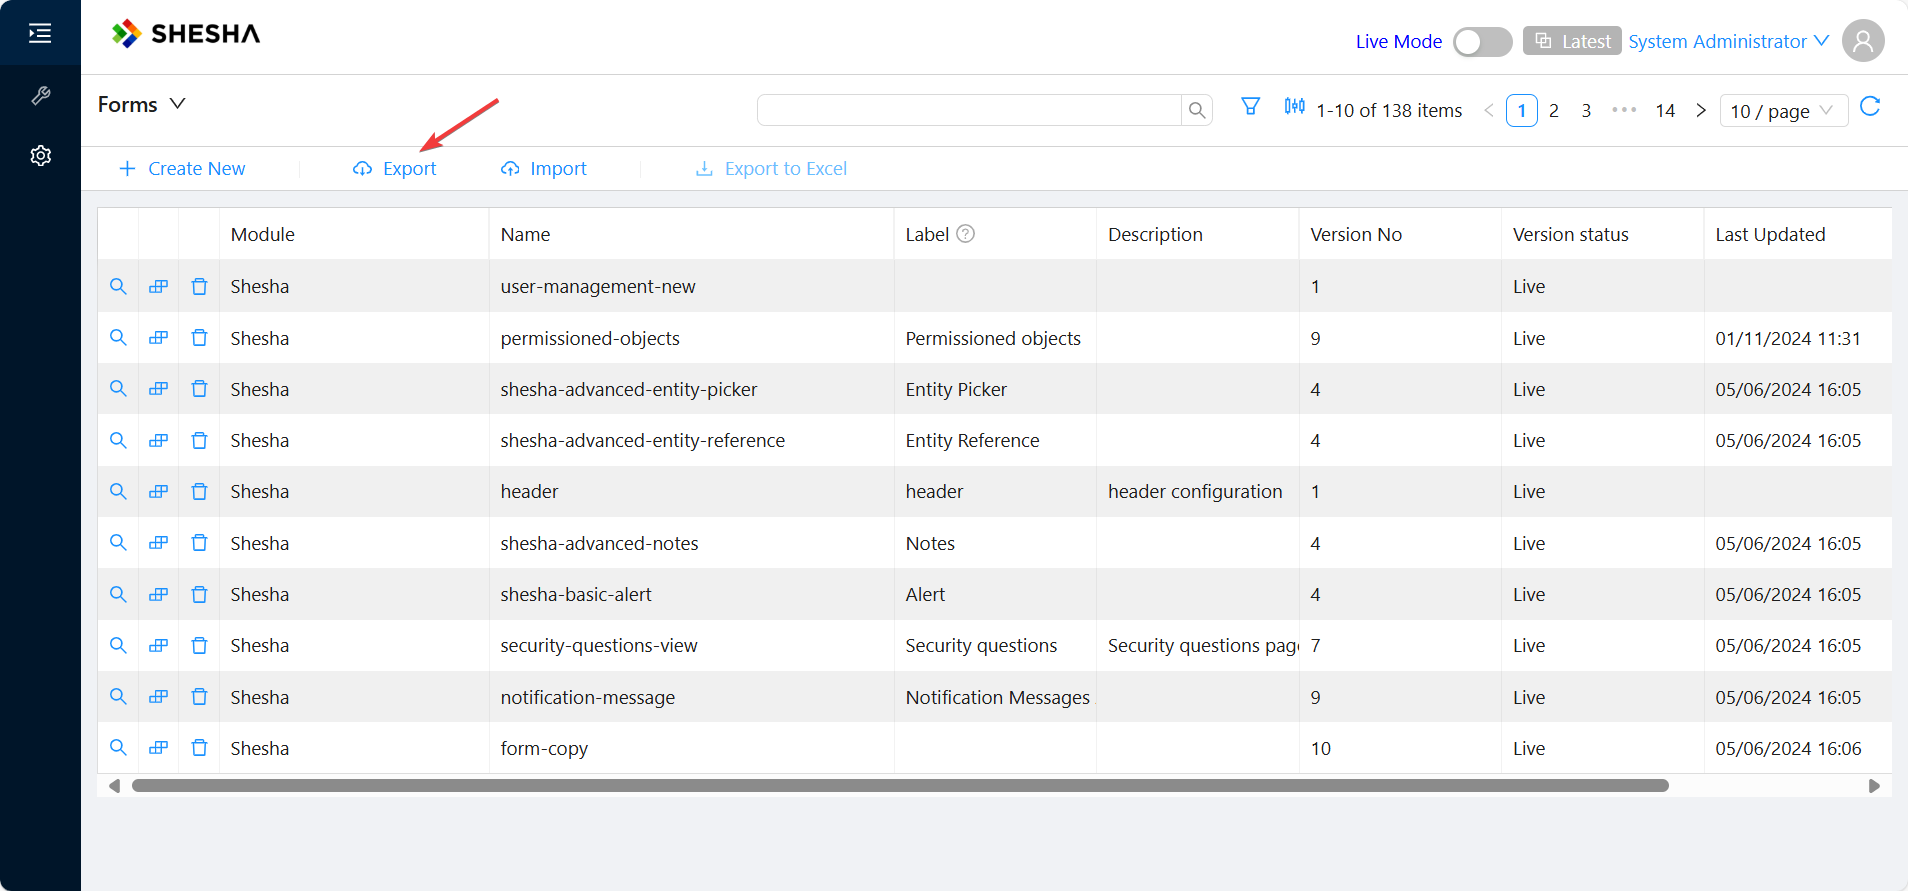
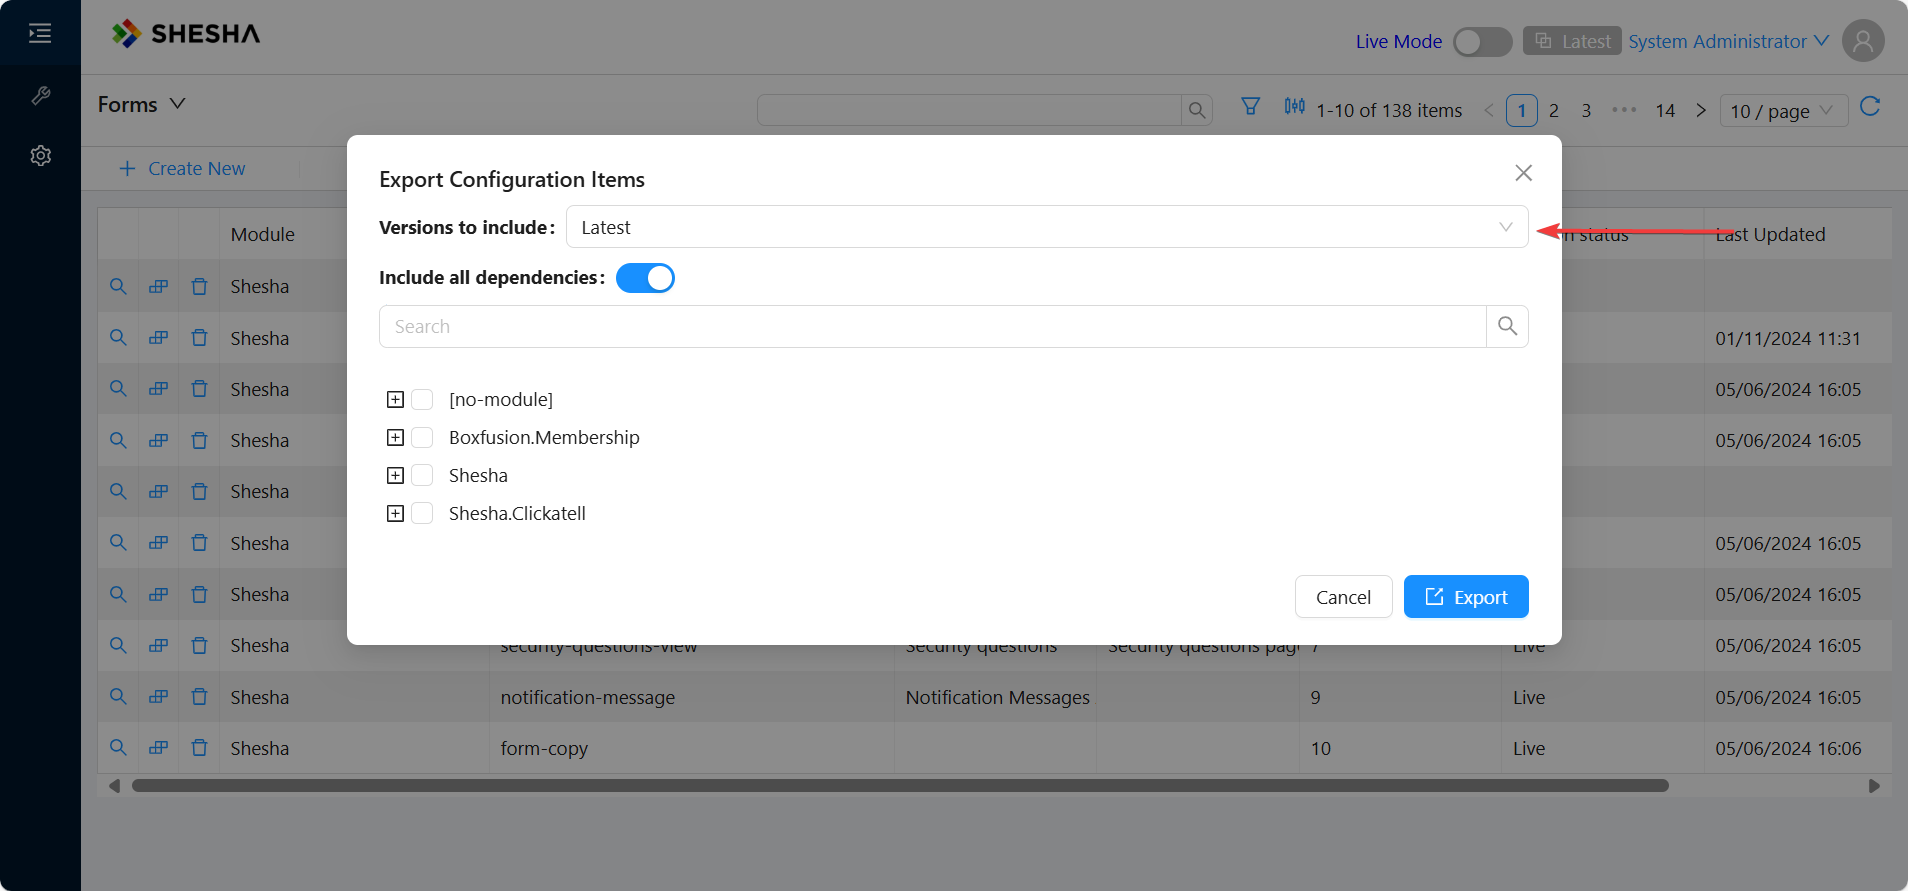
Navigate to Forms, click Export, and select the version to export (use "Latest" if you haven't published yet):
-
Select your module and form (e.g.
membership-payment-settings), then click Export: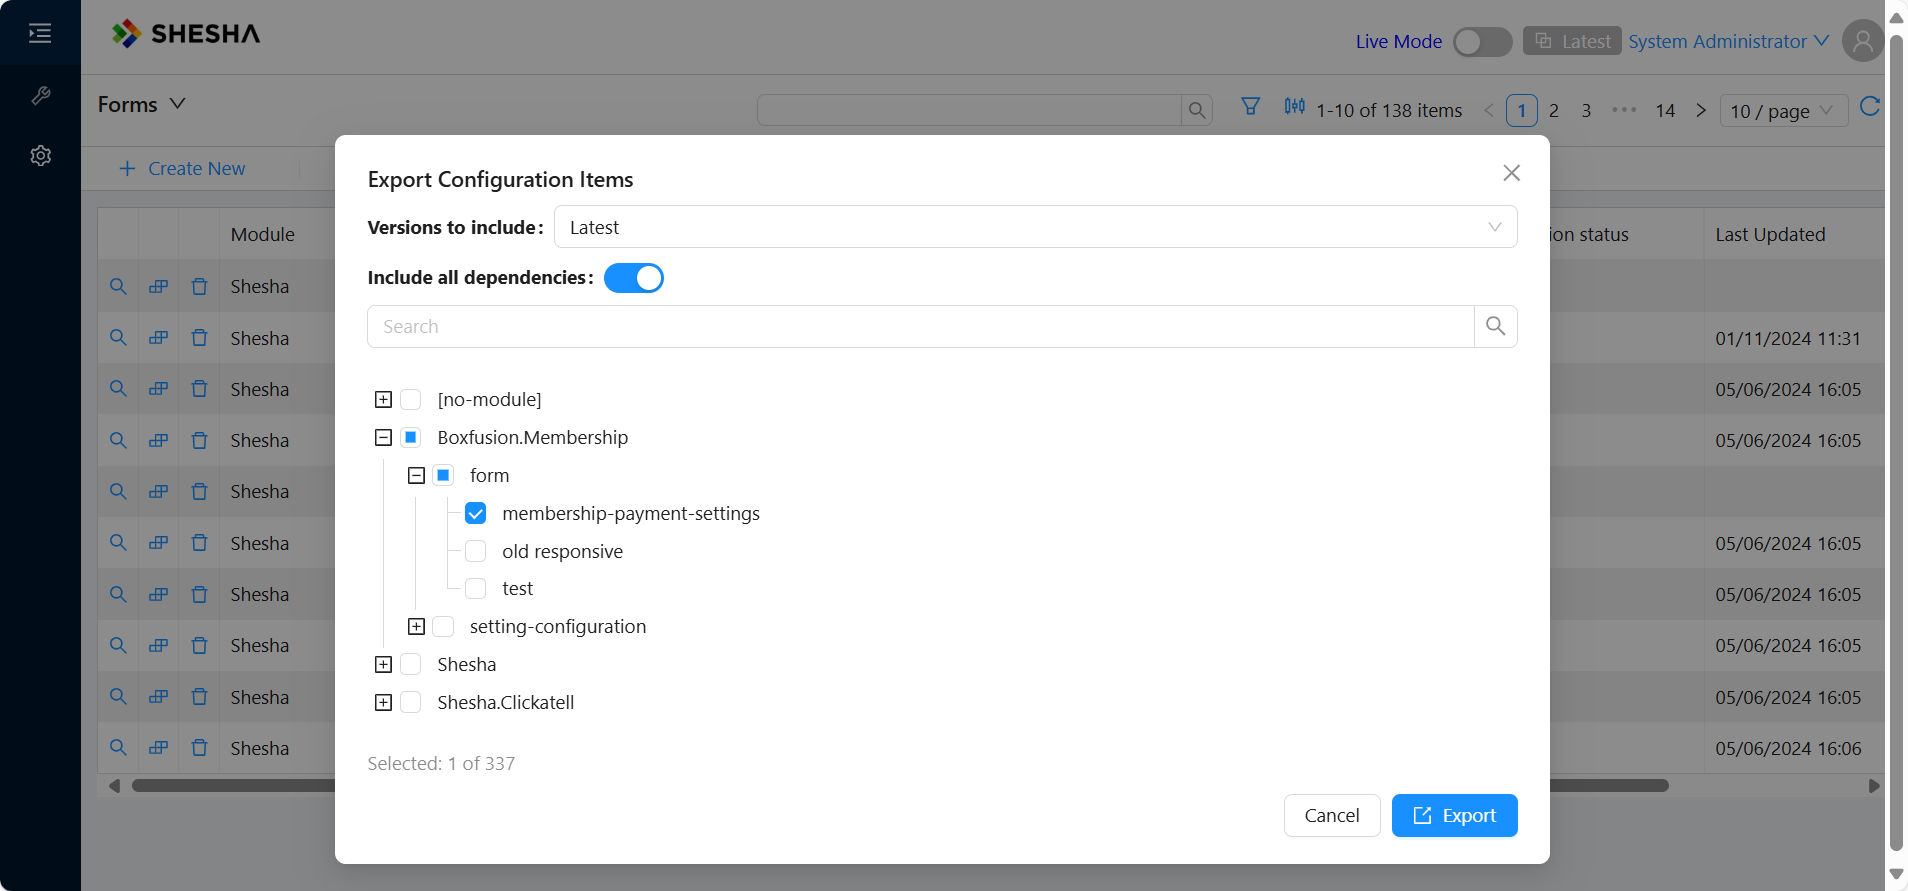
-
This downloads a
.shaconfigfile containing the form configuration as JSON: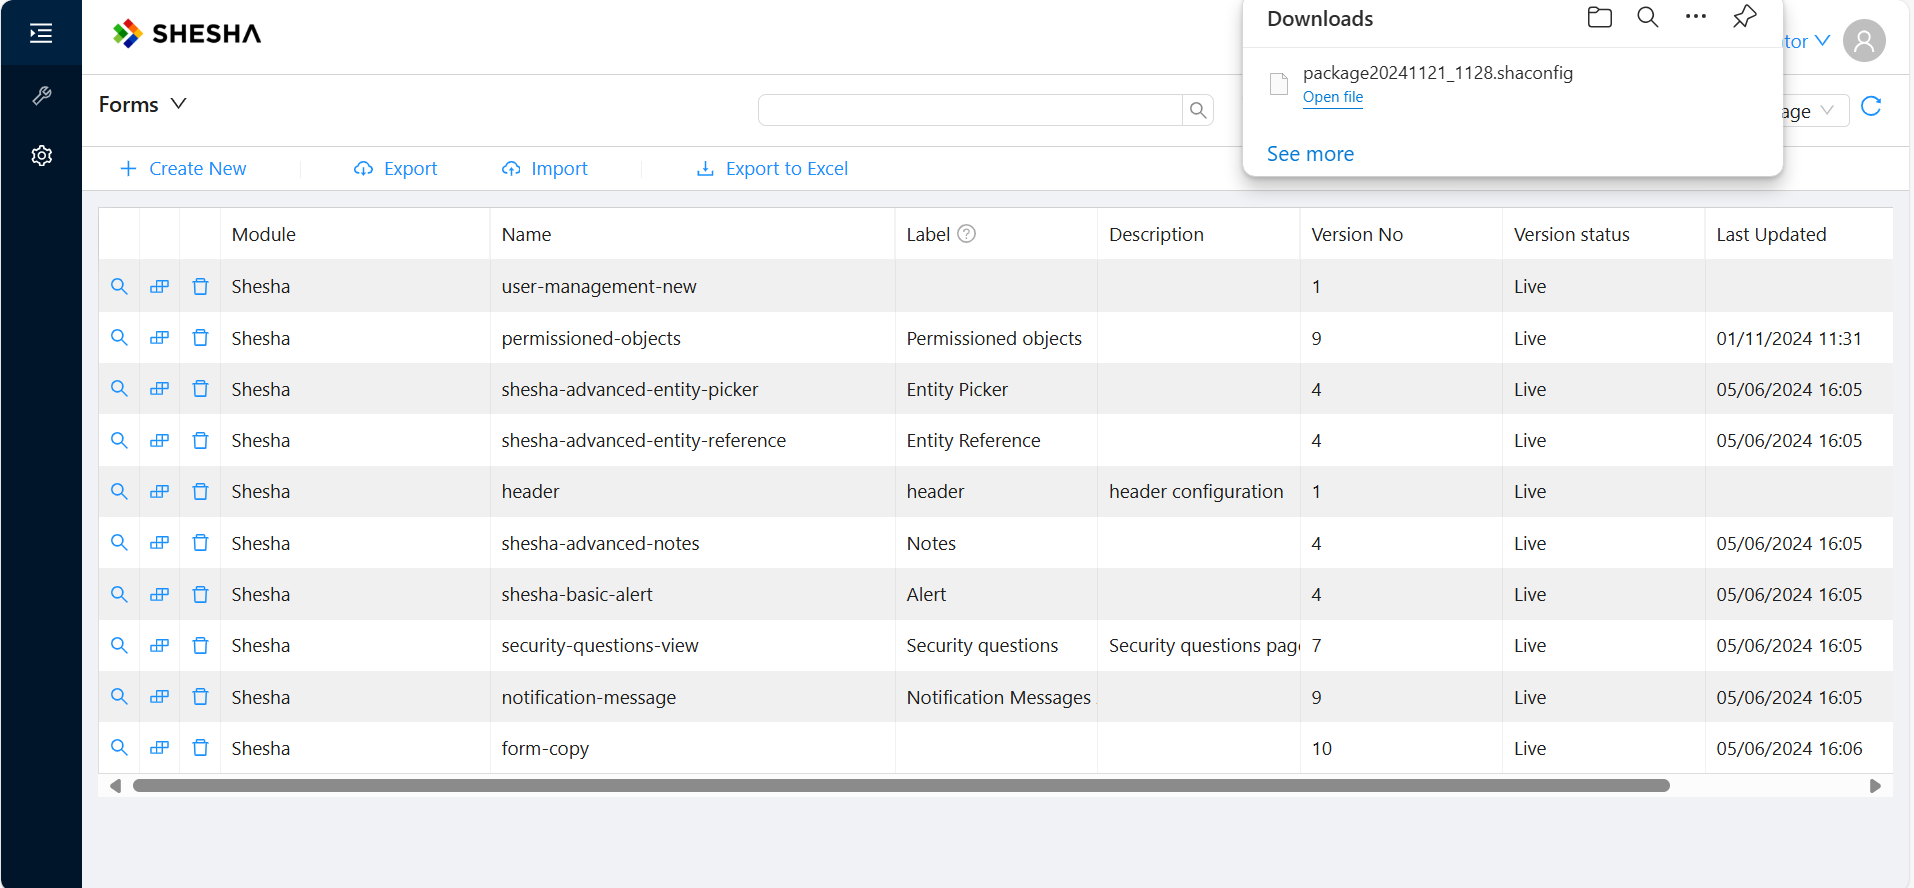
-
In your back-end Application layer, create a
ConfigMigrationsfolder and add the.shaconfigfile: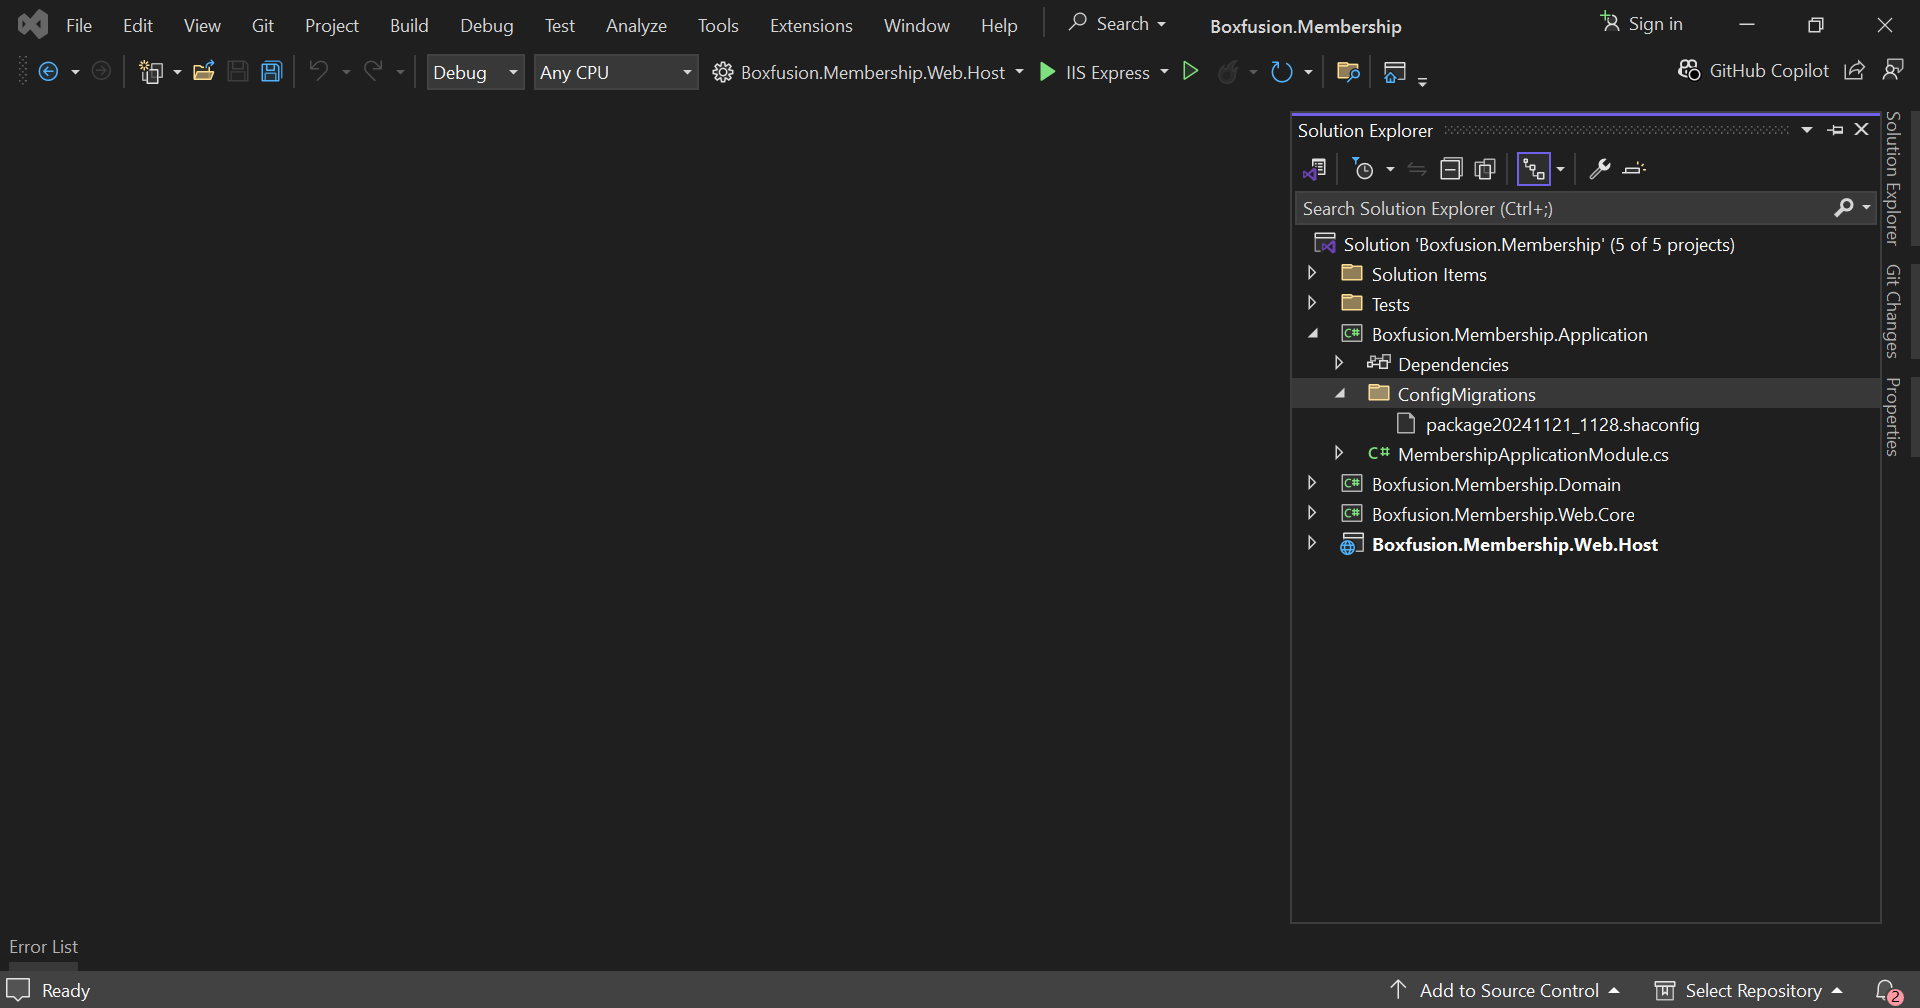
-
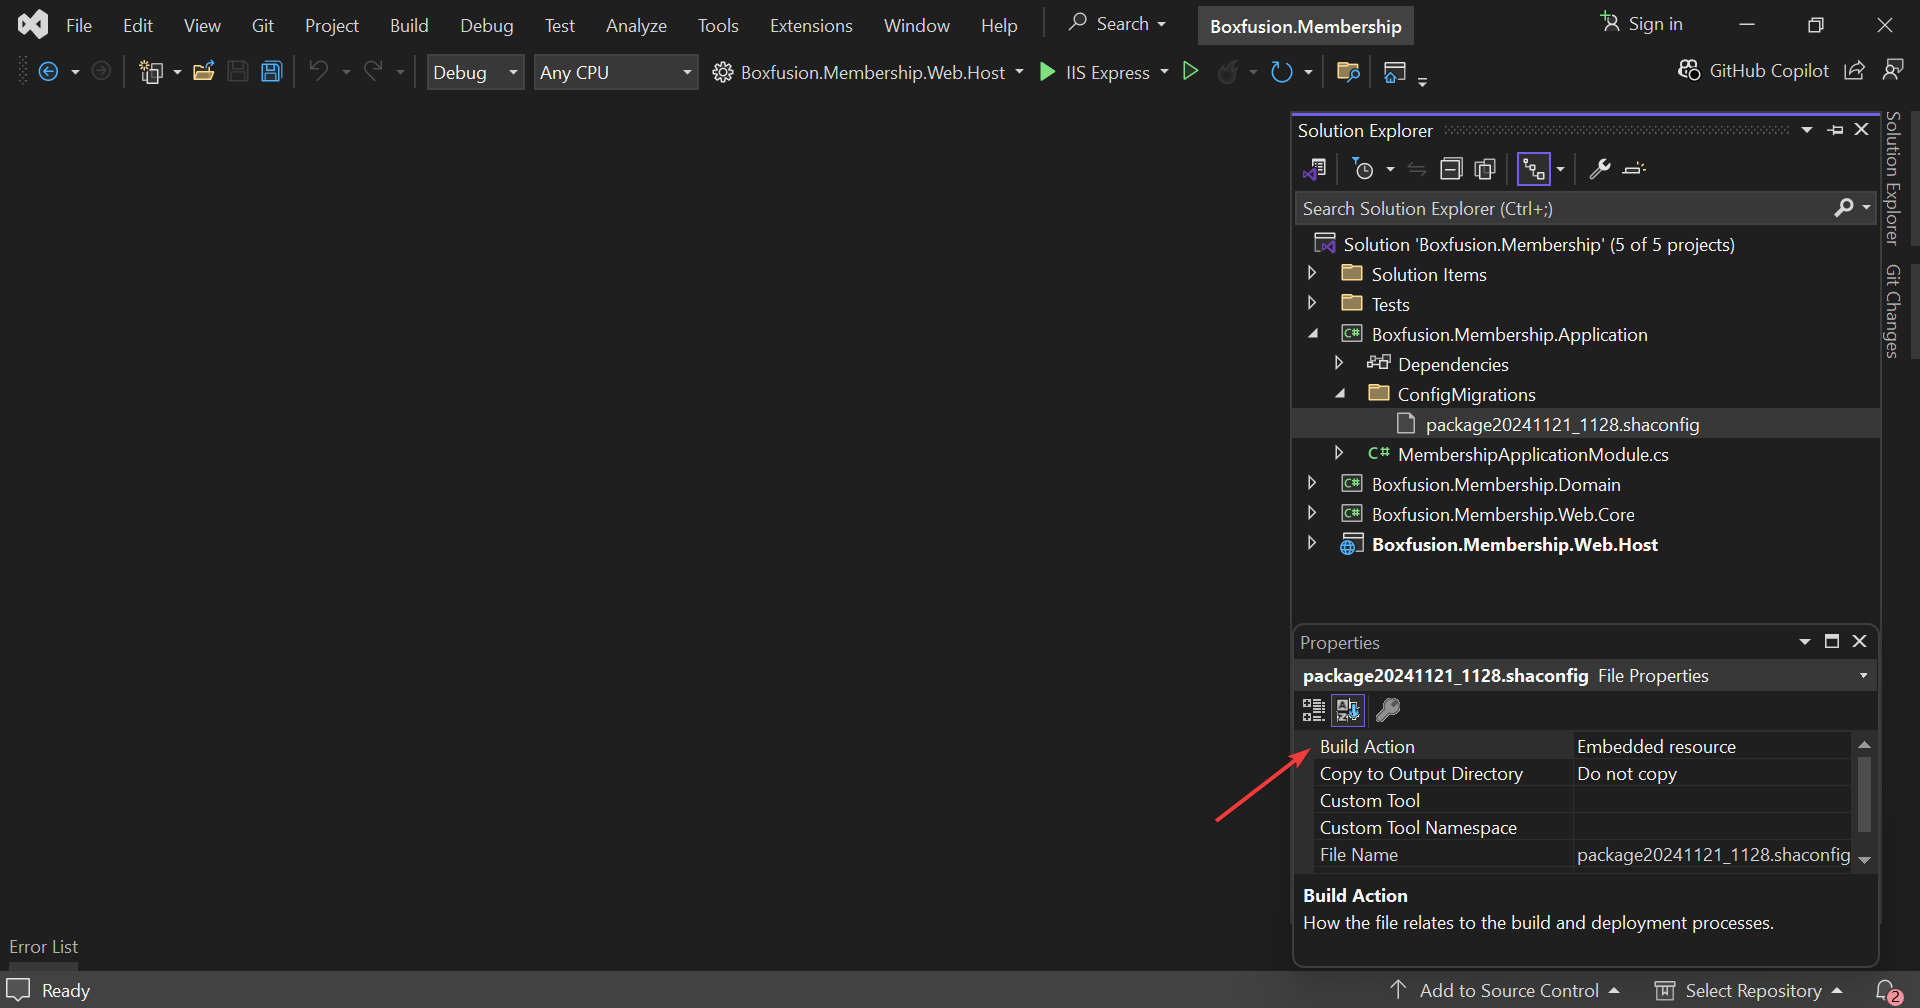
Set the file's Build Action to Embedded Resource in the file properties pane. This embeds it in the compiled DLL so it's automatically applied on startup:
Reference
Setting attribute options
The [Setting] attribute supports the following properties:
| Property | Type | Description |
|---|---|---|
Name | string | Unique name of the setting. Falls back to the property name if not specified. |
IsClientSpecific | bool | Indicates the setting can have different values per front-end client. |
IsUserSpecific | bool | Indicates the setting stores a separate value per user. |
EditorFormName | string | Name of a configurable form used to edit compound settings in the UI. |
Alias resolution for front-end access
When accessing settings from front-end code via application.settings.[module].[group].[setting], names are resolved as follows:
| Level | Resolution |
|---|---|
| Module | Alias property of SheshaModuleInfo, or the module name in camelCase. |
| Group | [Alias] attribute on the ISettingAccessors interface, or the interface name without I prefix and Settings suffix in camelCase. |
| Setting | [Alias] attribute on the property, or the property name in camelCase. |
Example: An interface ITestSetting with [Alias("common")] in a module with Alias = "functionalTests", and a property StarsCount with [Alias("stars")], resolves to:
application.settings.functionalTests.common.stars
SettingManagementContext (advanced)
All GetValueAsync / GetValue methods accept an optional SettingManagementContext parameter. This lets you explicitly read a setting for a specific front-end app, tenant, or user — overriding the automatic context detection:
var context = new SettingManagementContext
{
    AppKey = "my-frontend-app",  // target a specific front-end application
    TenantId = 42,               // target a specific tenant
    UserId = 123                  // target a specific user
};

var value = await _settings.DebitDay.GetValueAsync(context);
You rarely need this — Shesha resolves the correct context automatically in most scenarios. It's mainly useful in background jobs or multi-tenant operations where the ambient context isn't available.